A Krenov-inspired cocktail cabinet

UKworkshop.co.uk

Help Support UKworkshop.co.uk:

This site may earn a commission from merchant affiliate links, including eBay, Amazon, and others.
woodbloke":2phd6qh4 said:
As Modernist commented, the asymmetrical arrangement of the door style and rails is going to look odd (in my view at least).
JK's stuff is odd - that's part of the style
One of the things that JK was fanatical about was selecting timber for it's grain pattern and orientating it within the piece.
As have many/most cabinet makers been doing for hundreds of years. It's always talked about as JK's thing, which it isn't, it's normal.
......which (again my view) i.....
We know it's in your view Rob, unless someone has his hand up your back and is working your lips! Or typing fingers etc
Doms...I think had they been around when JK was building stuff, there's no doubt he would have used them as many of his cabinets were dowelled anyway.
He would have. He was a bit of a bodger - not into "proper" joinery and cabinet making techniques e.g. the bridle jointed corners.
 
gasman":2b6yz26v said:
Good point - but if that happened I could just put a ?cock bead I think it is called around the whole drawer? Think I will cut the burr and see how robust it looks
THanks again
You could do Mark, and that thought occurred to me, but...you'd be straying from the path of righteousness :lol: :lol: as a cock bead (to the best of my knowledge but happy to be proved wrong) was never used by JK on any of his cabinets. No reason why it shouldn't be done of course but if there's a way round not using a cock bead, then I think that's preferable...difficult call, n'est pas?
For some odd reason, there's two posts by Jacob that I can't see...I can guess the content though, probably worth disregarding anyway :-" - Rob
 
Jacob":33wno9kz said:
Re getting measurements wrong - use a rod (for the 1000th time! :roll: )

+1
This is good workshop practice, and should be one of the first things taught.

Its something I do for every job, within reason.
 
mtr1":4q044je2 said:
With regarding the drawer fronts, why not cut through dovetails then glue on the burr?
The problem then is that the drawers are curved with what I assume will be fairly thin sides. Gluing a three or four mm burr to a delicate, curved drawer is going to pose all sorts of cramping problems and would almost certainly stress the construction far too much...not something I would contemplate - Rob
 
Yes Rob I agree that would be more difficult
Can I ask you about coopering? - as I think the 2 side panels of the cabinet are going to be concave outwards coopered panels about 11 inches wide and 750 long. I have seen thread of yours where you talked about coopering but I could not find details of how you did the hollowing - did you use a radius plane - or pull shave, or sanding etc etc? Thanks a lot
Mark
 
woodbloke":v10a9679 said:
mtr1":v10a9679 said:
With regarding the drawer fronts, why not cut through dovetails then glue on the burr?
The problem then is that the drawers are curved with what I assume will be fairly thin sides. Gluing a three or four mm burr to a delicate, curved drawer is going to pose all sorts of cramping problems and would almost certainly stress the construction far too much...not something I would contemplate - Rob

So glue the burr on square then cut the curve, then cut dovetails?
 
gasman":27vvldjh said:
Yes Rob I agree that would be more difficult
Can I ask you about coopering? - as I think the 2 side panels of the cabinet are going to be concave outwards coopered panels about 11 inches wide and 750 long. I have seen thread of yours where you talked about coopering but I could not find details of how you did the hollowing - did you use a radius plane - or pull shave, or sanding etc etc? Thanks a lot
Mark
I wouldn't call it "coopering" really, more just a variety of raised fielded panel.
I'd do each panel from one piece. The outside is easy - you can shape it with any plane, a no5 would suit best perhaps.
The inside might as well stay flat. The only problem would be reducing the top and bottom edges to fit the slots - spokeshave perhaps. If you wanted to hollow the inside you'd need a hollowing plane of one sort or another, with a round sole. If you haven't got one it'd still be possible to bodge it with other tools.
 
gasman":1a0pl199 said:
Yes Rob I agree that would be more difficult
Can I ask you about coopering? - as I think the 2 side panels of the cabinet are going to be concave outwards coopered panels about 11 inches wide and 750 long. I have seen thread of yours where you talked about coopering but I could not find details of how you did the hollowing - did you use a radius plane - or pull shave, or sanding etc etc? Thanks a lot
Mark
If you're going to hollow the panel, some sort of plane would be needed...I used a woodie jack with a rounded sole, then card scrapers to finish. The jack with the round sole was a favourite of the late Alan Peters, who had several of different curvatures - Rob
 
My apologies for the delays in this project - I had a busy weekend on call and seem to have been late every night at work
Anyway have got a few hours done this week so far.
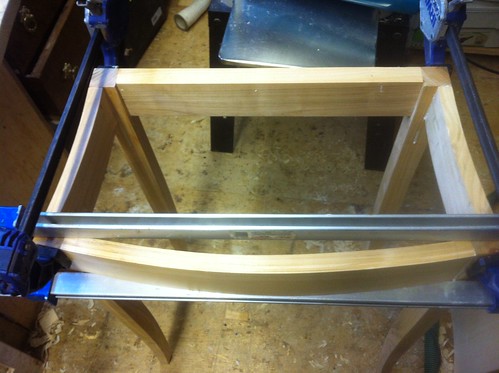
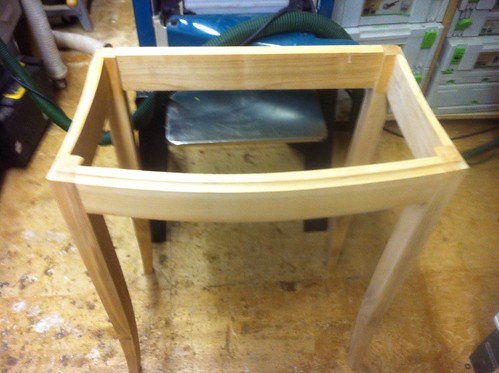
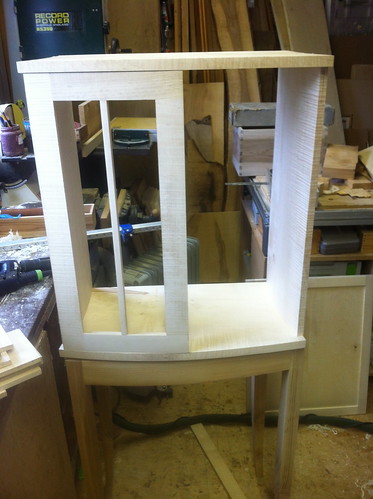
So I have definitely decided that the front of the rails of the base will be flush with the fronts and sides of the legs of the base - plus the side rails of the base will be concave so that the front corners still appear to be a right angle - like this (note this is still the old curved front piece in this photo)
6817411894_9fcfe92401.jpg

I have already remade the front - a little wider to match the doors width with straight grained cherry and it looks much better - I will post a photo when it comes out of clamps tonight probably
The concave sides to the base will be matched by the concave coopered curved side panels
The coopered panel business has gone quite well in the end - although only after making one panel and then abandoning it as it was not wide enough - so I had to go back to the sawmill and dig around until I found a 12 inch sycamore board and my choice was limited to 2 boards neither of which was as beautiful as some of the other narrower boards - which sucks.
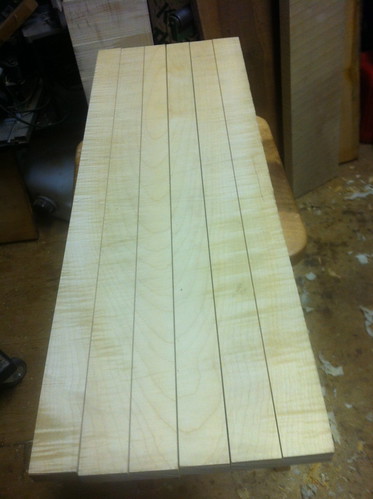
Here was my first attempt. I thicknessed a 720mm long piece to 20 mm, then cut it into 45mm section widths - then planed one edge of each square and using the micro-adjust feature on the fence of my Record C26 combination machine measured a 88 degree angle with the horizontal and then used the surface planer to get the 2 degree angle bevel on the other side. Here are the resulting 6 pieces lined up before glueing
6963537985_a92b3c6dc4.jpg

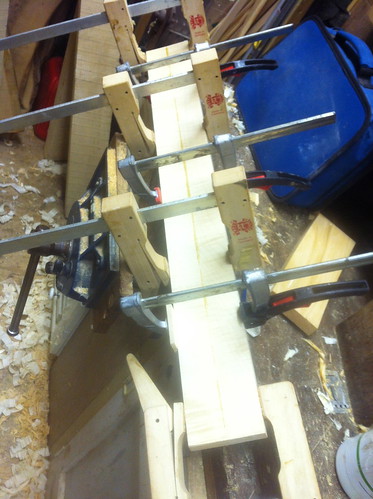
Then I glued these up in pairs to start with
6817414900_96cfc17e36.jpg

Before gradually glueing those pairs together. I used polyurethane glue to minimise any glue line - don't like TB3 in this respect for light woods
6817413978_81e46cc4e4.jpg

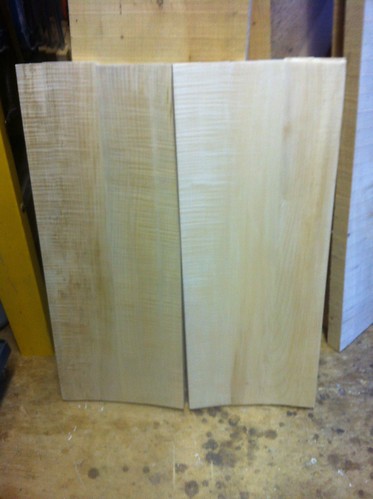
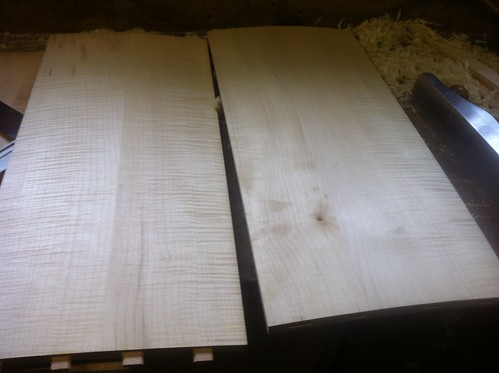
Anyway it was then I realised that this panel was only going to be 240 mm wide - so if you added the thickness of the door onto it made the thickness of the whole cabinet only 260 mm which is not enough to contain all the gin bottles my wife will require - but also as the width is now nearly 600 mm because of the doors which would make it look very wide and yet shallow. I did try to grain match another piece to add on without any success hence I found another 12 inch wide, 2 inch thick sycamore board, cut 720mm in length off it, and was able to make 2 complete curved panels 18mm thick out of this which measure 280mm on the concave (external surface which will make the cabinet overall 300 mm deep which is what I want
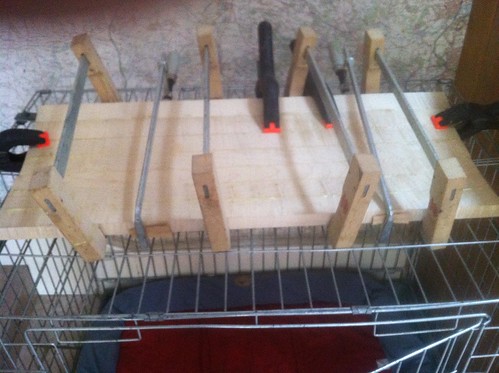
Here are the panels roughly glued up
http://farm8.staticflickr.com/7207/6963527937_d15d98ddc6.jpg[/img
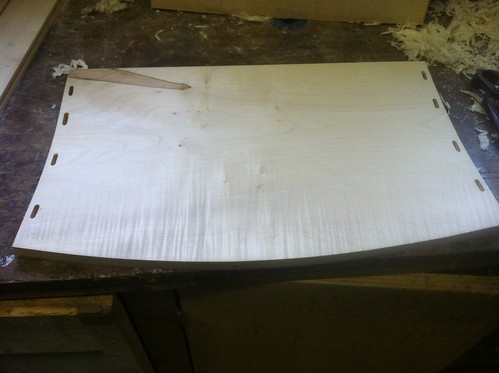
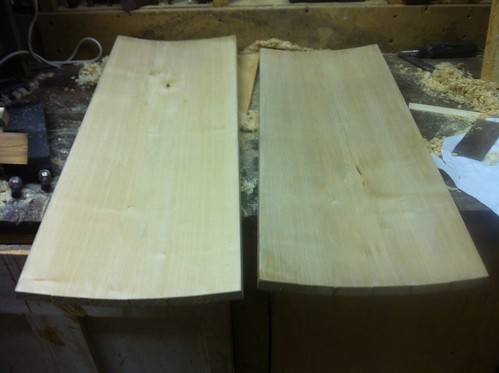
Then in the absence of any hollowing planes, I used a rotex sander with 80 grit paper to get the dried glue excess off and sand them very roughly
[img]http://farm8.staticflickr.com/7181/6963531393_949eb695c3.jpg
Before finishing with card scrapers - hard work but was very controllable and has given a great finish
6817407252_eccec8a82d.jpg

They have come out quite well, although there are no medullary rays on this panel which is a shame
6817406398_9c73090f5a.jpg

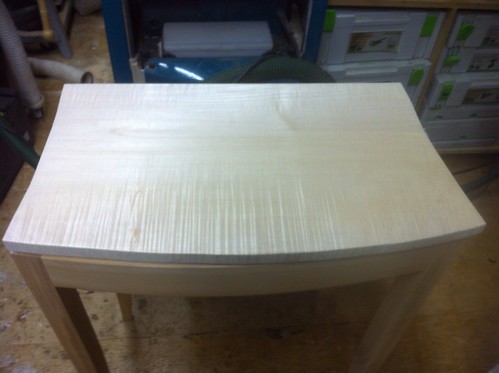
I will start work on the rest of the cabinet tonight - top and bottom and the rear panel which will have to be frame and panel construction
Thanks for looking
Mark
 
Looking good.

Regarding glass cutting (I make leaded lights so have cut a few miles of glass in my time :) )

Hold the cutter like a pen (not that important).
Measure your cut (mark it on the glass with a sharpie marker).
Get a decent wooden straight edge (doesn't slip so much on the glass)

Hold the sraight edge just off your line, check the cutter is in the right place, hold down your straight edge and run your cutter along it. Always push the cutter away from you. If you here a grinding noise your pushing too hard! All your after is a decent score along the glass.

Now after you've scored it take the piece of glass to your bench edge. Move the cut so its just over the edge and gently push down to break the glass cleanly.

Hope it helps... It really isn't that difficult its just about knowing how you material reacts to pressure etc


Just remembered... If you haven't got an oil fed cutter do as the other chaps say and dip it in oil before cutting. Just use sunflower/ olive oil or something similar. You don't want oil everywhere just literally a tiny amount on the blade to lubricate.
Dip and wipe :wink:
 
billybuntus":1rqf8f3g said:
Looking good.

Regarding glass cutting (I make leaded lights so have cut a few miles of glass in my time :) )

Hold the cutter like a pen (not that important).
Measure your cut (mark it on the glass with a sharpie marker).
Get a decent wooden straight edge (doesn't slip so much on the glass)

Hold the sraight edge just off your line, check the cutter is in the right place, hold down your straight edge and run your cutter along it. Always push the cutter away from you. If you here a grinding noise your pushing too hard! All your after is a decent score along the glass.

Now after you've scored it take the piece of glass to your bench edge. Move the cut so its just over the edge and gently push down to break the glass cleanly.

Hope it helps... It really isn't that difficult its just about knowing how you material reacts to pressure etc
I agree about all that except I pull the cutter towards me. I'll try it the other way next time.
Yes the noise should be a hiss, not a scrunch!
I'd add - lay the glass on a cloth while you cut it as it stops it slipping about and also avoids scratches.
 
Thanks guys for the advice - it is all stored away for future use and this Sunday is going to be the big glass-cutting day - eek!
Till then I need to sort out the cabinet and I was going nowhere fast with that bl**dy coopering business - not happy with them and they all be redone with better grained wood again - so the obvious solution was to finish the base which I did last night and today
Here is the base glued up which went fine - 8x50mm dominos used 2 in each joint
6966507397_7c2621cf4b.jpg

and here showing the curves in the front and sides
6966505003_769ed07084.jpg

ONce this is dry I can use it as a template for the cabinet - seems much more sensible to me
Cheers
Mark
 
Jacob":3jvmozgs said:
billybuntus":3jvmozgs said:
Looking good.

Regarding glass cutting (I make leaded lights so have cut a few miles of glass in my time :) )

Hold the cutter like a pen (not that important).
Measure your cut (mark it on the glass with a sharpie marker).
Get a decent wooden straight edge (doesn't slip so much on the glass)

Hold the sraight edge just off your line, check the cutter is in the right place, hold down your straight edge and run your cutter along it. Always push the cutter away from you. If you here a grinding noise your pushing too hard! All your after is a decent score along the glass.

Now after you've scored it take the piece of glass to your bench edge. Move the cut so its just over the edge and gently push down to break the glass cleanly.

Hope it helps... It really isn't that difficult its just about knowing how you material reacts to pressure etc
I agree about all that except I pull the cutter towards me. I'll try it the other way next time.
Yes the noise should be a hiss, not a scrunch!
I'd add - lay the glass on a cloth while you cut it as it stops it slipping about and also avoids scratches.

You'll find you cut much smoother if your pushing the cutter away.

My local glazier breaks larger sheets on a flat table with carpet on top. The give in the carpet allows you to push down on either side of the pane and it breaks clean along the score.

I prefer breaking on the table edge as I obviously handle much smaller pieces.
 
gasman":165oa16o said:
..... I was going nowhere fast with that bl**dy coopering business - not happy with them and they all be redone with better grained wood again - ......
Mark
I suggest forget coopering - it's not a barrel! Just make the curved panels from one solid piece. The grain would look better too.
 
Thanks for the advice Jacob - the curves on these side pieces are very shallow so they could be 'hollowed out' as you suggest. However, I do not have any beautiful-enough 12 inch wide sycamore for them - plus I really want to learn a new skill (i.e. coopering). Therefore I have remade the panels for a third time and am now, finally happy - they are both 280 mm wide which will make the cabinet 300 mm deep at the edges and about 330 deep in the centre which should be fine. Although they both look in the photo as if there is a very obvious join - it is not nearly as obvious 'in the flesh' and I am happy with it. The last set I made were big enough and the grain matched OK but the sycamore was so boring - I was even suspicious whether it might be a lime board which had sneaked its way in to the stuff I bought.... not sure how to tell that
Here are the 2 final versions of the coopered panels
6832890040_5b0612701a.jpg

I have also tidied up the base a little - used a 9mm radius bearing-guided coving router bit to make the coving around the top
6832892808_61e33547f7.jpg

Finally I have started on the rest of the cabinet - here is what will become the base of the upper cabinet sitting loosely on the base
6832895184_6b88b24773.jpg

Now I finally have a plan as to how to do the cabinet I should make much faster progress. This has been onerous for which I apologise - but to be fair work has been very busy too
Thanks for comments as ever
 
I seem to have got myself into a bit of a hole and would welcome some advice / assistance from some of the more experienced here
The doors which are all but finished, are 600 mm high and curved convex outward. They will sit in front of the curved sides. The concave curved sides are however 725 high as I wanted to put a 125mm burr-fronted drawer(s) below. Contrary to my first diagram I want the drawer front to be flush with the doors. So, my quandary is this: Either I have the burr-fronted drawer(s) full width (600mm - though it could be 2 or 3 drawers), in which case the problem is that the drawer front will have to sit in front of the sides like a kitchen cabinet drawer and also you will see the laminated side of the drawer front from the side. Or I have a more conventional dovetailed drawer sitting in a solid frame of ? sycamore which might look a bit weird. or I make the drawer front out of laminated sycamore which I think will detract from the impact of the piece - I really wanted a third contrasting wood to go with the ripple sycamore and the cherry
Thanks for any advice - gratefully received
Mark
 
Mark, this is difficult to get me head round :oops: ...if you could post some pics (or even clear drawings) of an example of what you're trying to achieve and what you have at the moment, I suspect we could offer help, but without knowing exactly what you have in mind the wrong advice is likely to be given, which would confuse the issue more than necessary - Rob
 
This has been a most frustrating stop-start project largely because of work getting in the way. However I have a few days off and have made some progress friday and yesterday
The best decision I made was to abandon plans to put a drawer in the curved upper section which has simplified things considerably and got over all the problems I was bleating about earlier! There might still be a drawer but I will address that once I see the balance of the rest of the piece
So for the main carcass I cut & thicknessed the top and bottom to 20mm
6845954990_5ec9955572.jpg

Then cut domino slots in the coopered sides and the 2 bases
6992082587_ed3d45624e.jpg

6845956406_7646d2c17e.jpg

Then dry-fitted the sides cabinet together
6992085185_d014354aa5.jpg

Today I'll do the back panel and think about the shelf, door catches etc
Thanks for looking
Mark
 
Back
Top