A Krenov-inspired cocktail cabinet

UKworkshop.co.uk

Help Support UKworkshop.co.uk:

This site may earn a commission from merchant affiliate links, including eBay, Amazon, and others.
It looks very nice but I must say you have made work for yourself by designing it on the hoof! Though I suppose this is a useful experience in itself.
But basically it's easier in the long run to design everything on paper first. It's much easier to change a pencil line rather than a piece of wood.
 
I have to agree with Jacob here :oops: but in the true Krenovian fashion, these things were usually sketched out (if that) on the back of a fag packet, but it's not something I would do without a decent full size drawing (or rod) plus quite a few detailed drawings - Rob
 
Looks very Krenovian to me, the Sycamore looks nice. I think some design development is fine, for eg the knob height discussions on my cabinet on the other side, but I agree with the others that the fundamental principles need establishing and fixing at the beginning.

Ed
 
The draughtsmen are of course correct however I am guilty of designing on the hoof myself and sometimes you are lucky, as you have been with the drawer. The drawer would be better inside the cabinet in JK style, although you will need to be careful with the view through the doors if they are glass and it leaves the outside looking much cleaner.

I think it is progressing very well indeed despite giving yourself a lot of work with the coopered sides.

Keep up the good work. Original cabinet making is the holy grail of what we do.
 
Modernist":3b7pbza9 said:
The draughtsmen are of course correct however I am guilty of designing on the hoof myself and sometimes you are lucky, as you have been with the drawer. The drawer would be better inside the cabinet in JK style, although you will need to be careful with the view through the doors if they are glass and it leaves the outside looking much cleaner.

I think it is progressing very well indeed despite giving yourself a lot of work with the coopered sides.

Keep up the good work. Original cabinet making is the holy grail of what we do.
I agree with Brian, this is going to be a really good piece of work when it's finished. I think designing on the 'hoof' is something we've all done from time to time and sometimes you can get away with it and at other times the whole thing goes completely TU...and then it's time for the bandsaw :p - Rob
 
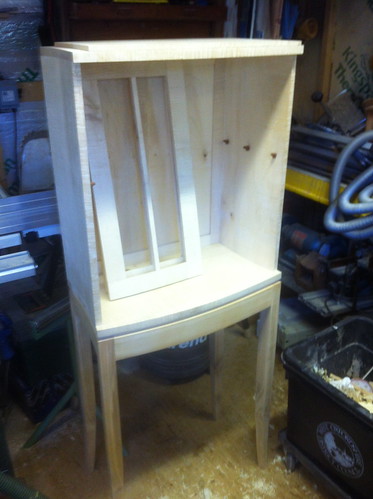
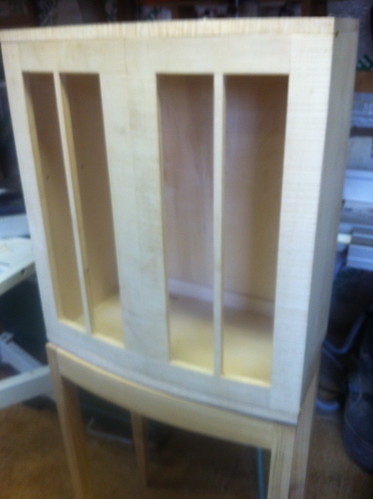
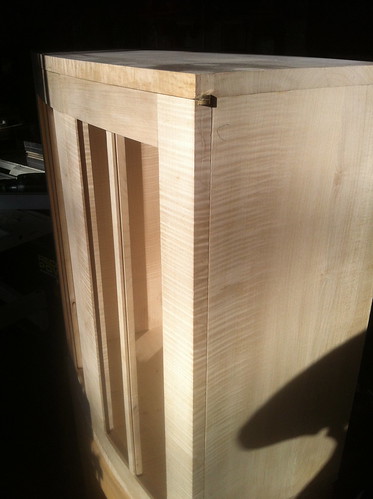
Cabinet is taking shape and going better. More decisions have 'happened' as I have seen how it is. First there will definitely not be a drawer inside the cabinet as there would not be enough room for all the bottles and glasses (!).
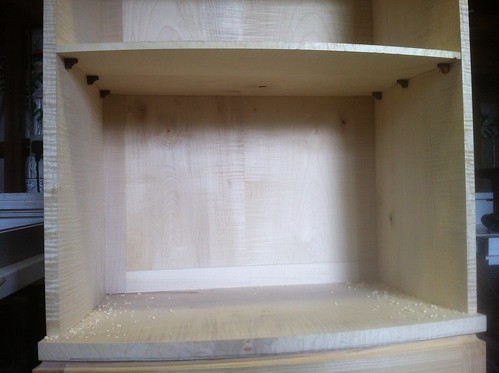
So, that being so I have glued up the cabinet with the back which is a book matched 240mm wide sycamore piece within a frame
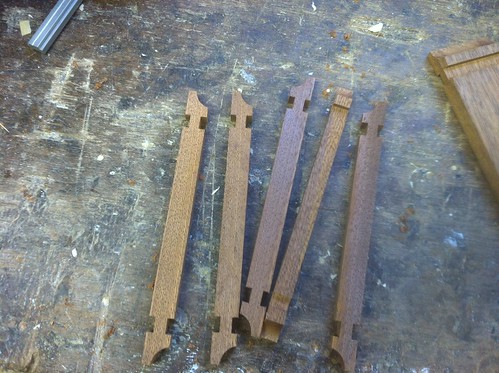
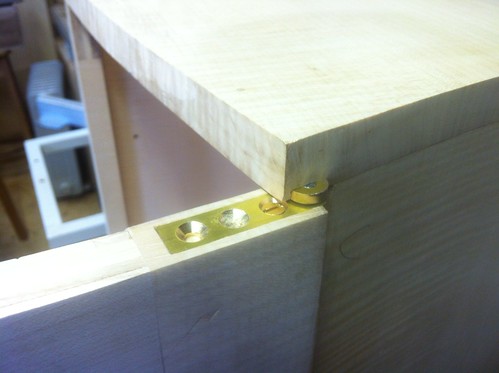
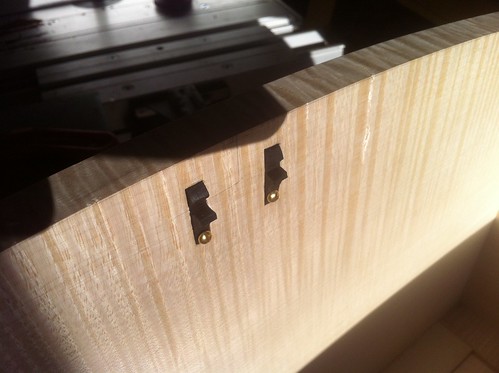
Then I made some shelf supports from a scrap piece of aformosia - using an ingenious idea from one of the FWW Krenov articles
6851408078_45bb126e95.jpg

Basically you cut a i/2 x 4 x 6 inch piece - then on the router cut a cove on each end and then either side and either end a groove....
Then you cut 10mm wide slivers off this
6851408086_f51a33885e.jpg

and then cut each end off and then hand carve the cut-off ends to form a shelf support - worked well and was quite straightforward
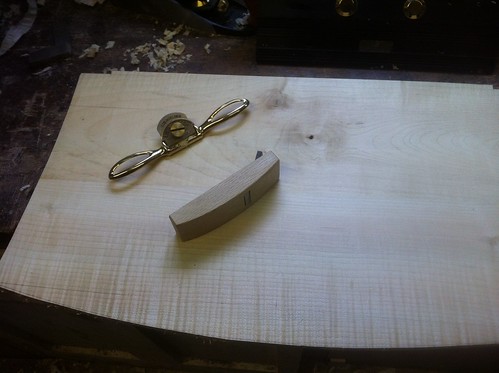
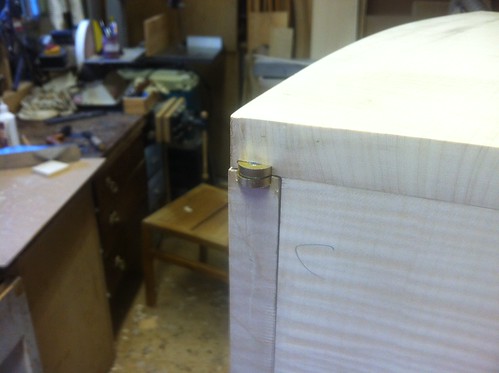
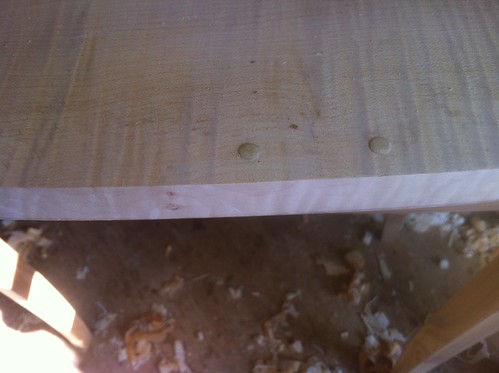
The shelf I had shaped roughly then used a neat little Japanese compass plane from Rutlands and the lovely little LN spoke shave to finely shape the curved ends of the shelf - I am not certain yet about the leading edge of the shelf - I think I may add a lip or something to it
6851408068_f7e7162171.jpg

6851408094_ce0ea7852d.jpg

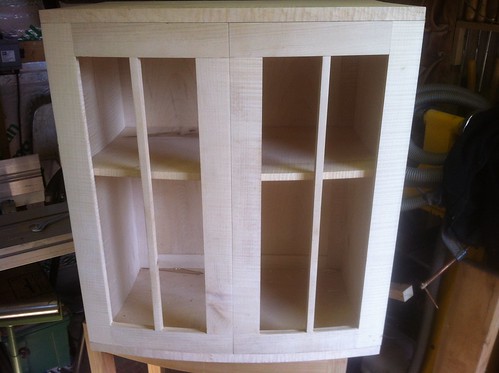
So here it is at present with one door stacked inside but the cabinet bit otherwise close to being done
6851408106_fed6b9a90e.jpg

I would still like a drawer - which means either adding another section between cabinet and base with the drawer in - or replacing the front curved edge of the base with a drawer. It is 1350 high overall at the moment and my wife does not want it any higher - so that means a drawer in the base or nothing - I think probably nothing but will get the doors on tomorrow and see how it is
Thanks
Mark
 
You should be regretting those coopered sides by now but you seem to be going from strength to strength!

I'd forgotten the shelf supports - nice touch.
 
MickCheese":dqesnxkd said:
Looking really nice.

It has been an interesting read, keep it up, on the homeward stretch now.

Mick
...agreed, but the doors have still got to be hung. I wonder if Gman has thought about the closure of the doors in the middle and made allowances for the overlap? JK expounds at length on the various ways of going about it...not something that can be planned ala hoof though as the centre stiles could end up different widths :oops: :x - Rob
 
It took almost a whole day but the doors are finished - and look good.
I used some knife hinges (my first time - loved them) - which were OK to install except that, had I been JK I would have cut the mortices for the hinges before glueing up - as a result I then had to cut all the mortices on the cabinet by hand - but it went fine and I did not make any mistakes
6860627540_b568000b27.jpg


7006744261_d26bac2f79.jpg


7006744917_8800e21f86.jpg

The doors fitted well in the centre after removal of bout a mm or so and it all looks fine - except Rob you have correctly illuminated one difference from JK in this design - namely that the doors meet in the centre but do not fit into each other as JK would have done - I just was not sure I wanted them too as I want to be able to open either door. Anyway there is a bit more fettling to do with the hinges - and all the other screws to put in - plus I have to get the shelf right - will have to wait till next week now
Finally, I think I am going to remake the base - but this time with a drawer in the base as I really want a drawer. I will leave it until MOnday pm and then have another look
Regards and thanks for the interest - it has really kept me going
Mark
 
Good to see that the doors went well...always a nerve wracking part of the job, because if you get the position of those mortises wrong, there's not really a 'fix' you can do to get out of it. Just for info, JK recommends that the carcase is cramped together dry in its final position and then the hinges are marked. It's then dis-assembled and the hinge mortises cut (usually by hand iIrc) The last pic is a little blurred so it's difficult to see in detail how the door fit
Edit - you need to also consider the door catches. JK used a spring loaded catch for each door which does work very well, but this needs to be used with a 'button' at the top (the same thickness as the 'shadow gap) so that as the door closes, the catch gently pushes it upwards against the 'button' so that there's just the slightest pressure as it locates...the pic below:

DSC_0020.jpg


...shows the sort of catch that he used, this one though incorporates a small upstand so that the door can't get pushed in further than the 'stop' - Rob
 
THanks Rob - yes I am planning to do those catches etc - There is a FWW article which goes into detail of all the 'Krnovian' details like the shelf supports, the door catches and the door pulls.
I will take a better phot to show the door fit next time
BW
Mark
 
It's difficult to see how the top and stand 'fit', but be careful remaking the stand and adding a drawer, it may make the bottom look blocky (is that a word?) and unbalance the whole cabinet which at present looks in harmony. may be you will need to make the stand taller to incorporate the drawer?

Just my thoughts.

Mick
 
This getting to look a rather fine piece. I completely understand the "not happy with it" idea, but from the pictures so far I'm not seeing the problem with the stand

Aidan
 
gasman":5692ru1c said:
6851408086_f51a33885e.jpg

and then cut each end off and then hand carve the cut-off ends to form a shelf support - worked well and was quite straightforward

Now that's clever and a neat way of making some fiddly bits, but what I intend on the next piece I do is to make that shallow housing two or three times as wide, to leave a long, almost rectangular section. After cutting into suitable width strips, each end could then be parted off and an individual shelf support could be mounted in a four jaw chuck on the lathe and a round 5mm (say) spigot turned, then finally parted off to length. I can't see any reason why it wouldn't work? - Rob
 
Progress is steady but I keep getting interrupted - work, phone, important jobs etc
Anyway the cabinet itself is virtually finished - I did all the little fitting jobs including:
Remaking the shelf which was too thin and not a perfect fit - this one is better with some more interesting grain
6879932478_eaa1f6090f.jpg

Doing the catches at the top of the doors - in ebony
6879932000_e69e3c138a.jpg

Putting the little buttons into the base for the bottom of the doors to 'catch' on
7026031353_85fac502f8.jpg

Fitting the doors better
7026032379_b4cb5aaca3.jpg

Getting the hinges fitting better too
7006744261_d26bac2f79.jpg

Making the door handles - a 2 inch length of this piece of cherry will be used for each door - the grain of the piece follows the curve
7026033017_5ee33f1d83.jpg

So at the moment this is (minus door handles and a finish) the cabinet finished - oh and I have also successfully cut 4 pieces of glass and cut the wooden pieces to hold it in place
6879933314_e47c556962.jpg

Now I can work some more on the base today - deciding if it needs a drawer and getting it to balance the top better
Thanks for looking
 
What, your phone going too? I'd answer it if I was you, you never know.
 
Back
Top