Resins

UKworkshop.co.uk

Help Support UKworkshop.co.uk:

This site may earn a commission from merchant affiliate links, including eBay, Amazon, and others.

mtr1

Established Member
Joined
10 Oct 2009
Messages
521
Reaction score
0
Location
North Norfolk
I think when I posted the pic of the resin coffee table, HC asked me to do a thread on how I did it. so here it is.

The table in question was this one.

It was made about fifteen years ago when I worked for J. Barnard a very good designer imho, and made by me.

Epoxy resin pours can be problematic when you pour thick areas, but not so much when its a thin area. The table above was poured in stages of about 12/15mm, then wait for the jelly stage and pour again, until you have your desired thickness(this one took about 18hrs.... boring ones at that), and lots of sitting about. You must have a dust free workshop, so no machining. You also need to block the resin from draining out, I used waxed hardboard and hot melt glue .

I'm doing an example for a pic for my website, here are some pics.

DSC00734.jpg


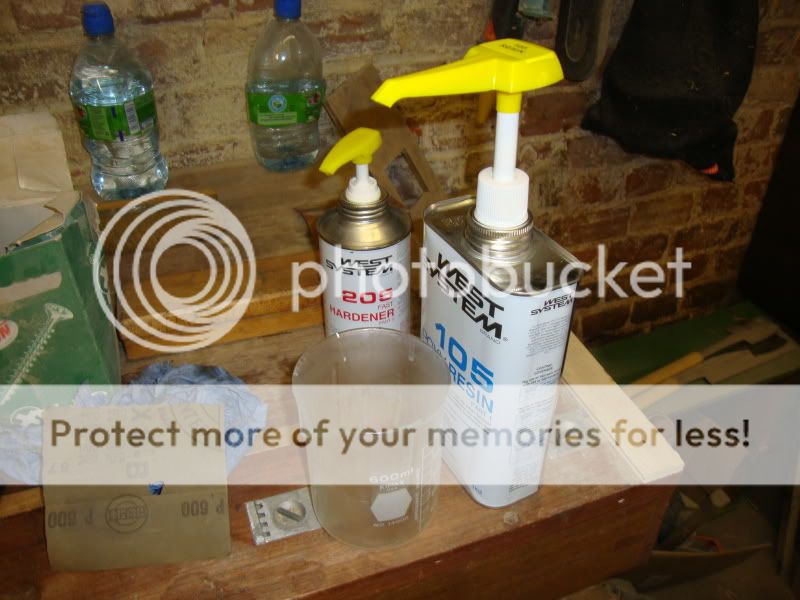
I'm using the West system, as when you do large areas the heat build up isn't as bad as others. Don't ask me why, Its just better. Although The example i'm showing you isn't a big pour, but Wests is what i've got.

DSC00733.jpg


This has just had some poured in, leave till morning and sand(do not plane)

DSC00735.jpg


I will post the finished article tomorrow.
 
Good thread Mark. That table is lovely too. Very original. The rope shelf looks quite nautical.
 
Interesting, like seeing things that I haven't seen before and interested to see the results and possible applications. Thanks for posting and keep it coming
 
Chris,

Its is a bit like planing glass, not very good for the plane, and it will shatter when fully cured. Its not timber after all, you might get away with it when not fully cured, but to get a good finish you need to use a sander i'm afraid. I've filled a knot on piece of scrap and will plane this to show, and will sand the piece I intend to have on my website, back in a bit.
 
mtr1":3dcydyuj said:
Chris,

Its is a bit like planing glass, not very good for the plane, and it will shatter when fully cured. Its not timber after all, you might get away with it when not fully cured, but to get a good finish you need to use a sander i'm afraid. I've filled a knot on piece of scrap and will plane this to show, and will sand the piece I intend to have on my website, back in a bit.
Get back to the workshop and off the bl00dy 'puter, I'm interested to see this :D
 
Ok heres a pic of the resin planed with a razor sharp plane, as you can see its not very good.

DSC00742.jpg


Here is an example sanded, look away purists...

DSC00743.jpg


DSC00744.jpg


DSC00745.jpg


The white dots are air bubbles, If you were doing this for a paying client, you would have to stand over it and prick the bubbles with a pin. Or you could over fill and gamble that the bubbles will be above the finished surface, and can be sanded out.

DSC00746.jpg


All the gaps are totally filled up and sanded, then waxed(normaly I would A/C it).


DSC00748.jpg


I appreciate that you can't see that well on the pics, if it was coloured it might have turned out clearer, but in the flesh it looks like the carving has been filled with glass.

DSC00749.jpg


Anyway thanks for looking.
 
I really like the idea. Must try it one day
 
very interesting, defo have to ive that a go some time. (anyone got a nice piece of burr they want to sell?)

Cheers mark


Luke
 
TrimTheKing":vfjtpnj4 said:
Thanks for that Mark. How long does it take to sand away that amount of resin with the BS? Do you need an aggressive grit initially?

I used a worn 80g to start, then 120g, followed by 180g in the ROS, and hand sanded with a block with some 240g. All in all it took about 15mins including the wax.
 
I worked for a printing company for a few years and we used resin every now and again. We found a little gas torch like those used for cooking run over the bubbles brought them to the surface. Only do it briefly or it gets kind of messy.

It may or may not work on this type of resin.
 
Thomas Hayman":7e6wyy81 said:
I worked for a printing company for a few years and we used resin every now and again. We found a little gas torch like those used for cooking run over the bubbles brought them to the surface. Only do it briefly or it gets kind of messy.

It may or may not work on this type of resin.

I suspect the "proper" method is to place the mixed resin in a degassing jar and by applying a vacuum - the bubbles are removed prior to pouring.
 
Probably, this stuff came in syringes though and mixed out of the nozzle so never tried that method. Maybe even vibrating it would help, might be a bit thick.
 
hi mark

just seen the thread, thanks for that and thanks for the an alternative view of the table really like the splayed legs, food for definite thought. hc
 

Latest posts

Back
Top