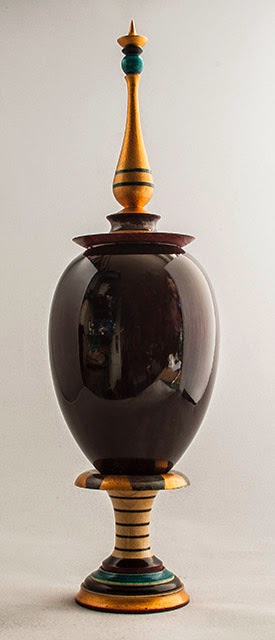
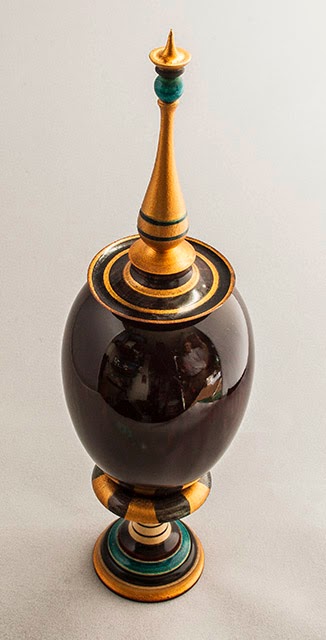
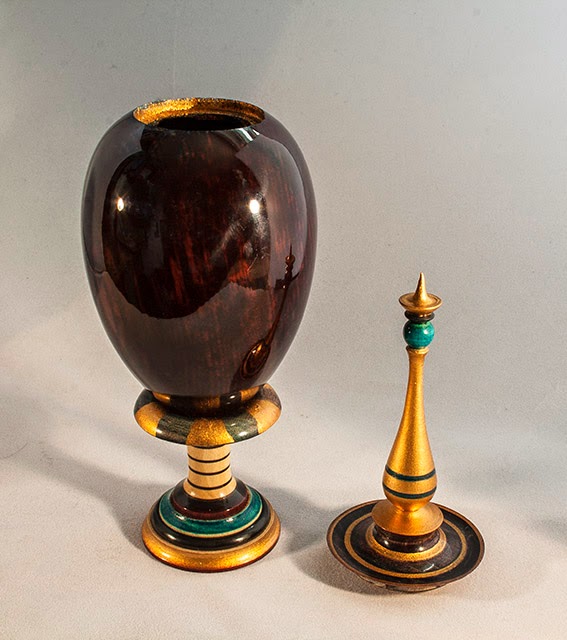
July Woodturning Challenge - PLEASE POST YOUR ENTRIES HERE

UKworkshop.co.uk

Help Support UKworkshop.co.uk:

This site may earn a commission from merchant affiliate links, including eBay, Amazon, and others.
Status
Not open for further replies.

henton49er

Established Member
Joined
16 Sep 2010
Messages
1,241
Reaction score
1
Location
Beautiful, but wet, Mid-Wales
Sorry it's a bit late, but please post entries here for the July Woodturning competition

Edit: As it was about 12 hours late going up, I will extend the time for posting entries and entrants' votes for the top three by 12 hours as well.

Roundup
 
Essence of Egypt

Having long admired the appearance of many ancient Egyptian artefacts in various museums and via television and books too, I went with a scheme that was inspired by such stuff, it isn't intended to be a copy or reproduction of any sort, it is just meant to have the "flavour" of ancient Egypt and the treasures found in the ancient tombs, hence the title of the piece.

It is vaguely functional in that it can be used as a trinket box, but it's main purpose is just to look the part.

The body is Ash, the base and finial sections are Holly, colours are spirit stains and gold powder plus ebonizing lacquer all applied by hand with a small artists brush. Finish is Acrylic lacquer in parts and Shellac in others, the base is finished with shellac and is in fact full gloss though the image does not capture that too well.

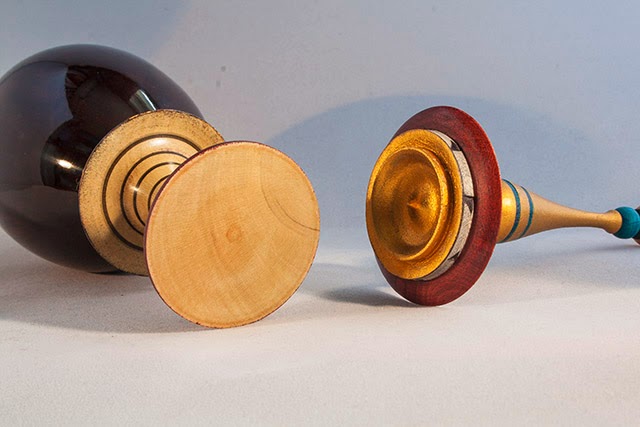
Around the fit section of the finial lid can be seen a repeating black tooth like pattern, this is from the chuck jaws biting in a bit, the whole edge was black, but a small trim for perfect fitting was required leaving this interesting pattern which I like, a little bit of serendipity there.

Tools used were roughing gouge, 1/2" spindle gouge, fine detail spindle gouge, and parting tool.

Some gloss sections were polished with micro abrasive cloth.

Egypt-1.jpg


Egypt-2.jpg


Egypt-3.jpg


Egypt-4.jpg
 
The Devil’s Chimney

This started as a single block of Sycamore which was rounded off and a tenon turned in the bottom so that it could be held in a chuck, once mounted into the chuck the other end was supported by the tailstock, but the position that the tailstock rested against was changed several times to create various off-axis rotations and for each of these rotations a gouge was made in the side of the block – initially with a parting tool to get the size and then the edges were opened up with a spindle gouge to create a smoother transition. Once all the slits had been cut, the remaining blank space was assaulted with a variety of drill bits to create the overall pattern.

The block was then mounted centrally and the middle hollowed out (eventually) with a combination of bowl gouge, scraper and hollowing tool. Once I’d hollowed out as much as possible, got the walls down to a reasonable thickness (about 3mm) and left a rounded lip on the very top, I parted the cylinder into two pieces – the ‘chimney’ and a base which was then further hollowed to create a holder for a night-light. A groove was cut in the base and a lip put on the chimney so that they piece together. Finally I started to clean up the bottom of the base, but then heard a crack and discovered I’d got it a bit thin so I stopped before any more damage was done. Doesn’t look great, but at least it’s on a bit no one should see. The inside of the chimney is also a bit rough as I couldn’t figure out how to hold it safely on the lathe to tidy it up.

To finish it I sanded to 600 grit and applied sanding sealer and then removed it and applied it again and then removed it and tried a third time – it was drying before I could get the whole piece coated so eventually I did it in small sections. Once dried, I gave it all a good buffing and a top coat of Carnuba wax.

I certainly learnt a lot making this piece (which is named after a local landmark), mainly how not to do things !

Devils_Chimney_alight.jpg

Devils_Chimney_1.jpg

Devils_Chimney_tops.jpg

Devils_Chimney_bottoms.jpg
 

Attachments

  • Devils_Chimney_bottoms.jpg
    Devils_Chimney_bottoms.jpg
    128.2 KB · Views: 1,755
  • Devils_Chimney_tops.jpg
    Devils_Chimney_tops.jpg
    127.5 KB · Views: 1,755
  • Devils_Chimney_1.jpg
    Devils_Chimney_1.jpg
    143.6 KB · Views: 1,755
  • Devils_Chimney_alight.jpg
    Devils_Chimney_alight.jpg
    103.3 KB · Views: 1,755
Hi had no Idea what to make looking around I noticed a Pineapple in the fruit basket :idea: so here is my stylized Pineapple. Its body is Yew with coloured pencils inserted, the top and base are Mahogany all turn on the lathe sanded down to 120 grit and finished with sanding sealer.
100_2019.JPG

100_2016.JPG

100_2017.JPG
 

Attachments

  • 100_2019.JPG
    100_2019.JPG
    42.3 KB · Views: 1,729
  • 100_2016.JPG
    100_2016.JPG
    48.7 KB · Views: 1,729
  • 100_2017.JPG
    100_2017.JPG
    53.7 KB · Views: 1,729
MY CAREER IN BASEBALL

I played baseball for about ten years growing up, I could catch and run, but not a great hitter of the ball. Done in quarter sawn white oak(just happen to have a 4" by 6" by 16' laying around) . mounted in several Rube Goldberg type fashions, none of which were entirely safe, but excersised caution and here it is.Basically marked out the outline of the bat on the wood and then glued blocks to one end for mounting between centers. Turned the barrel end and then took glue blocks off and glued some on to barrel end so I could remount in between centers to turn the handle. I had to do a bit of shaping at the knuckle(the blonde thinks it looks like a dog bone) sanded to 220 and a couple quick coats of oil. Just ran out of time. 32" by 3" by 1 1/4" at the handle. I will send a WiP along after the comp if anyone is remotely interested. I know it should have been a cricket bat. I used a roughing gouge and a spindle gouge. Thanks to all involved and please support the challenge.
 

Attachments

  • P1020279.jpg
    P1020279.jpg
    131.8 KB · Views: 1,658
  • P1020278.jpg
    P1020278.jpg
    129.2 KB · Views: 1,658
  • P1020277.jpg
    P1020277.jpg
    125.3 KB · Views: 1,658
SELF PORTRAIT

This is made from an old oak sleeper, the main head was shaped on the lathe, ebonised and then I sawed off one side and planed & sanded it flat. The mouth was then turned, split in half on the bandsaw, then glued on to the face, then the eyes drilled out. It's been finished with several coats of shellac.
IMG_20140729_175900.jpg

IMG_20140729_175830.jpg

IMG_20140729_175800.jpg

IMG_20140729_175816.jpg
 

Attachments

  • IMG_20140729_175900.jpg
    IMG_20140729_175900.jpg
    74.3 KB · Views: 1,644
  • IMG_20140729_175816.jpg
    IMG_20140729_175816.jpg
    77.4 KB · Views: 1,644
  • IMG_20140729_175830.jpg
    IMG_20140729_175830.jpg
    59.3 KB · Views: 1,644
  • IMG_20140729_175800.jpg
    IMG_20140729_175800.jpg
    64.5 KB · Views: 1,644
WOW nearly did not make it.

Anyway this is made from Walnut and Iroko turned using a bowl gouge only. The base (Iroko) has been coloured black to offset the walnut bowl, which is supported with a brass rod. it stands 5" tall and the base is also 5" across. Finish is sander sealer and then all is buffed.

2014-07-30001001_zpsac27519b.jpg


2014-07-30001003_zpscd764d2b.jpg


2014-07-30001004_zps76e5f967.jpg


Sorry for photo's done in a rush
 
Status
Not open for further replies.

Latest posts

Back
Top