Anima - Box WIP

UKworkshop.co.uk

Help Support UKworkshop.co.uk:

This site may earn a commission from merchant affiliate links, including eBay, Amazon, and others.

Anima

Established Member
Joined
21 Aug 2012
Messages
109
Reaction score
0
Location
Somerset
Well here it is.

The plan

Having read an article recently on making a small jewelery box with a coopered lid made from mahogany I hope to replicate it with dovetails included somewhere (I can't find the original article). My box will either be used for storing candles or tea, I haven't quite decided yet.

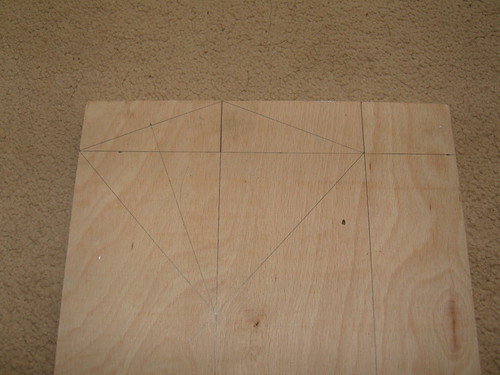
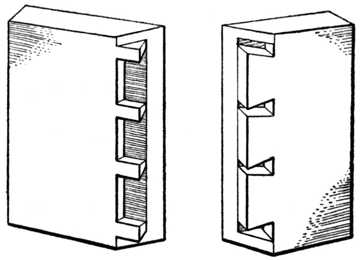
I was intending to build this box even before the competition cam up so I thought about it a bit and decided I didn't really want to see the joints so came up with a a mitered blind dovetail joint as a solution.

Just like this
f288.jpg


The Inspiration
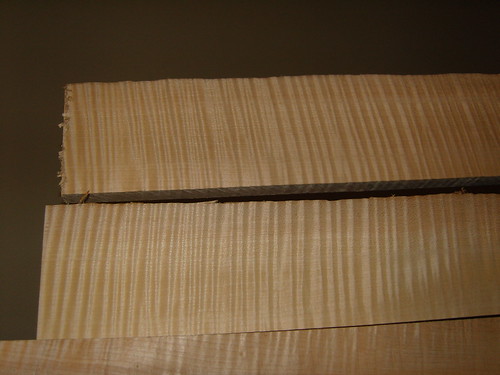
The look I want is something like this but with out the dark wood sides:
241938-438x.jpg

Combined with this:
jewel%20box2.jpg


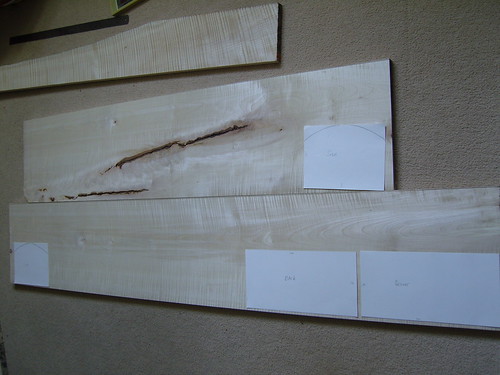
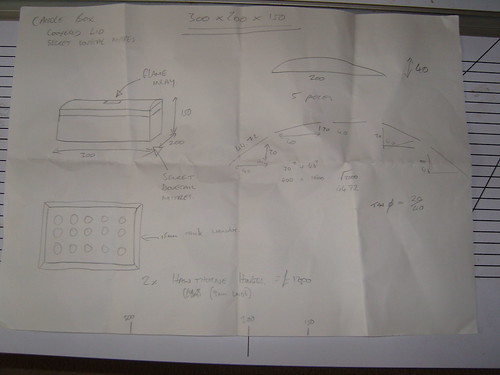
This is the rough plan I'm working to. I haven't quite decided whether it will have trays but If I do they will be walnut.
8474975275_0bdf0a3740.jpg


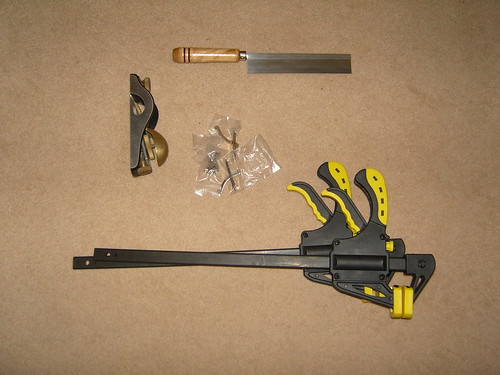
The problem is I didn't quite have all the tools I needed so went on a miniature spending spree.
 
The Timber
And this is the rippled sycamore that I picked up today.
Its 20mm thick which is a tad thicker than I wanted but it felt criminal just planning it down to 15/16mm so it will have to be a chunky box.

wood2.jpg


8476062642_202f8ca5f8.jpg


There is enough here to make two or three more projects so keep your eyes on this section.
 

Attachments

  • wood2.jpg
    wood2.jpg
    91 KB · Views: 2,952
Sorry about that ill try again tomorrow.I was having trouble photographing the white paper. It either came out too bright or too dark.
 
The white balance on your camera needs to be changed for the plan pic ;)

Nice plan and timber btw :)

PS I hope the price for the handles is £12 not £1200 as it looks on the plan :shock:
:lol:
 
The Tools
I took another one of the plan today and it seemed to turn out better, I'm afraid you will to zoom in a bit though.

No definitely £12.00 from Hawthorne crafts although from the reaction I got from the missus at the "expensive pile of sticks" you could be forgiven for thinking they cost £12000000000000000000.

The pile of tools I've bought so far:
Zona 24tpi Gents saw
Quengsheng low angle from aces&eights
Two quickgrips
Two hinges from Ian Hawthorne
8476060094_4bca1e6cba.jpg


I could still do with a very slim skew or fishtail chisel but I'm in no great rush.
 
I do love a project at the early, optimistic stage!

I know how you feel about wasting the wood, but think hard about what makes your inspiration boxes look good - they would not look nearly as nice with chunky, clumsy sides.
 
i was about to comment with the same as Andy- personally i think that 20mm wiuld be too chunky for a box of that size. If you had a bandsaw, you could cut a veneer or two off to save wasting it, but it would look far better at 15/16mm.
 
I tamed this down from the original dream box. After your post in my tea chest design thread I was originally going to do compound miter joints to get that oriental house shape, when the competition rules came out necessitating dovetails I got rid of the compound bit and inserted dovetails. I've also made a very rough mock up in some offcut oak to get the feel of the joint. I might need to cut some corners (get it hahahaha :? ) but we I'll see when I get there.

A veneer on the bandsaw is exactly the solution I came up with as well, its just that 150mm is approaching the max throat on my saw so it struggles a bit. I think a scraper will be my best friend on this as rippled syc has a tendency to tear as you can probably see in the picture.

Ian's hinges are 9mm wide otherwise I would go for 10-12mm (see handy picture of one of his boxes), basic miters and put a token dovetail in a tray somewhere. The chance are this will end as a candle box for the missus (to pacify her after the expense and the time I'm going to spend hiding away doing it) so trays will be unnecessary meaning the dovetails have to go in the corners.
ripple-sycamore-cufflink-box--UDU2Ny01NDM2LjI1NDE2.jpg

If my box looks even 10% as good as that I'll be well happy.

I might have a cunning plan for the top but I'm keeping that to myself for now.
The bottom I'm still not decided on and will depend on the finish/lining/tray/time/budget and whether I do indeed give it to the better half or whether I keep it for myself.

Laying out
Anyway heres a pic of the templates for the sides laid out on the living room floor so I could get an idea of what and where the grain is going and how the ripples will line up. The two curved sides are perfect where they are as the grain there curves almost identically to my rough template so should look good.
8475353487_61dedcaf94.jpg
 
The lid

Before cutting up the sycamore I decided to make a mock up of the lid.

First off some plywood formers. Using some basic trigonometry and a router I made up accurate curves for a 40mm height over a 200mm span however it quickly became apparent that 30mm is a better height.
8476873214_858a19df1f.jpg


With that done I set about cutting up an old softwood scrap that I had loafing. It used to be one of those £20 canvas wardrobes from ARGOS, useful for storing clothes in lofts but not much else. Handily though it was a similar width and thickness to the sycamore so fairly representative.
8476886336_0d80580b17.jpg


After setting up the bandsaw for 85deg bevel and running the bits through I smoothed them out with my new plane and put them in the former.

They still need adjusting slightly as I need to re-calculate the required bevel. As you can see from my first drawing for a 40mm curve it was Tan X 20/40 but now will be tan X 20/30.

Thats all for today folks
 
Looking good so far ! Looks like you building up quite a collection of tools :cool:
 
The lid continued
With the lid and the joints rehearsed I decided it was time to cut some sycamore. I figured the lid and its curve are the pivotal parts of the design as it will decide where the the sides and their rebates will go, so that is where I started.

Initially I was looking into ripping the highly figured smaller part in the first photos into bookmatched boards, joining them edge on and slicing them crossways for the coopering. However as the board is only 20mm the resultant bookmatched parts would only be 8mm after finishing which clearly isn't enough for a strong joint.

So I resolve to having non matching halves but still retaining the 'V' shape in the grain.

First I ripped the board down to 16mm leaving a thin veneer. Apart form a small wobble as I changed position of my hands and used a push stick the boards are uniform +-0.3mm. I was quite chuffed with the veneer as this is the smallest I've tried to rip off.
8478430173_f794edab9e.jpg


I've kept the veneer as it may come in handy for the base. I'm also keeping all the offcuts so that when I'm done there should be some pen blanks up for grabs.

When I researched the timber I knew it would be hard to plane and get a smooth finish but I didn't expect it to be this hard!!! The plane wouldn't touch it so I resorted to sand paper...and would you believe it I got tear out...with sand paper! In the end I had to use medium paper to anywhere near a smooth face before moving on to the finer stuff.
8479507734_c34236e68c.jpg

Now I'm sure some more experienced people will say "you can't get tear out with sand paper" but I promise you I did.

I played around with the grain and I think it looked OK. Finer adjustments would obviously come later when I glued it up.
8478425839_7a1ae22751.jpg


Because of the coopering running cross-ways and this join running forward-back the lid would essentially be a patchwork of rectangles. This means the joins would have to be pretty strong to withstand the planning and finishing to get the smooth look so I decided to add a spline to this join. I probably won't do it for the cross-ways coopering as the angles are a bit much for me to cope with. Any way out comes the router table.
8478421625_1bd8d2464e.jpg


I used some of the offcut sycamore for the spline so a)expansion/contraction should match and b) if for any far fetched reason some of it gets exposed it shouldn't look as bad as if I used something else.
And heres the final board glued up in clamps
8478468505_4ac1a375e0.jpg


And yes I'm a firm believer in "there's no such thing as too much glue".

Hopefully tomorrow I can start the coopering, fingers crossed.

I'm off to sharpen my plane irons, thats it for today folks.
 
Ill cut the glued up board into strips crossways to the vertical joint. Ill the saw/plane a bevel of approx 85deg (calculations yet to be done). The strips will the be glued and strap clamped into the plywood templates I made.

Once dry I'll plane and sand it into an external curve. The internal curve is a problem as I don't have the appropriate plane and the prospect of sanding it round is too much. I'm open to suggestions or if anyone wants to loan me the plane...

Hope that helps apache_sim
 
I really wish I could help with a plane the box looks great.
I was wondering if you would have to somehow strengthen the joins but I suppose the lid ends will provide suitable support.
As you can guess I am quite new to woodworking but have just started making boxes so am very interested in what you have created. But way too advance for me just now
 
Anima":2qpsp83t said:
The internal curve is a problem as I don't have the appropriate plane and the prospect of sanding it round is too much. I'm open to suggestions or if anyone wants to loan me the plane...

Hope that helps apache_sim


Old wooden planes are not that expensive on ebay ;)

http://www.ebay.co.uk/itm/Old-Wooden-Pl ... 257ab24759

Or something similar will help with the internal coopering.

Or you could do what i am doing and making a Krenov style round bottom plane to do the curves on my box :)
 
The eBay option is tempting.

My other plan was to make one myself. I was fortunate enough to receive a scrub plane from speeder1987 in the hand tool secret Santa. If I use the iron from that then make the body out of a sandwich of the pine I used for the practice lid I could then thread a coach bolt (or similar) through to hold the wedge and iron. Shape the sole etc etc. it wouldn't be very pleasant to look at nor would it last very long but it might just get the job done.
 
Back
Top