Workbench - some assembly required.

UKworkshop.co.uk

Help Support UKworkshop.co.uk:

This site may earn a commission from merchant affiliate links, including eBay, Amazon, and others.

frugal

Established Member
Joined
29 Dec 2007
Messages
1,018
Reaction score
0
Location
Dursley, Gloucestershire
I have been away from here for a number of years, in fact I have been away from most forums and social media, but in the meantime I have still been woodworking. One of my problems is that whilst I have a nice big garage for all of the tools and machines, the only surface I have for working with handtools is a Workmate. Which is fine for somethings, but does tend to skitter across the floor as soon as it sees a handplane. Whilst we were on holiday in France last year, we went to a Broconte (French town fair / tractor show / car boot sale) and my wife convinced me to get a hold fast that was going cheap with the comment "now you have to build the bench to go with it".

Well, 6 months later I finally decided to go for it. I had read all of the books (The Workbench by Tolpin; all of Chris Schwarz workbench books), I had watched any number of videos and blogs on workbench builds, I had chosen the size, the shape and the vises that were going to go on it. All I had to do was to summon up the courage to start.

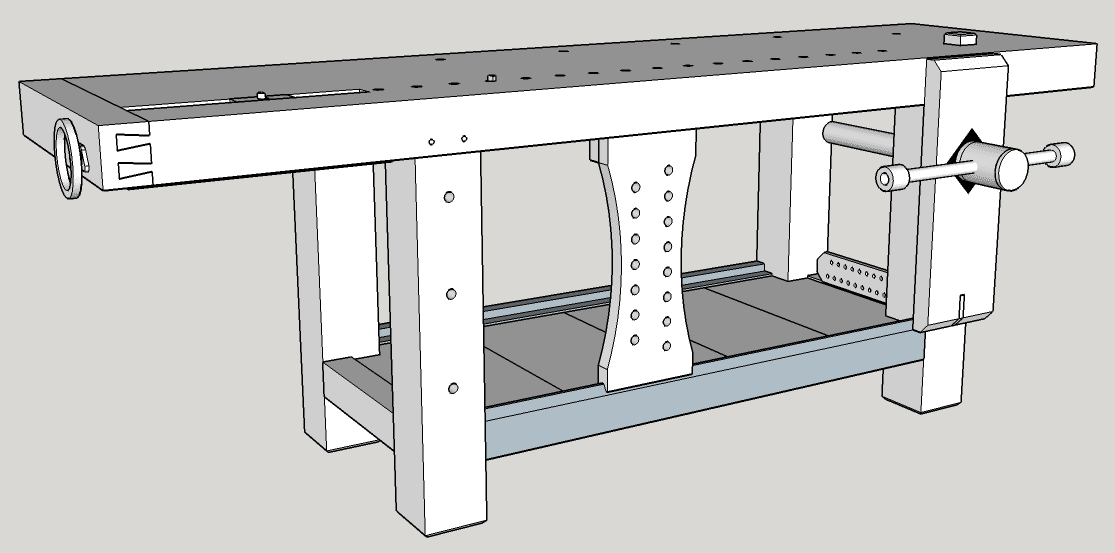
I had decided to go for a Roubo style bench with just a shelf at the bottom. Leg vise on the front and a wagon vise on the end. As I am left handed and as the only feasible spot in the garage is under the window with a wall to the right, I decided to be awkward and put the wagon vise on the left hand side near the front and the leg vise to the right hand end of the front. I am going to break some other rules whilst I am at it: The height will be 36" or so, as I have a bad back and I do not want to bend over too much. I will also be making it 30" deep and 8' long. I am going for 30" deep as I am going to be having cabinets on the walls above the bench, and even shallow cabinets are going to take up some of the depth.

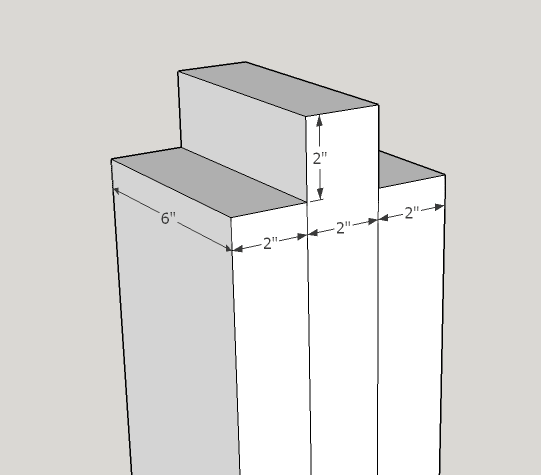
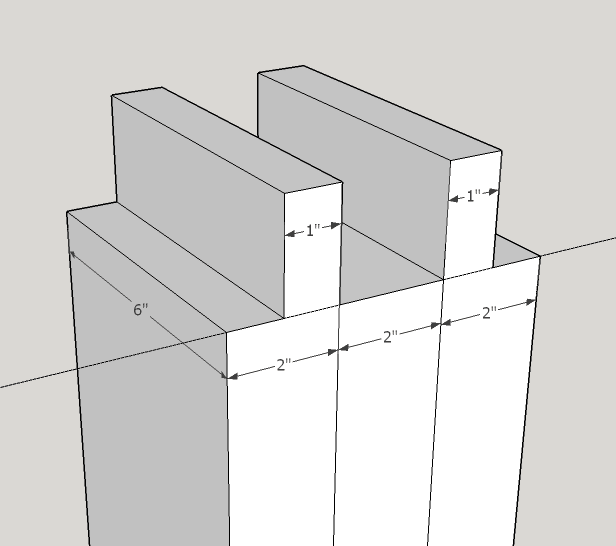
One rule I am going to follow is "make it solid", boy am I following that rule. So the top is going to be 8' long, 30" wide and 4" thick ash, made from 17 1.75" thick boards laminated together. The legs are going to be 6"x5", made up of three boards laminated together. I only intend to make one bench, so I am going to do it right.

So bonus time rolled around this year and I got ready. I knew that my little DW733 thicknesser was not going to cut it, and I would also need a planer, so I splashed out on a AW106PT2 planer/thicknesser from Axminster, and a AT3202FDP floor standing pillar drill. I also ordered a wagon vise and a wooden vise screw from Richard Maguire. The wood was all english ash apart from the vise chop, deadman and breadboards which are Cherry. All of the wood was from Interesting Timbers. 31cu.ft of Ash and 2cu.ft cherry. That hurt the wallet.

20150416_190946%257E2.jpg


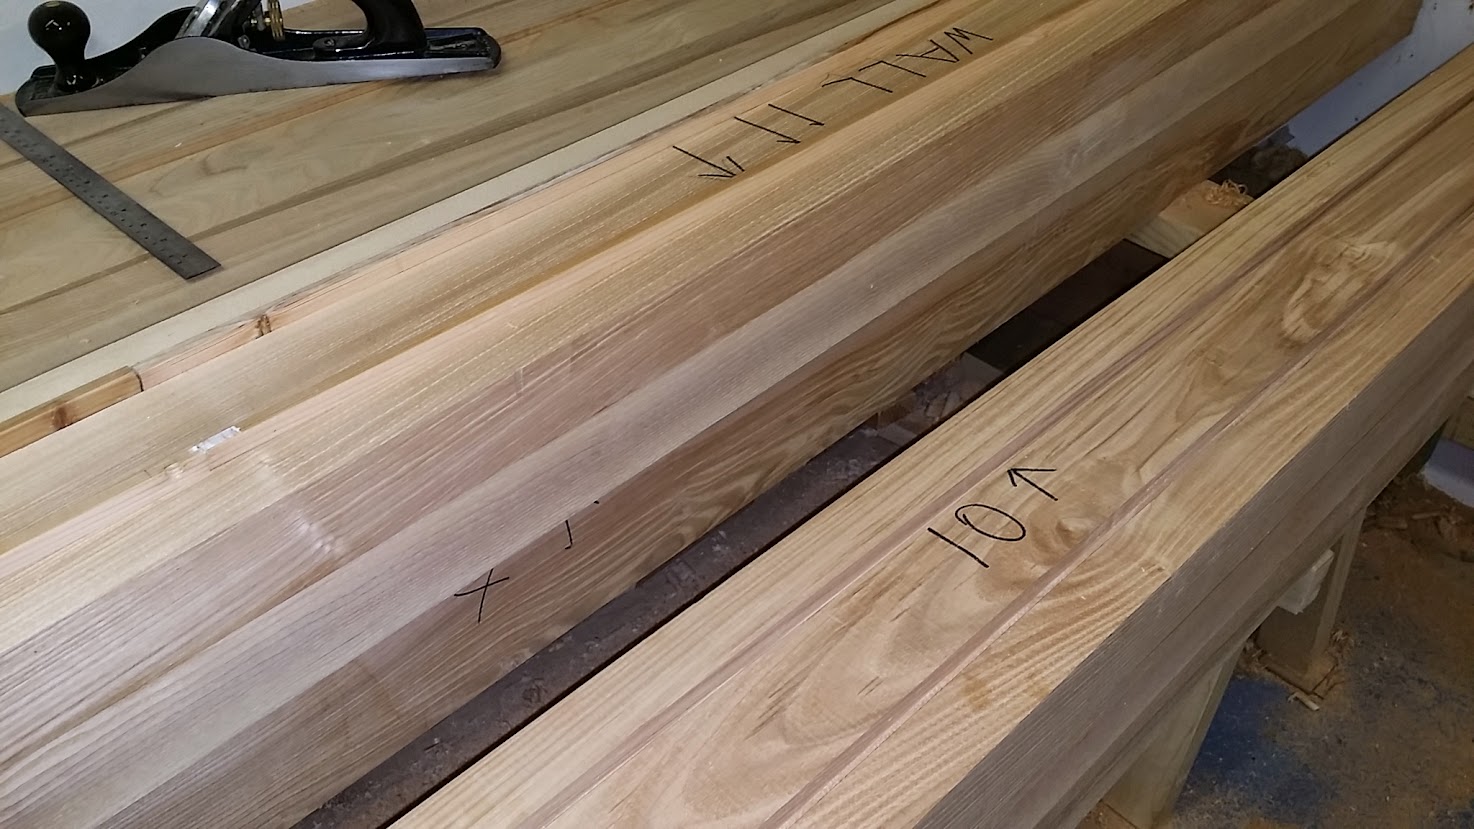
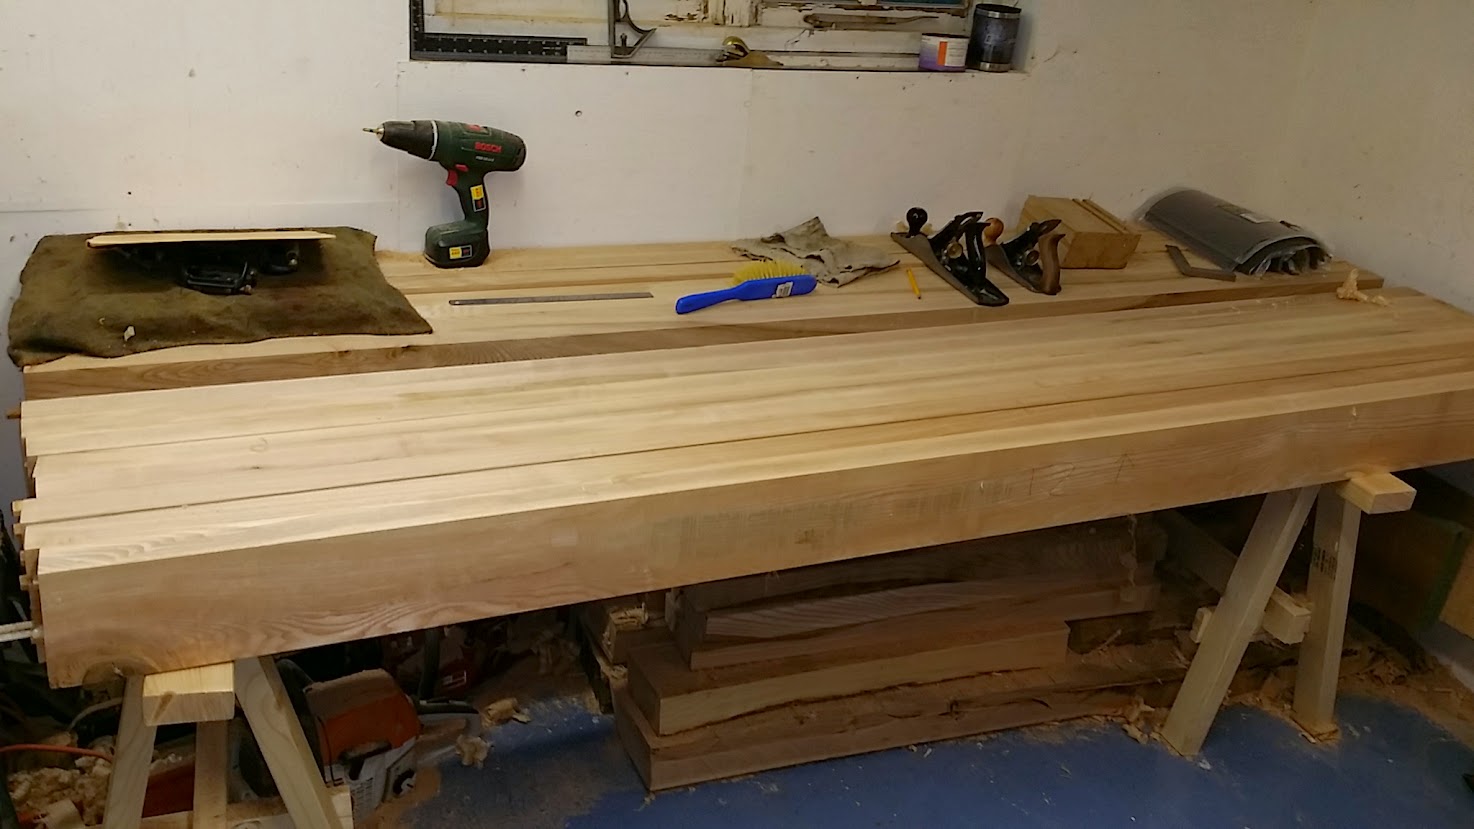
I have to say, after picking up most of my stash from auction, the wood from Interesting Timbers was gorgeous. They asked for my cut list and pulled the boards themselves (their yard is only open Mon-Fri and I work full time so I could not go to see them). For reference in the photo, the ruler is 24" long. Most of the ash boards were 16-18" wide, and they were all 12' long. So from each board I was able to get a couple of the 8' bench top pieces, and a couple of the leg pieces.

In fact the wood was so clean and so wide and I recalculated how much I would need. I was expecting to get 2" boards that would be thicknessed down to 1.75", however all of the 2" thick stock was actually 2.25" and so flat that after thicknessing it was still 2 1/8" thick. It was also so wide that I was able to thicken the top from 4" to 5.5", and still have a full board left over as well as a large number of good sized off cuts.

As these boards were all too big to move by myself, I roughed them out with the circular saw on the driveway and moved the smaller planks into the garage.

So now I have 15 8'x5.5"x2" boards for the top; 9 3'x9"x1" board for the bottom shelf; 12 3'x6"x2" boards to laminate up into legs, and some 3" thick stock for the stretchers between the legs.

Unfortunately I also worked out how much this is going to weigh, and it comes in at something over 300lbs...
 
First thing to do after roughing everything to size was to sticker and stack it whilst I went off and made up some sawhorses / trestles. Otherwise I was going to have nothing to build this behemoth on. Chris Schwarz has a nice plan for his $5.87 saw horse which is strong and simple to build. Obviously Americans get their wood much cheaper than we do, because even with cheap construction grade pine, they came in at a lot more than $5.87 each...

However I now have a work surface to start on. The planks for the benchtop have been stacked on top, and the rest has been put away underneath. I know have room to move around in the garage again.

20150513_205431.jpg


The planks have been sorted for quality, with the best reserved for the front of the bench, and the least nice looking ones consigned to the back. Each board was then numbered on the end to keep track of them.

As each board is 8'x5.5"x2" they weight a considerable amount, so I am afraid here is where I cheated for the first time: Ash bends nicely (it is used for longbows after all), so I was not as worried about making the boards completely flat along their 8' length, so long as they were reasonably flat and the two 5" faces were parallel then I could get away with it. Especially if I used all of the currently glued up boards as a former. This is after all a workbench, not a piece of fine furniture. I do not care if all of the boards are flat, just that the top and the final front edge of the bench is flat and true.

I did go to quite a bit of trouble to ensure that the top edge was 90 degrees to the two faces however and that it was flat along it's length. Otherwise I would have far too much clean up to do at the end. Each board got it's number written on the face, along with an arrow indicating which way as up and 'wall' written on the side that was to face the wall. I need as many clues as possible to stop getting confused during glue ups ;)
20150513_205759.jpg


I also decided to use splines to help strengthen the laminations and also to help alignment. I used 22m thick pine battens that were salvaged from the wall our plumber needed to take out earlier in the year. ripped into 8mmx22mm splines (because I had an 8mm straight bit for the router). The Axminster thicknesser was a godsend for this, as the readout gauge is accurate to 0.1mm, so I was able to get a nice snug fit for the splines.

I laminated boards 1 and 2 together, and then 3 and 4 (but I also had 1 and 2 in the clamps to ensure that the new pair aligned with the first pair). Then I glued the two pairs together. Then I realised that a lamination of 4 boards gave me something 8'x5.5"x8", which is heavy, really heavy. I managed to lift it to get it through the thicknesser, but I decided that I would restrict myself to 3 board laminations from then on.

So 5,6 and 7 got laminated (using the first 4 in the clamps as well as a former), then thicknessed to the same 138mm thick as 1-4 (yes I chop and change between metric and imperial as the mood suits me, I know I am weird). Then 8, 9, and 10.

20150513_212517.jpg


It is a bit difficult to see in the image, but the board "11 wall" has the splines placed into the grooves, and board "10" has the matching grooves as these boards await dry fitting. All of the routing was done with the edge guide for the router referenced off of the top edge. Oh yeah, I might have also accidently bought a new Makita 1/2" router to do this project as my little 15 year old Trend T5 was not going to be able to keep up.

At this point I am still waiting for the vise hardware. I have the instructions that they kindly emailed me in advance, but as I need to put the wagon vise on the wrong end of the bench I am not sure how far back from the front I need to put the handle, so I am loathe to do any more laminations until I can look at the actual hardware.

So the current state of play is that I have one lamination of boards 1-4, one lamination of boards 5-7, one larger lamination of 8-12 (which has been made up of two smaller laminations that were individually thicknessed to the same 138mm). I have three more planks to laminate. One of them I know needs to be taken down to 41-43mm thick from it's current 53mm based on the vise instructions, however I do not know if it needs to be the second or third board back from the front at the moment...

I have also realised that I need much more glue, as I have already gone through nearly 2 litres of the stuff do to the large surface area.
 
That's going to be one well made bench. And good looking too!
It is commendable that you chose to laminate the top and not make it out of a single slab (like some people out there).
I imagine the breadboards will be more of an aesthetic thing, as I doubt that such a thick benchtop will need
any help staying flat.
Keep the photos coming!
 
dzj":3vpkw10v said:
That's going to be one well made bench. And good looking too!
It is commendable that you chose to laminate the top and not make it out of a single slab (like some people out there).
I imagine the breadboards will be more of an aesthetic thing, as I doubt that such a thick benchtop will need
any help staying flat.

I can only imagine the laughter that would come from the timber yard if I asked for a 30" wide 5" thick single slab ;) You could probably get away with 2 15" wide slabs, but you would need to yard to cut it to order from the trunk as I doubt they would ever cut 5" thick stock as standard. Plus 5 years waiting for it to dry is more time than I am willing to wait ;)

The other advantage of laminating up the top is that I can use quartersawn stock. As the planks were so wide and were mainly from the centre of the tree, once I ripped them into 5" wide planks, they were pretty much quartersawn.

I am not sure how much effect the breadboards will have on the flatness of the top, but they will at least stop me from chipping bits out of the end grain. I am also going to have the breadboards in Cherry, mainly because I can, and it will add an accent to the bench. Plus I really like cherry, but I could not justify the cost of making the whole thing from cherry ;(
 
Woodmonkey":bd5delbd said:
Blimey let's hope you never have to move it once it's built!

The removal men were less than impressed when I demanded they move the 7' long 18" diameter yew trunk when we moved in 7 years ago ;) It is still stood up in one corner of the workshop waiting for me to figure out what I am going to do with it...

If we ever move, then with the lathe, planer/thicknesser, flood standing pillar drill, bandsaw, wall full of wood stash etc, the garage removal may cost as much as the rest of the house ;)
 
frugal":18pujkar said:
I can only imagine the laughter that would come from the timber yard if I asked for a 30" wide 5" thick single slab ;) You could probably get away with 2 15" wide slabs, but you would need to yard to cut it to order from the trunk as I doubt they would ever cut 5" thick stock as standard. Plus 5 years waiting for it to dry is more time than I am willing to wait ;)

I was poking a bit of fun at the crazy Americans who made such benches from single oak slabs. :)
5 years for it to dry? Maybe more. Some people argue that such slabs never really dry.
 
Most benches seem to have laminate top which has many advantage. Because of timber cost, I use a 1 inch laminate layer on top of three layers of mdf. It works great but is definitely not to be moved to offen.


Sent from my iPad using Tapatalk
 
The legs for this bench will be 6"x6", and will be laminated up from 3 6"x2" planks. Where they need to attach to the bench top I am going to use mortice and tenon joints that are pegged through from the front for added support.

1 - Given that I will be laminating the leg, should I just make the middle lamination 2" longer and declare that to be my tenon:
Leg%2BTenon%2B1.png


2 - Or is a single 2" tenon not a great option for a 6" wide leg, and should I use the inner edge of the outer laminates as a twin tenon:
Leg%2BTenon%2B2.png


3 - Or should I just make a massive tenon from the whole piece:
Leg%2BTenon%2B3.png


Or does it really not matter given the weight of the top and the fact that they are going to be pegged?
 
frugal":1qa48vwi said:
The legs for this bench will be 6"x6", and will be laminated up from 3 6"x2" planks. Where they need to attach to the bench top I am going to use mortice and tenon joints that are pegged through from the front for added support.

1 - ... should I just make the middle lamination 2" longer and declare that to be my tenon:

2 - Or is a single 2" tenon not a great option for a 6" wide leg, and should I use the inner edge of the outer laminates as a twin tenon:

3 - Or should I just make a massive tenon from the whole piece:

Or does it really not matter given the weight of the top and the fact that they are going to be pegged?
None of the above. The top is heavy enough on its own, and with the leg structure an integral part of the whole it makes it all rather cumbersome to manoeuvre in and out of spaces, which could be a challenge for moving in the future. I think you'd be better off making the under-frame a separate item to which the top drops on, perhaps located onto the frame with a couple of dowels, and maybe a screw or two to lock it in place.

I suggest two end frames that comprise the two legs M&Td into a front to back spanning foot with a similar top rail, reminiscent of refectory tables. Then connect the two end frames with a wide stretcher (150 - 180 mm wide) front and back, set about knee height or a bit lower. You could make these KD with a stub tenon or similar at either end. Near the top and bottom edge of each stretcher run a groove for two pieces of 6 or 8 mm rod threaded at either end to accept a large washer and nuts. The rod passes through holes bored into the leg so the whole shebang can be locked together. I think that arrangement would be more than sturdy enough, and I suspect you could also reduce the leg size to about 90 - 100 mm square too. Slainte.
 
Richard,

The legs are not going to be all that supports the top, there will be a pair of long and short stretchers about 4-6" off the ground. The theory being that when the top swells and shrinks it makes the H frame more of an A frame which should tighten up the joinery. The stretchers will also support the shelf at the bottom.

Bob%2BLang%2BRoubo.png


I was going to use M&T joinery throughout, but also drawbore the joints for added strength. I am not planning for this bench to come apart at any point. If we ever need to move house then I will pay some strong blokes with a big truck to move it ;)
 
Excellent... not frugal but a great bench. You will enjoy the RM bits, the wagon vice is a gem. Pleased to see flush front.
Very deep at 30", everything is personal taste though. Are you left-handed? I ask because the norm is face vice to left end. But a while ago I did a bench that happened to have a Record 52 (7") as the tail vice, and I found myself using that a lot as a sub for the face vice. I'm sure I'd be happy with the face vice at right-hand end (I'm right-handed).
Also, the planing stop - I put one in my current bench (quite like yours except 20" deep) and never use it. Chris Schwarz said to put one in so I did - it seems to me it would be more useful placed somewhere else. For long boards (6' say) I place the stock against a dog. It's the only bit I don't use - i put a deadman in thinking I may as well, and I use it a lot - really good.
I'm may be missing the trick about planing stops, but I manage :D
I'll look forward to seeing progress.
 
I've got eight steel brackets holding the two pieces on the top down. Saved a load of time and effort and works perfectly well. I screwed the brackets to the frame with the frame upside down on top of the two 11" x 3"s with a piece of thick card between the wood and the bracket so as to ensure they pulled down dead. As long as the top is fixed down dead, why do all the work? It's easy to dismantle, as well, which is good because it's been moved four times.
 
I would go for option number 1.
As this offers simplicity in creating and laminating the tenon without the extra work of actually having to cut the joint.
It will also make the mortice easy to create in the bench top by using the same laminating process.
 
Dougals,

I agree that 30" is deeper than normally advised, but I am planning to have some cabinets on the walls above the bench which will effectively bring the wall in by 6" or so. You can just see the bottom of the window in the second photo, I have been using the window sill as tool storage whilst I work and I have not had any issues reaching over to the window to pick up items, so I think I will be OK with the width.

The vise configuration was driven partly by being left handed, but also by the fact that the only feasible location for the bench is under the window, which means that it has a wall behind it, and a wall to the right. Being left handed give me an advantage in this particular case as I can plane towards the wall. There will be an 18" overhang at either end of the bench, so I will have plenty of room to stop before I run into the wall.

I was not planning on putting a planing stop in as it look like something to bang my hip on ;) Based on the feedback about the holding strength of a wood screw leg vise I am not anticipating the work piece moving in the vise. If I do find it to be a problem then I could always retrofit one at a later date.
 
By the way, the Maguire leg vice does not use a pin mechanism, rather a steel rod at a slight angle. (At least the wooden leg vice screw that I got from Richard did)

I built almost the exact same thing, split top.

wip-another-roubo-t80579-45.html

Pictures there of leg vice.

I did mortice and tenon on the legs, however as I managed to make each from two pieces, I did sort of the 3rd option. Again there are photos somewhere in my thread.
 
Very nice looking bench!

Unfortunately Richard no longer sells the steel rod and bushing as part of a leg vise kit, you can only buy the vise screw by itself. I am going to try to make my own and I have a 20mm stainless steel linear shaft and a 20mm linear bearing that I will fit into the leg to act as the bottom pin. If it all goes horribly wrong I can still make a cut out for a standard sliding pinned board instead.
 
frugal":3jtq7z39 said:
If we ever need to move house then I will pay some strong blokes with a big truck to move it)
I guess you'll need those strong blokes if ever you move it! I recognise the bench type now, having seen the style elsewhere, mostly on American forums and the like. The design isn't one I'd replicate exactly if I wanted to make that style of bench, along with the various vises and other accessories. I can see a way to adapt the design into a two part construction, a top and a leg set, which would make it easier to move about if required; and there'd be no loss of functionality either, as far as I can tell.

I'm sure the end result will be a fine bench to work on, so I hope the construction goes well, even if shifting the darned thing from time to time is rather, er, challenging, ha, ha. Slainte.
 
Back
Top