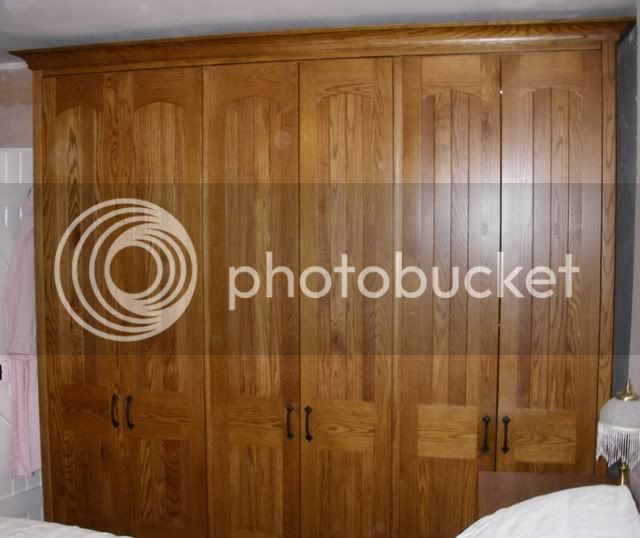
WIP: Fitted Wardrobes (finished)

UKworkshop.co.uk

Help Support UKworkshop.co.uk:

This site may earn a commission from merchant affiliate links, including eBay, Amazon, and others.
Very good work Sim, considering it was all built on site. If I had one comment though (and this is personal preference), I'd have preferred to have the applied panel edges bevelled slightly.
Keep up the good work.
 
nice job- bet it really comes to life with the colour applied as well.

I have lost count of the number of times i've cut something too short by the thickness of the timber, so although I never learned anything new from the project it's certainly helped to remind me to double check any diagram for that exact problem (pity I made my garden table in April and made virtually this same mistake by misreading a diagram!).

I think your project will inspire others that such large builds are achievable with planning and a methodical approach.

Nice one :)

Dave
 
Thanks to everyone who's looked! Please feel free to comment.
Have been down there today undercoating the wardrobes and painting the ceiling of the room.

Riley- As you said, it is personal preference, however I did consider routing the edges of the panels, but decided to leave them to create the straight edges and have a clear line between panels, rails and stiles. With a routered edge I don't think I'd of achieved that.

Dave- As I said just above, been putting the undercoat on today. Undercoat doesn't really do the wardrobes justice just yet, thats the gloss's job! With regards to the finish on the MDF, I haven't experienced the furry edge problems others have described in the past, the edges seem to have taken the paint extremely well. The edges were sanded up with an orbital snader with a fine grit. - Sorry, I know you didn't ask but thought I'd mention that...
As you mentioned about getting things cut too short, this project has taught me to work it out better in future. It has also given me an idea of how much I should charge for labour on a job like this one if it was going to be paid for.
I hope my work does inspire others to realise they can do a project this big. I should point out although I do get paid to be a bench joiner, this wardrobe build was unknown territory for me with regards to as how it should be done and so it was a bit off the cuff and only had my experience behind me to help me.

Please keep comments, and questions coming, thanks, Simon.
 
Simon,

Not a bad first effort at fitted wardrobes - probably a lot better than mine!

My comments centre on the doors.

The 'panels' applied to the surfaces of the doors look a little odd to me. Better IMO would have been to apply 6mm thick strips around the edges and across the middle of each door in imitation of rails and stiles leaving sunken 'panels'.

In future I woud always go for concealed 'kitchen door' hinges. 4 or 5 on a door of this size is plenty strong enough and the beauty is that they are adjustable. You have chosen to fit your doors inside your wooden frame. Unless there are pressing design reasons for this I would always mount wardrobe doors on the surface of the frame for ease of ftting and adjustment.

Lay-on doors = very easy and quick
Inset doors = time consuming and a PITA!

People will pay extra for a kitchen with doors inset within a frame and hung on brass butts, but in a bedroom 99.9% of people are perfectly happy with lay-on doors. Keep the gaps between them small and use filler strips or end panels at each end of a run of doors and no-one will know the difference anyway!

For instance these are lay-on doors hung on standard concealed hinges, but look inset.

NewBedroomfurniture005.jpg


Doing them like this can save a day in terms of making and fitting time for a big wardrobe.

Cheers
Brad
 
Well Done Sim, better than I could have done. I do agree with Brad that lay on doors would have been better. Do show us once the room's finished.
 
BradNaylor":1b81a4zj said:
Unless there are pressing design reasons for this I would always mount wardrobe doors on the surface of the frame for ease of ftting and adjustment.

Lay-on doors = very easy and quick
Inset doors = time consuming and a PITA!

People will pay extra for a kitchen with doors inset within a frame and hung on brass butts, but in a bedroom 99.9% of people are perfectly happy with lay-on doors. Keep the gaps between them small and use filler strips or end panels at each end of a run of doors and no-one will know the difference anyway!

[snip]

Doing them like this can save a day in terms of making and fitting time for a big wardrobe.

Cheers
Brad
Damn - that's one 'trade tip' I didn't pick up on when I did mine - wish I had, though!
Already had one aborted attempt to hang inset doors on a set of wardrobes I made some time ago... wonder if I could alter the design to do it this way. Where's the tape measure??

Dave
 
These are the pain in my neck!

Yours, however are a job well done, and on your own too!

I (admittedly - I'm a newbie), put a whole carcase in the gaps in my bedroom, one each side of the chimney breast - don't ask me why! When I saw the piccy of the noggins to hold the shelf supports I could have kicked myself... :oops: How to save time, effort, & money...

Anyway, being a 'rustic' joiner (i.e. I'm not brilliant), I did do half lap joints, on cross-overs, pocket hole screw joints, trued up vertical and horizontal etc, etc. BTW Have you ever tried lifting a square frame into position on your own - don't try it - it's a pain! Also - don't ask a shorter person to help - twisting the frame can cause a headache.

I didn't have the "ceiling too high" problem, rather, "wood's too long". - oh, and the bedroom was being lived in at the time - try explaining sawdust in the bed to your wife :roll: .

I laid my doors on the outside, with the disadvantage of having a radiator up-pipe in the wayof a fully openeing door - 3 hinges on there, so 3 on each of the others. MDF is too thin, so slightly warped doors (being kept stacked in the garage didn't help), I DID, however, manage to put shelving in each wardrobe, chipboard shelves & uprights, a noggin in both sides and the back (I know!), AND I didn't fall into the "allow for shelf thickness" problem - previous trial and error taught me that.

NO pictures of it - I'd be ashamed to show my paultry efforts on this thread, after the wonderful pics above, just, you did ask for comments ( :wink: ?)

My wife has been banned from visiting this website on pain of me being divorced for lack of speed / quality / enthusiasm / etc... :lol:
 
Thanks for all the comments :D

I think I may go for trying kitchen type hinges next time.
I think the materials came to more like about £500. There's quite a few sheets of 18mm MDF and 6mm MDF and 12 lengths of 44x44x2.4m and 10 lengths of 12x32x2m we also had to pay for 3 deliveries for this lot.
And, I did make the frame on trestles but had help to lift it up.
 
That still sounds expensive for materials. I'd have thought around £300-£350 for the timber, fixings and other hardware - maybe £400 max if you're buying hardware from the sheds. The cutting service and delivery charges must account for a fair proportion of the bill!

Don't forget to add your labour costs onto the final amount, and let your relatives know the amount it would have cost them if you'd have been charging the full amount. Then ask them to get their friends around to show off the new wardrobes, and offer them a referral fee (half or full days days labour on future projects) for any orders that result from the viewings.

Looking forward to seeing the finished product.
 
As you said also the hardware, thats included in the rough estimate in cost. Thats.... 30 cranked concealed hinges, 10 handles, 20pk magnetic catches, all the different sizes of screws..... I used 5.0x100mm 5.0x70mm 3.0x25mm 3.0x20mm 15mm veneer pins. It all adds up.... and also... two single panes of glass, one for a window i put thru and another for one that was previously cracked before. Delivery charges were about £20 a go, which would be £60.
 
Hi Simon, been following your WIP with the robes, and I am sure your relatives/customers will be pleased !

I noticed this thread about the same day I started a very similar job, alcove, fitted robes, MDF , etc etc but I went about it in quite a different way.
Nothing wrong with either way but I am quite happy with mine now, which requires a minimum of framework and yet is still strong/ Another approach to hinges, another way of embellishing the door with panelling effect, in fact much the same job but done a different way.
If I can remember how to post pics I will if you don't regard it as hijacking your thread !

PS
I have done a fair few built-ins more or less as you have done there and I find the way I have come round to doing them much easier..just a bit more shop time beforehand. Each to their own, but we all learn along the way.
 
Well as promised, here's the final set of pictures with the finish on them. Well, when I say final, I might post a final, final picture once the room has been carpeted and moved into..... But I'll see. The fitted wardrobes have had two coats of undercoat and a final coat of satin finish "Champagne" colour, it took a hell of alot of paint to do the three coats!

The first two pictures show you the wardrobes from the outside, with the second one giving you a better view of the top.

DSCF0445.jpg


DSCF0446.jpg


This next picture shows you the full height of the wardrobes, and next to it the first wall I've ever wall-papered, which I realised has a skill to it. The other two walls of the room, were just painted.

DSCF0438.jpg


This next one is a close-up of the handles, and panels, I know these photos have been done before, but they look different now the finish has been applied!

DSCF0447.jpg


The middle compartment, with full length hanging space. A small shop-brought shoe rack is to be assembled and just placed at the bottom.

DSCF0449.jpg


The end walk-in cupboard. As you can see, I left the original doorway in, and the shelves have been left in from the previous cupboard. The ceiling of the cupboard has been fitted above in such a way that the screws can easily be located and the MDF removed if you were to want to use the space above the cupboard in the future.

DSCF0451.jpg


And, finally, the other end compartment, with shelving and hanging space combined.

DSCF0448.jpg


Just to end, here's what it looked like before I did the work.

DSCF0388.jpg


I hope you've enjoyed reading through this long work-in-progress. I'm glad its all been finished now..... onto the next project!

Thanks for reading, Simon
 
Thanks, went over there today to help move furniture back in after the carpet has been fitted, and all i can say is WOW, without being too big headed, with the carpet laid, the wardrobes look really good and the wallpapering on the accent wall really sets it all off. I'm hoping it brings me work in the future, but I think I'll give the decorating part a miss> too long winded!
 
Back
Top