Use of dowels when joining edges.

UKworkshop.co.uk

Help Support UKworkshop.co.uk:

This site may earn a commission from merchant affiliate links, including eBay, Amazon, and others.

Andy Kev.

Established Member
UKW Supporter
Joined
20 Aug 2013
Messages
1,364
Reaction score
128
Location
Germany
I'm currently trying to build the anarchist's tool chest and progress has been slow but steady, while the learning curve with respect to planing accurately has been steep and very rewarding.

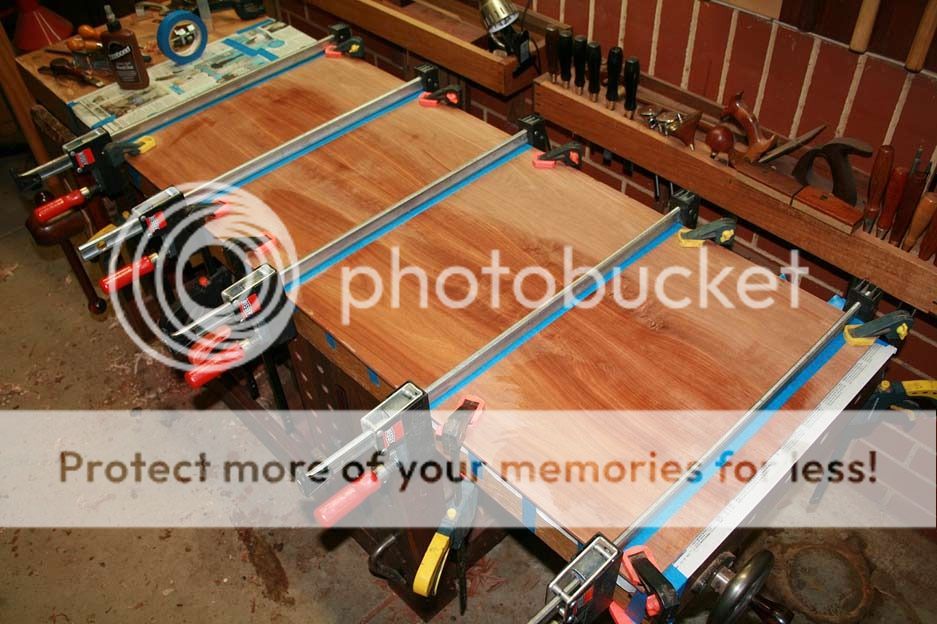
What I have discovered is the benefit of whacking in a couple of dowels when gluing the edges of boards together. It's widely documented that this adds nothing to the strength of the joint and the only benefit - accuracy of alignment - seems to get little more than a passing mention. I have, however, found it to be a tremendous benefit: three dowels, one at each end and one in the middle of e.g. a pair of two foot boards mean that putting them together is like assembling an Airfix model and the middle dowel is especially useful as it counteracts any small tendency to bowing.

I'm left wondering why this simple technique is not promoted more or am I missing something?
 
I think it's not promoted by many as it prevents you from rubbing the joint end to end to get good adhesion. Instead, you rely on cramps to pull the joint together. But if it works for you, use it!
 
I have found that dowels are a pain to align they need to be exact it both directions ie distance apart and in thickness of the board.
Biscuits only need to be the right distance from the face, lateral alignment isn't that important.

But an Andy says a rub joint is just as strong and only needs a flat face planing, you can tap the planks flush while you are clamping them up.

But if it works for you then carry on, they are no strict rules in woodwork just people :wink: :D

Pete
 
There are several methods for keeping alignment whilst glueing up, dowelling being one, loose cross-grain tongues in ploughed grooves being another. When there's no margin for error, or when glue can't be relied upon long-term, they're valid techniques.

In a case such as this where exact thickness of glued-up panel isn't essential (the conrer joints are just marked out and cut to the exact thickness of wood at each joint), I tend to prepare the stock a little full on thickness, then glue up without dowels or tongues, and finish-plane the panel to level any slight misalignments after the glue has set. That gives a bit more tolerance of slight misalignments (though obviously not gross ones - care is still needed in glueing and cramping, just not as much), some of which might result from slight inconsistency in thickness planing of the stock boards.

If machine-thicknessed stock was being glued up, the use of alignment aids makes sense, since the stock will be of accurately consistent thickness, and there is no need for a levelling-up after the glue has set.
 
I used them on more than one occasion a decade or so ago, but they went they way of biscuits and pocket screws for me as my thinking and techniques for assembling evolved. As has been said, they can become more of a hindrance than a help. Depending upon what I'm building and lumber, I'll use either hyde or yellow glue, with both working very well to rubbing. As far as an alignment aid, I like rubbing better as you have the ability to "whack" one face or they other, or use clamps reaching in from the ends.

In short, I've had more alignment issues if care is not taken to make sure dowels are exactly placed (and the same goes fo biscuits, etc.).
 
Biscuits are the easiest for for face location as they are forgiving in positioning lengthwise. There isn't any advantage strength wise, but cramping a joint with sash cramps is very hard to keep flat as the glue allows the boards to slip. Dowels can be used, but require very accurate positioning.
 
Yes to rubbing for a stronger and easier joint.
3 or more boards you can have more alignment control by just doing one joint at a time - glue two together and then add the third later when the first two are solid.
You stop them slipping by cramping them up a bit - watch them slip a bit - push them back and cramp again and they stop moving as the glue grips. Only a few extra seconds with PVA glue and a lot quicker than fiddling with dowels. But gets problematic with more than two boards on the go - hence the one joint at a time.
I always flood both edges with glue due to past experience of failures. Too much glue is better than too little.
 
You can use veneer/panel pins - knock them fairly well into the edge of one board and nip of the heads. When you clamp up the short ends of the pins (about 3mm) will bite into the other side and stop the boards sliding. This can be good if the boards are known to be a little out of line in the first place.
 
AndyT":2fgshtbz said:
I think it's not promoted by many as it prevents you from rubbing the joint end to end to get good adhesion. Instead, you rely on cramps to pull the joint together. But if it works for you, use it!

Two other advantages which I find, are that I get to putting the clamps on instantly because it is impossible for the boards to slide around on the glue (obviously) and secondly that for the technique to succeed, I have to plane the reference faces very accurately, which is a good skill discipline.
 
Your mention of 'putting the clamps on' makes me wonder - how are you setting up to do the clamping?
I normally have two clamps standing on the bench, adjusted to the right opening and with strips of softwood in place to bear against the boards. I then glue up the boards and put them onto the clamps, resting against the bars, or else resting on long bits of scrap that are planed to be slightly higher than the bars. So more a case of putting the wood into the clamps, rather than putting the clamps onto the wood.

If necessary, once the boards are in the first two clamps, I will add one or two lighter ones the other way up, in between them. This picture shows the last board being added to others, where I have added one at a time, as described by Jacob. No alignment aids meant I could flush the top surfaces as close as possible as I added each one.

IMG_3801_zpsaionztro.jpg


It can all get a bit awkward, especially if the boards fill the bench. Anyone got any other tips?
 
I put a bit of parcel tape on the clamps where they might touch a glue bead and otherwise cause a black stain.
 
That's pretty much my approach, Andy. If the panels and cramps won't sit easily on the bench, I find a bit of nice, flat floor space; I also tend to lay a piece of plastic sheet or bin-bag over the lower cramp bars to catch the glue-drips (even more essential if you're using cramp-heads on wooden bars). The long scrap bits for pressure pads spanning the two lower cramps help a lot, too - using individual bits of wood is fiddly because they always fall out at a critical moment.

Robert Wearing has some clever dodges for glueing up panels, especially thinner and smaller ones for things like drawer bottoms, in his books 'The Resourceful Woodworker' and 'Making Woodwork Aids and Devices'. Both out of print, I think, but available through the secondhand book dealers. Amazon and Abebooks.co.uk can be handy sources.
 
I've just remembered another tip I learnt on here - I think it was from Jacob - you can coat steel cramp bars with thinned down linseed oil, which just looks like a clear varnish when dried. It means that water based glue won't make black stains on the wood and any drips can be picked off. A bit less bother than tape or plastic sheets, I think.
 
I have seen it suggested that a good coating of paste wax on wooden cramps, cramping bars and paraphernalia prevents glue sticking. I've never tried it myself, so can't confirm, but I mention it in passing.
 
On the current build I glued up bookmatched panels. A simple process, but it occurred to me to take a couple of pictures for discussion of the technique here since I do not recall having read much or anything in regard to glue up technique.

The panels are only 1/4" thick, which makes them more flexible than usual (they are to bend in a curved frame).The thinness also means that they obviously needed to rely on means other than dowels or biscuits for alignment (which I never use) ...

2-preparing-to-glue2_zpsglepqe9h.jpg


Glue of choise here is Titemark hide glue. This is applied to both sides in this case. It might only be applied to one side if the boards were thicker and not required to bend. I wanted to ensure no weak spots.

The boards are rubbed together and then clamped in the centre. Note that I use blue tape to avoid contaminating the wood with the clamp (cramp) ...

3glue1_zpsqiiajojb.jpg


I then work my way outwards. I have already checked with a dry fit that there is a slight hollow in the centre. The first clamp draws this together, and succeeding ones enable tuning of the alignment ..

6glue4_zpse952gsom.jpg


Here I am using the work bench as glue up surface as it is flat (and I do not have space for a dedicated assembly bench). The panel is wider than the bench, which enables clamps to extend over the top. If the panel was narrower than the bench top I would raise the panel on MDF. If you look carefully, the panel is also levelled at the corners and edges with other clamps.

Is it controversial that I wash away glue residure on the show side immediately? I have never experienced a problem with finishes, but this may be related to our local woods.

After planing any slight glue lines, the final step was to scrape down the glued up boards ...

7scraping1_zpsbvmq1mdr.jpg


Regards from Perth

Derek
 
I see no controversy in wiping off surplus glue straight away. It's what I did in the glue-up shown above, hence the plastic tub with water and a damp rag in it.
The slight dampness is visible on the boards which have just been joined, ie the two on the right. I too like hide glue which cleans up particularly easily.
 
PVA I let it go off slightly (few minutes) and then scrape it off with a blunt scraper. I don't like wiping it off with a wet cloth too soon in case of wiping it out of the joint, or getting water into it.
 
The use of a large hammer (and scrap) to level the joint, as the pressure is applied, rarely seems to get a mention. (Waring) This works very well.

I like to isolate the work from clamp bars, on bearers, and use pyramid blocks at the edges. This is because clamp faces are rarely square.

David
 
Back
Top