PART 1:
This piece is supposed to compliment my earlier long post about files and filing. Like the previous (now a sticky - "fame at last!" - thanks CHJ), it's very much aimed at the hobby woodworker faced with doing just a bit of metal bashing now and then.
As I was lucky enough to have a "proper" apprenticeship, when we learnt a lot of stuff like metal cutting, here goes.
This is mainly what I was taught, plus some bits & pieces of experience picked up along the way. But just because "I" say "this is the way", or "I was taught to do this in a that way", if you have your own other way of doing things which work successfully for you, then the best of luck. There are a few (and only a VERY few) "real rights and wrongs" here - as so often in life. But for those new to the whole business of metal working, here's a good starter for you.
SUMMARY:
First, to encapsulate what's discussed below, and for those who can't be bothered with long and complicated discussions, here's my own version of the "Metal Cutting by Hand Top 10" (top 6 actually):
1st: Full size hacksaw with bi-metal/all-hard blades (plus PERHAPS also a diamond/carbide coated and/or a power
hacksaw blade);
2nd: IF available, abrasive cut-off discs ("DREMEL"- sized drill or Angle Grinder, to suit job size & availability),
3rd: IF available, "GOSCUT" tool - for sheet metal;
4th: IF available, electric drill "NIBBLER" accessory - for sheet metal;
5th: Powered scroll/fret saw - sheet metal (again!);
6th: Jigsaw (if no GOSCUT or NIBBLER available) - sheet metal, yet again!
As there are only two basic types of hacksaw frame we'll start off there.
DETAIL 1. JUNIOR (or "MINI") HACKSAWS:
Here are three slightly different variants on the basic theme:
Photo 1 HS
View attachment 65729
The most common and cheapest type (top in picture) consists of a "sprung" frame with an integral "bent-up" handle. Not the most comfortable to hold, but "it'll do". The centre example is also quite common but a little more "refined". It has a male threaded boss at the back of the frame onto which a metal heavy-duty craft knife handle is screwed. The lower example is more posh, having a cast frame handle with threaded blade tensioner built in. The most comfortable in my opinion.
All are designed to take 6 inch long blades, and as far as I've seen, this Imperial measurement is also valid in Metric countries.
Junior hacksaw blades all have a small steel pin set horizontally through the blade at each end. These fit into a slot in each end of the frame. Again as far as I've seen, junior hack saw blades are not often branded, and seem to come in "no name" packs of 10 or so which are marked either Coarse or Fine. In my own stock the fine blades seem to be about 30 TPI, the coarse about 18 TPI.
The steel used for these blades is pretty soft for a cutting tool. This means that A), they tend to wear out quickly, and B), unless you take steps to increase blade tension it's pretty difficult to cut a truly straight line.
In the case of the two frames shown at the top and centre of the photo, tensioning the blade means gripping the frame in the vice (without blade) then giving it a bend/tweak until you can still (just) get the blade into the frame as you now fit a blade by flexing the frame against the bench. The more complicated frame shown at the bottom has the benefit of giving more scope for tensioning by means of a screw thread and thumb wheel. To increase available tension on what generally seems to be a pretty short thread, my method is to place washer/s of differing thickness between the thumb wheel and the frame because as bought, the available adjustment length isn't really sufficient I find. Care with tensioning this way is needed though, as on my own example ("Little Marvel" brand) the cast handle looks a bit weak in places and I guess such handles would easily bend or more likely break if over-tensioned.
As the teeth are small, junior hacksaw blades do not have set on each individual tooth. Instead they're "wavy set", meaning that the first tooth has no set; then the next 3 or 4 teeth have a set which increases to the maximum on one side; then the next 3 or 4 teeth return to zero set; then the next 3 or 4 are increasingly set in steps to maximum on the other side; followed by a return to zero set - and so on and so on. I hope that's clear in the photo below. It's also worth noting that blades for full size hacksaws (see later on) and a few other metal cutting blades, such as those for jigsaws (also see later on), are often also "wavy set", just like junior hacksaw blades.
Photo 2 HS
View attachment 65730
Like all other hacksaw blades, junior blades should be installed so that they cut on the forward stroke. I've seen no help with getting this right with junior blades, unlike the big blades which generally have a different paint colour or shading of some sort at the forward blade end to make sure you get it right. Here, you just have to eyeball it.
Diag 3 HS
View attachment 65731
Due to the above-mentioned softness and limited tension, junior hack saws can't really be considered as precision tools, but they are often handy for small/delicate jobs in the shop, and I imagine would be useful for site workers to have in the tool bag on a "just in case" basis. I also find mine quite useful for clearing damaged (or making new) slotted heads on grub screws, etc.
The fine junior blades are also quite useful for rough-cutting smaller/thinner plastic items such as small electrical conduit and ducting.
DETAIL 2. HACKSAWS:
Photo 4 HS
View attachment 65732
Again there are several variations on the basic theme. A couple of my own are shown, and these are the more modern types, with a tubular steel frame with a cast metal (or moulded plastic) closed-grip handle. Earlier versions are still around, and these tend to have flat steel strip frames and file-type wooden handles which screw onto a boss at the back of the frame. This brings the handle into line with the blade. Both are perfectly serviceable, and as with just about all other tools, we all develop our own preferences. Personally I like the type shown above.
Some hacksaw frames are adjustable in length, being capable of taking both "standard" 10 inch and 12 inch blades. The adjustable length types tend to be the older ones (with the in-line handle), but I haven't seen any 10 inch hacksaw blades on sale for many a long year. I've no idea if they're even still made, but we can say that hacksaw blades come (came?) in either 10 inch (if you can find them) or 12 inch lengths. This Imperial standard also seems to be valid in Metric countries.
Just like 10 inch blades, it used to be possible to buy "Coarse" blades, meaning 14 TPI. But again I haven't seen any 14 TPI blades on sale for a long time. That's a pity, because for heavy cutting in thick stock these really are very good tools. But I still have a couple of old stock 12 inch long X 14 TPI blades which I now only use when really necessary.
Apart from 14 TPI blades, the three standard TPIs are 18, 24, & 32 TPI, although in many of the more DIY-oriented stores, only 24 TPI seem commonly available. A pity that, because as we shall see, having all three TPIs to hand is very useful, and saves a LOT of wasted energy - something I'm ALL in favour of whenever possible!
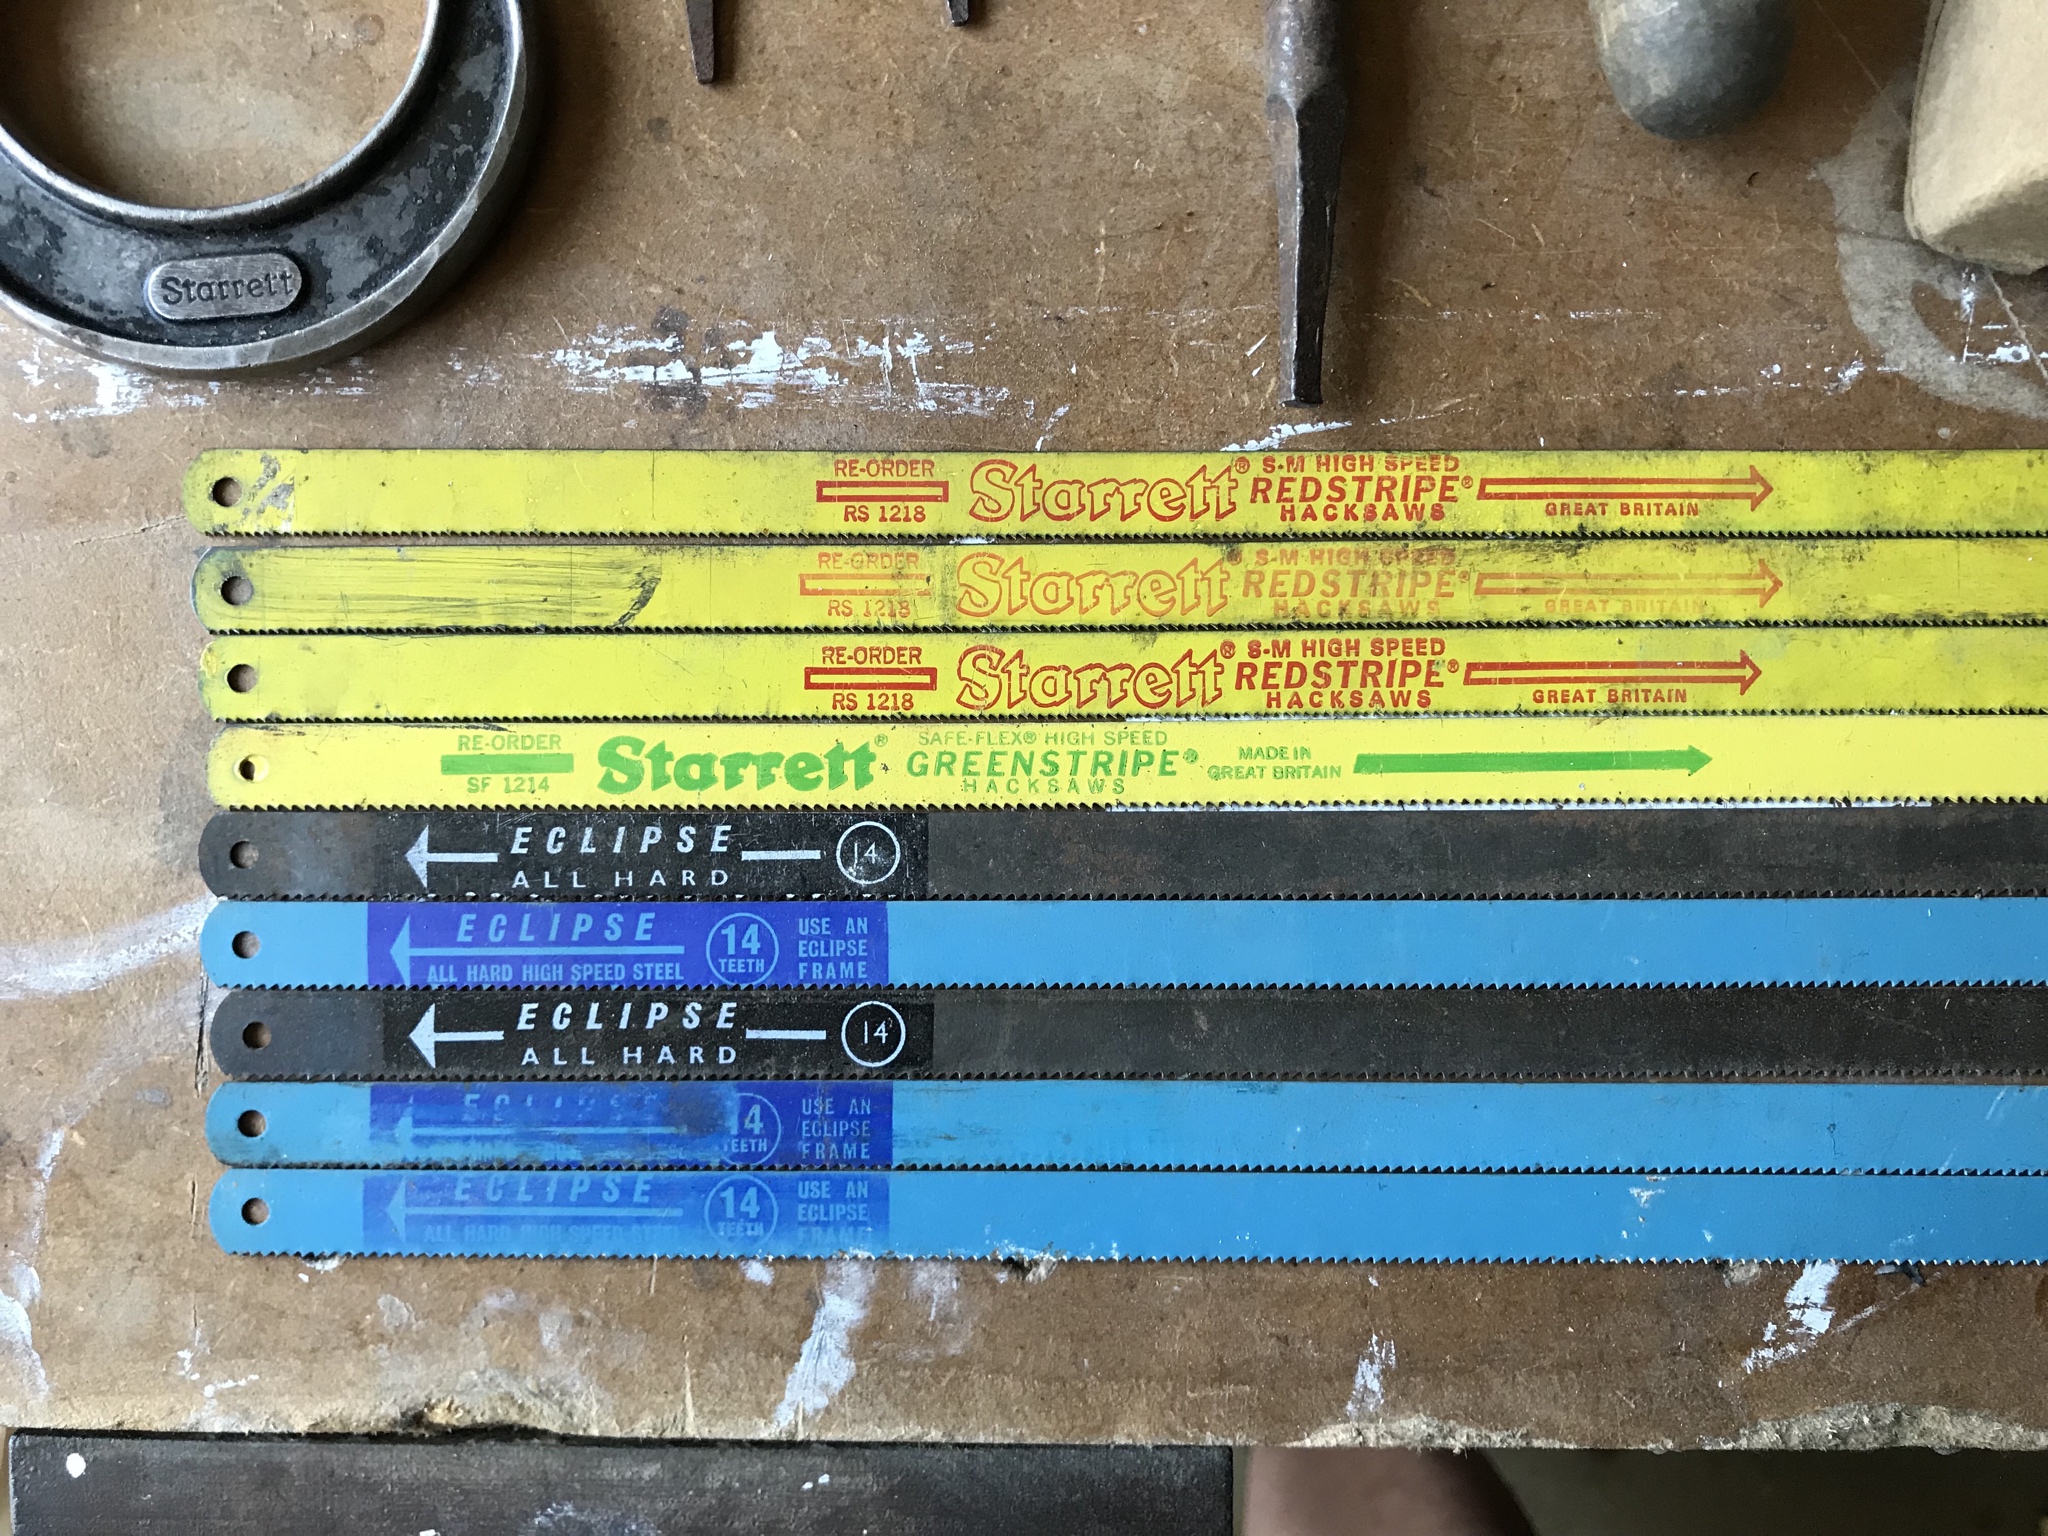
Photo 5 HS
View attachment 65733
Apart from two length/s and three (or possibly four) different TPIs, there are three different types of blade available - "cheapos" which may or may not have had some type of hardening process, but which are anyway made of pretty soft steel (i.e. they wear out quickly unless used only on soft metals and plastics). And these blades are also rather flexible, which may seem an advantage, but that definitely isn't so once you've got the hack sawing knack. Read on!
Then there are properly hardened and tempered tool steel blades. In the interests of long life and cutting ability, these are pretty hard, and cut very well indeed when used properly, but they do tend to shatter if flexed or bent off line, often by not very much (leaving bits of blade to go pinging about all over the place - DAMHIKT)! A favourite old dodge was to grind these into very handy general purpose knives (with suitable handle!) once finally worn out.
And a relatively new addition to the armoury is the diamond-coated blade, also shown at the top of Photo 5. These are generally made from a "soft-ish" steel backing blade which is diamond or hard metal (carbide, etc) impregnated along the cutting edge, producing a somewhat thicker kerf than conventional blades. These are useful for getting out of trouble when faced with cutting really hard metals and are handy to have as a back up, but as we'll see later, IMO there are an even better options for cutting really hard metals.
Finally, and much more common these days, come "bi-metal" blades. These consist of a very narrow flat wire strip of tool steel, suitably tooth-cut and hardened and tempered. This wire is then "vacuum-beam" welded onto a much softer steel backing strip to make up the full approx 1/2 inch (12 mm) width of the standard blade.
These are the 3 blue and orange blades shown in Photo 5 above. Below (Photo 6) I've tried to show the very thin line of weld just above the root of the teeth. To make it visible I had to take a fine wire brush to the colour on a partly used blade - look for the fine grey-ish line just above the gullets of the teeth. This is where the thin strip of tool steel is joined to the much softer backing strip. That welding process is very interesting incidentally - long rolls of flat strip of each type are held in a special jig, then fed into a vacuum chamber (to eliminate weld impurities) where they're welded together by a computer-controlled electron beam, resulting in an apparently one-piece blade. All such welds I've seen are impeccable.
Photo 6 HS
View attachment 65734
Bi-metal blades are a good all round compromise, because unlike the all hard blades mentioned above, which really did give problems with shattering almost immediately as they strayed off the intended vertical cut line, you can literally twist bi-metal blades about all over the place with very small risk of blade breakage. I've seen the odd bi-metal blade with just a few teeth broken off (usually somewhere in the middle!) but leaving the rest of the blade "more or less" intact and still usable. They are pretty good on tough metals like various grades of stainless steel.
The basic bi-metal idea is so good that nowadays hole saws are often available in bi-metal configuration, amongst other applications. See later.
Like most compromises however, there's a down side to bi-metal hacksaw blades. Even with a hacksaw frame which allows plenty of scope for blade tensioning, bi-metal blades tend to wander off the straight and narrow all on their own - simply because they're so flexible. The resulting cuts are less accurate than could be achieved with a properly used all-hard blade.
My fix for this problem (but only a partial fix I'm afraid) is to add washers of suitable thickness to allow the blade to be tightened as much as the frame will allow - like the junior frames mentioned above, I find that as standard, the adjusting screw thread is a bit too short to allow maximum tension, especially for bi-metal blades. Even so, I still find it necessary to cut a little further away from the line than would be necessary with an all hard blade because I find bi-metal blades still tend to wander off line a bit - all of their own volition (he says innocently)!
Once you get reasonably comfortable with wielding the hacksaw properly though, the all hard blades are the ones to look out for, but around these parts anyway, bi-metal blades seem to have just about taken over in most shops, even in "serious" tool stores. I think you may have to look quite hard for all hard blades but admit that after a 25+ year absence from UK I'm not exactly up to date on what is/is not freely available these days.
DETAIL 3. HACKSAW BLADE SELECTION:
OK, having already established that 12 inch bi-metal blades are what you're most likely to come across, what about choice? As said, the really coarse 14 TPI blades seem to be very rare, leaving just the 18, 24, and 32 TPI blades to be found. But at first try you'll most likely often find only 24 TPI blades in the shops.
That's "OK-ish", because 24 TPI is obviously a reasonable compromise between 32 and 18 TPI. But if you've got any more work than just the very occasional bit of metal to cut, it's definitely worth making an effort to find 18 and 32 TPI blades as well.
One reason is the well-known "3 teeth in contact at all times" rule. If you've got some thin sheet material to cut, a 32 TPI blade is the obvious choice - you'll find it VERY difficult to cut thin sheet with a 24 TPI blade because it will tend to jam with the blade stuck fast in the job by the gullet of just one tooth.
Equally, if cutting, for example, a two inch thick piece of steel, it's going to take you all day with a 24 TPI blade, however sharp it is. An 18 TPI (or even better, a 14 TPI blade if you can find one) will be MUCH quicker, and you'll use a LOT less energy.
So in my own shop I have three hacksaw frames, one for each common blade TPI. A little OTT perhaps, but handy all the same - a bit like having three drill-drivers on a job, one chucked with a pilot hole drill, one with a countersink bit, and the last with a screwdriver bit.
But back to blade selection - in short, material thickness more than any other consideration should be your guide when selecting which TPI blade to use.
Once you've mastered hack sawing though (and it's NOT all that hard really - it simply needs some thoughtful practice), then IMO anyway, the all hard blades really are the bee's knees and are my own weapon of first choice nearly every time.
I've added a small list of the known good blade manufacturers at the end, because in the case of hacksaw blades I've always found that buying a "cheapo, no name" blade definitely is a complete waste of the hard-earned!
DETAIL 4. STARTING A CUT:
Here I'll pinch directly from my earlier piece, "Files & Filing":
At secondary school (which was the only formal wood work teaching I've had), I was taught that when cutting timber it's important to start the cut by placing the thumb just to the waste side of the chosen mark, then draw the saw backwards a few times (I'm assuming a conventional wood saw here, not a Japanese saw or any other which cuts on the back stroke). This makes a small vee in the job and ensures that the saw doesn't bounce out of the proper position as you start the real, forward stroke sawing. I hope that's the right procedure for wood!
But I've seen many beginners attempting exactly the same procedure when starting to cut a piece of metal with a hacksaw. Unfortunately, this is usually doomed to failure as the hacksaw will usually just bounce around all over the place on the top surface of the job. Not at all what we want for the start of a cut which is supposed to be in the right place!
Diag 7 HS (FF 28)
View attachment 65735
The following method will work EVERY time, WITHOUT fail. Use a short smooth triangular or half-round file to make a small vee similar on the top rear of the job. It's much easier to keep a file in the correct position for a few strokes than trying to do it with the hacksaw. But do make sure to keep the flat surface of the file as close to the mark as you dare (!!), and also, keep the flat surface of the file as vertical as you possibly can, leaving the half-round or the other two sides of the triangle to cut into the waste metal. See diagram 7 above.
DETAIL 5. HACK SAWING TECHNIQUE:
NOW we get to it! Hack sawing is very much like filing - so much so that you can almost consider a hacksaw blade as a file with just a single line of teeth! And just like I said in my filing piece, it's common to see folks "attacking" a piece of metal with a hack saw by using VERY short strokes and just "smashing" backwards and forwards at breath-taking speed - even on the non-speeded up YouTube video sequences!
I guess that's natural enough. Someone with little or no experience of cutting metal thinks "metal is hard, I don't really want to do this, but it must be done, so let's get it over and done with as soon as possible, cut, cut, cut," - pause to wipe sweat from brow and eyes - followed by even more frantic "cut, cut, cut, cutting"!
Now I'm not suggesting that hack sawing is great fun, but one thing I definitely can assure you, when taken at a SLOW and STEADY pace, using at least 75 to 85% of the full length of the blade for each stroke, you will not only cut the job MUCH quicker but you will also save a LOT of energy - not to mention no longer suffering from blades with teeth completely worn away in the middle and virtually untouched at each end!
Hacksaws cut on the forward stroke, as shown in Diagram 3 above, so the differently coloured/shaded part of the blade usually found on most hacksaw blades goes at the front of the frame.
Just like filing, your stance is very important. For right-handers, the preferred position is with your right foot in front of the vice and slightly to the right of the vice centre line, and with your left foot about one normal pace forward and slightly to the left of the vice centre line.
Set the work up vertically or horizontally in the vice, as appropriate - use a small spirit level or square if necessary. This gives you the best chance of making an accurate cut. And don't set the job too high up in the jaws either. Too high leads to work piece vibration and chatter and that only increases the cutting effort needed AND significantly reduces cut accuracy.
Start the cut with a file, as described above, and then place the saw blade in the file-cut vee with the handle end of the saw as far back as reasonably comfortable from the vice front. MAYBE the saw is held with the front SLIGHTLY lower than the rear - whatever you find most comfortable. Now make a forward stroke with medium downwards pressure at slow speed until the handle has almost contacted the front face of the vice. Now REDUCE the downwards pressure to ALMOST nothing, then draw the saw back towards you, keeping it in LIGHT contact with the job until you're back in the original start position. Then repeat.
If you've previously tried the frantic "cut, cut, cut" method that I caricatured above (I bet you have!), now compare how well and how quickly the saw has cut using this "approved method" - and after just a few (almost) painless strokes! Sometimes these old blokes (like the instructor who taught me) were not so soft after all it seems.
Of course this all takes much longer to write (and to read!) than to actually perform, so I hope the photos below plus a bit of practice will help you develop the basic method. As with just about everything else, "practice makes perfect". But I think you'll find it's easier than learning to file accurately - AND sawing correctly will help you improve your filing technique too. So overall, not bad really, as you get to be a winner all ways round!
Photo 8 HS
View attachment 65736
Photo 9 HS
View attachment 65737
Unlike filing, it's not necessary to worry too much about the natural up and down rocking motion that you will probably automatically develop while making your to and fro hacksaw cuts - in fact, provided you don't allow it to become excessive, and provided almost the full length of the blade is being used on every stroke, a little up and down rocking can usually help the blade to bite better.
But this time, just like when sawing timber, it IS necessary to eyeball the cut (usually it's best done with the job still in the vice, unlike when filing). This "shufti-checking" means looking from in front and even from behind the job, and of course, from above. This is to ensure the cut is proceeding correctly against the pre-prepared vertical and/or horizontal mark/s or line/s, and is still proceeding as squarely as possible across the top of the job too.
As a beginner, you'll most likely find your cut is wandering off the line you marked out. Don't worry about it, it happens to us all. The trick is to spot it early enough (i.e. frequent eye balling), and if going off the vertical then "lean" the whole hacksaw SLIGHTLY in the opposite direction. Make just two or three more strokes, then eye ball again. Keep on until you get your cut back to the vertical, even if it is now a bit further away from the line than you had planned initially - but bad luck if the cut is now into the wanted side of the line and not into the waste side! Just start again with another piece of stock if that dimension is critical.
"Verticality" is the important point to be aiming for, and here the bi-metal blades come into their own as you can (almost) lay the saw flat on it's side before the blade starts to complain - in fact it's odds-on that if you lean the saw sideways much too far, your strokes will be stopped altogether as the blade will simply bind in the kerf (unless that is, you've completed the Charles Atlas Course - "Dear Mr. Atlas, I've done your course, now please send the muscles." I'm sure the under 30's (under 50's?) won't have a clue what I'm on about here!
Never mind, back to business!
Personally, when making angled cuts I prefer setting the work up in the vice so that the cut will still be vertical in relation to the vice and bench, and that's how I was taught. I think it would be quite difficult to cut on an angle to the vice/bench, especially with thicker stock, but if you can make it work for you then I guess it's OK. And of course, if you need a cut which is not at 90 degrees to the main axis of the work piece then you should set the cut line and NOT the main axis at vertical.
As above, wandering off vertical is a common problem, and can ruin a job if you've marked your cut-off line too close to the required final dimension. The only answer is to compensate for this in your marking out, then just keep eyeballing and keep practising with every cut you make until you suddenly find it's "clicked" (as it definitely will).
Also as suggested above, don't be too hard on yourself about a bit of wandering off line, as with a bi-metal blade you'll find it hard to keep dead on to the vertical anyway - that very flexibility that allowed you to save the day when you wandered off line badly during your "beginner cut times" is now conspiring to keep you OFF the straight and narrow! But that's not a reason not to try harder because you'll then "graduate" to using all hard blades, and in comparison to all others, they really are akin to the common "hot knife through butter" saying.
The only other wandering problem you may come across is being a bit off square when the job is eyeballed from above. This is less of a problem as if you've been eyeballing frequently enough, you'll see it and correct for it before any real damage is done. But if required, the correction is simply to adjust your stance a little, and/or to change the angle you're holding the saw in relation to a square line running across the top of the work.
So far I've assumed you're cutting some bar, tube, or strip stock (any metal). But when we get to sheet metal, especially thin sheet, a slightly different technique is called for. Although that "SLOW & STEADY" method is the same, this time, especially when the sheet is large, you'll probably find it much more convenient to lay the job horizontally on the bench.
For a start, with thin sheet material, this helps you keep to the "3 teeth always in contact" rule, because even with a 32 TPI blade you're going to find it impossible to always keep 3 teeth in contact with the job if the sheet is only, say, 1/8th inch (3 mm) thick - trying to cut that vertically it's obviously impossible to keep 3 teeth in contact at all times.
Secondly, especially if you don't want distortions in the sheet (either in the job itself, or on the waste side), clamping the job horizontally onto a bench with an extra support on the waste side is very helpful in reducing distortion to the absolute minimum - I often find my old B&D Workmate good for this. And remember that especially with soft metals like aluminium and copper, it's dead easy to introduce distortion into a sheet, but it's often just about impossible to completely remove unwanted dents and buckles afterwards!
Another point which comes into play, and this also applies when cutting wider/thicker strips and bars in the vice, is that with the job set up in the normal vertical position, a typical hacksaw frame only gives you about a 31/2 inches (90 mm) depth of cut (i.e. the point at which the bottom of the hack saw frame has hit the top of the job, so preventing you cutting any deeper). However the cunning designers thought of this a long, long time ago, and on all hacksaw frames I've ever seen there's a method to allow the blade to be set up horizontally instead of vertically in the frame. I hope the picture shows this clearly.
Photo 10 HS
View attachment 65738
This horizontal blade set up is quite useful when cutting sheet metal as it's now possible to cut sheet of any length - but now you're restricted to strips of only 31/2 inches (90 mm) wide, maximum! Maybe OK for some jobs, but by no means all! But there are other ways to overcome this particular problem which we'll look at shortly.
CONT: PART 2