TS2500 - blade height adjustment stiff

UKworkshop.co.uk

Help Support UKworkshop.co.uk:

This site may earn a commission from merchant affiliate links, including eBay, Amazon, and others.

Les1693

Established Member
Joined
31 Dec 2005
Messages
32
Reaction score
0
Location
Gloucester
Hi, I have a scheppach ts2500ci table saw. The blade height adjustment is getting very stiff to turn. I guess this is due to the cogs being bunged up with sawdust.
Has enyone else had this problem and if so what's the best way to sort it - turn the saw on its side (it's a heavy lump to do this) or take off the cast iron table (is this easy to do).

Many thanks, Les.
 
I don't have that particular saw, but my guess is that your diagnosis is correct.

Do you not have any sort of access panel on the side or back? I guess not. So if you cannot get it cleaned out through the throat plate, then I'd get a mate to help you turn it on its side. I'd only remove the CI top as a last resort.

CHeers
Steve
 
eoinsgaff":3ja9s0tm said:
Any chance of blowing it out with compressed air?

Eoin

I've taken the throat plates off and there is no access at all to the height adjustment parts.
 
Hi Les,

You cannot gain access to the saw unit by taking off the cast iron table as the saw unit is bolted to the underside of the cast iron that's where all the weight is. If you don't have assistance to turn the saw on it's side(I recommend not even if you are strong it can/could get away from you)
The next option is to take off a side panel I would go for the one at the front as you face the saw. If I recall it's only 4 screws should be fairly obvious. Once you have done this you can lie on your back and crawl under with a tin of dry lube like GT85, http://www.gt85.co.uk/about
Liberally spray what appear to be moving parts. Get someone to wind the saw unit up and down whilst you're under it so you can get best access. you may be able to do this yourself while underneath. Don't be surprised if you find you have to do this regularly this design seems to be affected as the pivot points are not particularly sophisticated being made of pressed metal. I think you'll find it's these pivot points rather than the screw threads but you can attend to all. Let us know how you get on.

Alan
 
What I remember of that saw is that the height winding system bears against a steel/tin plate (remove saw plate insert on tabletop) and wind up the blade , I had a problem there, a nasty bit of wood might have bent something.
Then you might not have to consider getting under.
 
I've got the earlier version of that saw, with the ally table, and have the same problem periodically.
About once a year I have to crawl under and clean the lead screw with a small brush to get the cack off. On my model a whole panel of the ally top is removed for blade changes, and this makes it easy to get the worst of the dust out with brush and vac first. Tilt the blade over fully for ease of access to the screw. I then give it a good spray with a dry silicone lubricant. If you use oil or grease it just attracts the dust and you're back to square one in no time.
 
Do what you have to do to get the muck off the winder screw then liberally spray with a silicone lubricant spray (dashboard shine or back to black will do) this will reduce the ammount of sawdust that sticks to the thread .

I use this stuff on my enduro bikes and it prevents the mud and dust sticking during races :wink:
 
As I have mentioned in threads relating to the TS2010 this is a major design fault IMHO.

I crawl underneath and take the pressed steel plate off (carefully because it has lethal edges on the vent holes) and then work from there with goggles on.

As others have said you MUST use a dry lubricant. If you use grease or oil it makes the matter worse!

Good tip there eggflan....I may try that this weekend.

I have dust extraction as they suggest but it still gets everywhere.

Jim
 
Hi guys, many thanks for all the replies.

I took the lower front panel off (4 screws). Crawled underneath and checked the threaded rod, did not seem to have much dust on it at all but wiped it clean anyway. Height adjustment was still stiff so gave the rod a good blast with some silicone lubricant whilst turning it - this sorted it out ok.

As this is the first time i've used silicone lubricant I was wondering if it's ok to spray the bed of my planer/thicknesser with it. I use an old wax candle at the moment.

Cheers, Les.
 
Les1693":2vuq8zle said:
Hi guys, many thanks for all the replies.

I took the lower front panel off (4 screws). Crawled underneath and checked the threaded rod, did not seem to have much dust on it at all but wiped it clean anyway. Height adjustment was still stiff so gave the rod a good blast with some silicone lubricant whilst turning it - this sorted it out ok.

As this is the first time i've used silicone lubricant I was wondering if it's ok to spray the bed of my planer/thicknesser with it. I use an old wax candle at the moment.

Cheers, Les.

General concensus seems to be no to silicone on planer beds, due to risk of transferrance to workpiece and consequent problems with finishes. I suppose it depends on what finishes you use and whether you finish straight from planer (personally I tend to always skim off planer marks with a hand plane afterwards). I used to use it on everything and never had a problem, but nowadays I use Liberon lubricating wax instead just in case. It also seems to last longer and have better rust inhibiting properties.
 
As a guitar builder who uses nitrocellulose and other finishes I wouldn't have any silicon based product anywhere near my wood. It causes blemishes on most finishes which are to be applied to wood...fisheyes etc.

I'm even going to watch where I spray inside the TS when I do it in case any escapes into the open!

Jim
 
WellsWood":30w54ozk said:
nowadays I use Liberon lubricating wax instead just in case. It also seems to last longer and have better rust inhibiting properties.

Cheers Mark. I'm sure I've got some lubricating wax somewhere.
Les
 
Only if you use a mild hardwood. Interlocked and difficult grain requires higher effective angles to avoid/minimise tearout.

Note this response appears to have been atached to the wrong thread - it was posted in reply to a question about plane angles for hardwood.
 
I thought a few pictures might help here to see what is the cause and cure of the problem....

Firstly...I gave up lying underneath the saw....even with a facemask the sheer amount of inaccessible dust made it very uncomfortable..it gets EVERYWHERE....so I took the sliding mitre fence off....and unclipped it and tried to lift it.

This is a stupid idea....don't try it...

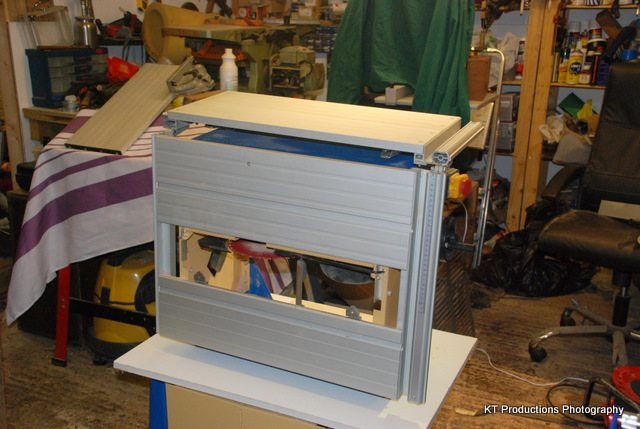
You can just about lift it up but then it becomes an uncontrollable animal...the stand bloody well folds up and you are in trouble...I got my son to help me lift it...put a piece of board between the saw and the stand and then laid it carefully on its side:

DSC_0002.JPG


Now we have perfect access to spend over an hour getting all the dust out....this is the state it was in after cutting some oak and some engineered oak flooring...not a lot of work really...

DSC_0004.JPG


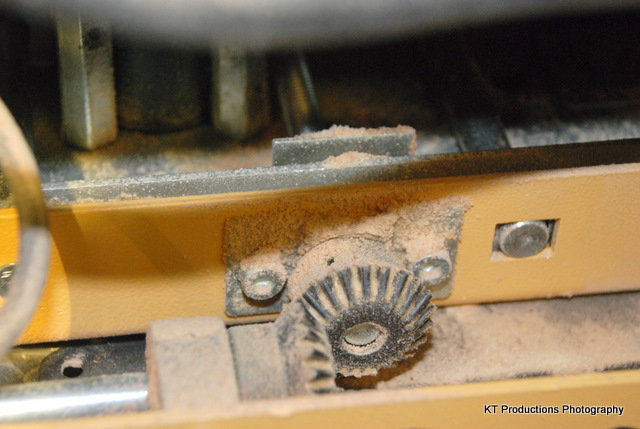
This is the view of the rise and fall gearing. They absolutely caked in solidified dust in each of the mesh grooves and I am surprised they mesh at all!!! This has hardened so much that a brush was not enough...I had to use a dental pick to scrape them all clean one by one!

Behind these cogs is the elevation screw and two guide rods....

Each end of these were completely bocked with dust as you can see on the lower part just behind the cogs. This prevented the rise and fall to go to the extremes of travel...its very action keeps compressing and bunching up debris which I presume will get progressively worse as time goes on....

DSC_0003.JPG


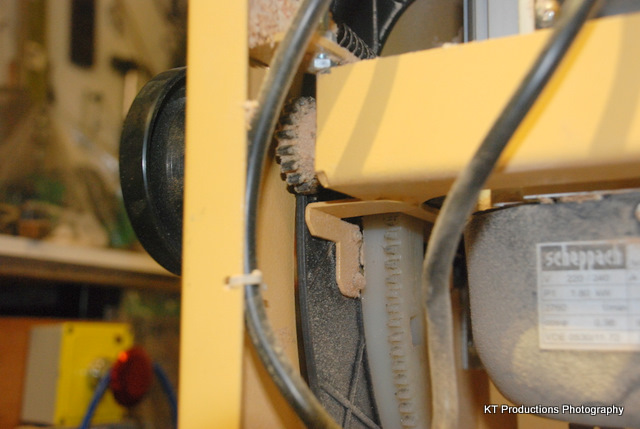
Next I looked at the tilt mechanism...the "patented" (one wonders why they bothered) DUAL action system....

DSC_0008.JPG


The accumulation of dust here did the same thing with the rise part of the dual mechanism...both cogs were very congested...again they needed scraping rather than brushing....this clogging causes the rise and fall mechanism to be very stiff as the meshing surfaces become tighter and tighter.

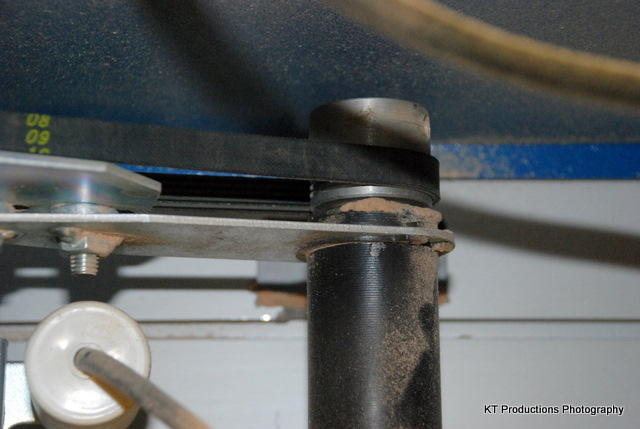
Finally I checked the arbour near the bearings and pulleys and these too had compressed fine dust....I feel that left to accumulate this would present undue load on the whole drive with unknown results (although I could guess...!)

DSC_0007.JPG


I'd like to point out that I use dust extraction in all points as mandated in the manual...but frankly...the way the dust flies all over the place I think that no end of extraction is going to prevent very fine dust getting in the areas that you really don't want it to.

It was getting late so I left it at this for now...tomorrow I will show some "after" pictures of the cleaned up saw....

Hope this helps.....

Jim
 
Going back to my earlier post I had trouble with the steel guiding plate, I seem to recall it had got distorted, this made things very stiff when altering height of blade, it wasnt dust causing the problem the saw was only a couple of weeks old, but it was nearly 5 years ago and things are a bit hazy now.
 
Back
Top