MikeW
Established Member
This is a cross post from WoodNet...thought you might want to see.
Hi Y'all,
The latest issue of Woodworking Magazine has a simple trivet in it. Here's the link to the current issue. Scroll down for a [too] small graphic of the lead-in page:
http://www.woodworking-magazine.com/backissue.asp?issuedate=3/1/2007
Woodworking magazine, btw, gets a hearty recommendation from me if you don't already buy the issues...
The article uses typical power tool methods to make it. It is made using rail and stile construction, mortise and tenon joinery. Tile in the center which rests on a rabbeted edge. So you know, ya build the thing, take a router and a rabbeting bit that is set for width/depth, run it around the inside and square the corners. Easy if not noisy and dusty.
When I am remaking something for efficient and good hand tool methods, my mind sometimes gets all befuddled because of the different thinking about how to solve a particular problem.
So the question is, how do you do it with hand tools and avoid making a stopped rabbet on the stiles? Or does one go through the hassle of making the stopped rabbets on such a short length [tile is 8" x 8"], or does one do the through rabbets and then one cut overlapping ends on the rails to cover the rabbets on the stiles, which is a raditional method?
I've done it before a certain way, but I had to think about it--and still got a width issue messed up in my head until I started to cut wood and had a forehead-slapping moment.
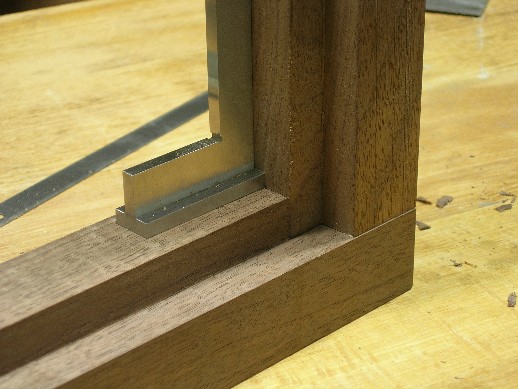
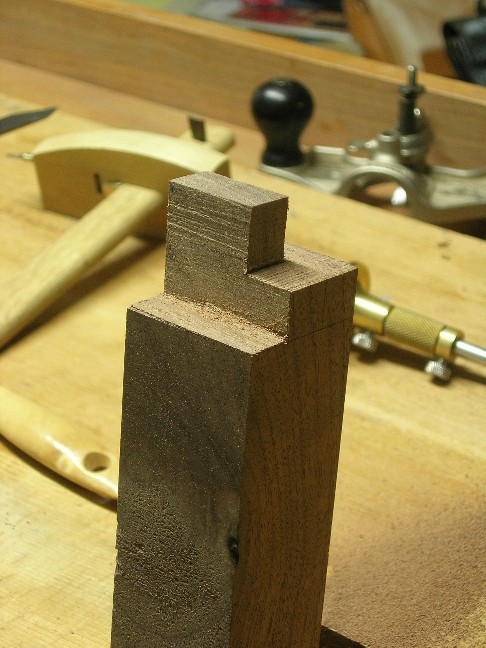
Here's a few pictures which should show how I did it.


While I didn't take pictures of the actual making, the above pictures who that I rabbeted along the entire lengths of the rails and stiles and trimmed back the rabbet on the stiles. The result is similar to have started up the noisy router [if I could find it in the storage shed].
I would contend on something easy like this, the overall time to make the frame, mortise and hand saw the tenons was faster than machine set up and change-over.
Oh. One last tip if you use this project to work on your hand tool skills and still have something useful when done. I used a brace and bit to drill out for the mortise rather than simply chopping them out. The reason was the short end-grain at the end of the mortise. I didn't want levering out the waste to break out the end of the mortise.
Take care, Mike
Hi Y'all,
The latest issue of Woodworking Magazine has a simple trivet in it. Here's the link to the current issue. Scroll down for a [too] small graphic of the lead-in page:
http://www.woodworking-magazine.com/backissue.asp?issuedate=3/1/2007
Woodworking magazine, btw, gets a hearty recommendation from me if you don't already buy the issues...
The article uses typical power tool methods to make it. It is made using rail and stile construction, mortise and tenon joinery. Tile in the center which rests on a rabbeted edge. So you know, ya build the thing, take a router and a rabbeting bit that is set for width/depth, run it around the inside and square the corners. Easy if not noisy and dusty.
When I am remaking something for efficient and good hand tool methods, my mind sometimes gets all befuddled because of the different thinking about how to solve a particular problem.
So the question is, how do you do it with hand tools and avoid making a stopped rabbet on the stiles? Or does one go through the hassle of making the stopped rabbets on such a short length [tile is 8" x 8"], or does one do the through rabbets and then one cut overlapping ends on the rails to cover the rabbets on the stiles, which is a raditional method?
I've done it before a certain way, but I had to think about it--and still got a width issue messed up in my head until I started to cut wood and had a forehead-slapping moment.
Here's a few pictures which should show how I did it.
While I didn't take pictures of the actual making, the above pictures who that I rabbeted along the entire lengths of the rails and stiles and trimmed back the rabbet on the stiles. The result is similar to have started up the noisy router [if I could find it in the storage shed].
I would contend on something easy like this, the overall time to make the frame, mortise and hand saw the tenons was faster than machine set up and change-over.
Oh. One last tip if you use this project to work on your hand tool skills and still have something useful when done. I used a brace and bit to drill out for the mortise rather than simply chopping them out. The reason was the short end-grain at the end of the mortise. I didn't want levering out the waste to break out the end of the mortise.
Take care, Mike
 An interesting set of pictures, Mike. Thanks for posting them.