Stanley 50

UKworkshop.co.uk

Help Support UKworkshop.co.uk:

This site may earn a commission from merchant affiliate links, including eBay, Amazon, and others.

jim_hanna

Established Member
Joined
21 Jan 2008
Messages
156
Reaction score
0
I’ve started down the slippery slope of using old planes and have bought a Stanley 50 Combination plane (from theoldtoolshed.co.uk)

The bits I have seem in reasonable nick and there’s a full set of cutters, however it’s disappointing, I expected the plane to be complete from the description but I’m missing the beading gauge and shaving deflector (G and H on the diagram below). I want the plane as a user, not as a collection item so I don’t much care how the parts look.

Could some kind soul with a Stanley 50 please measure the parts on their 50 and post the dimensions so that I can make something to fit.

Thanks
Jim
diagram.jpg

IMAG0277.jpg

IMAG0276.jpg
 
Those shaving deflectors are often missing. I don't know if they make a difference, or are just a gadget.

Anyway I'll measure up my "item G" tonight when I get home, and post the dimensions (if someone else doesn't beat me to it).

Cheers, Vann.
 
i have one at home, that may have the bits that you are after for the cost of postage,

i am at the mothership now and be home by monday so will check then.

adidat
 
Jim. This is measured off the Record equivilent (the #050) which is probably identical. Dimensions as promised:

Base is retangular (square ends) 123.1mm long; 12.5mm wide; & 4.0mm thick.
The rebate along the top RH side (refer your diagram) is 2.35mm deep and 1.60mm wide.
There's a notch on the RH side to clear the cutter. This starts 43.1mm from the leading edge and is 12.6mm long and 4.1mm wide.
The rod is located 19.5mm (to centreline) from the leading edge and approx. 4.5mm in from the LH side. It is ø5.55mm and ~30mm long (high?).

I hope this helps.

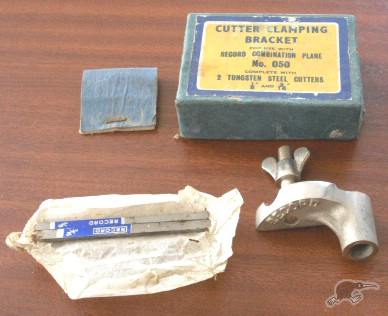
Greg. You need the Cutter Clamping Bracket for the 1/8" and 3/16" cutters.
Record 050 CB.jpg


Cheers, Vann.
 

Attachments

  • Record 050 CB.jpg
    Record 050 CB.jpg
    18.5 KB
jettagreg":3qxfz4ag said:
If anyone can tell me how to clamp the smallest cutter in place, I'm all ears

Greg - quote from the manual "Remove the sliding section entirely, place the cutter in the cutter seat and insert the Cutter Holding Screw (J) into the bolt hole for sliding section on main stock and tighten with wing-nut used on sliding section"

HTH

Dave
 
MickCheese":15khrhgt said:
These come up frequently on eBay often without the blades or just parts.
Mick

The only way to get these parts seems to be to buy them with a plane. The one I have has all the cutters and is fine for normal grooving and beading so I don't really want to buy another.

The only e-bay ad I found which offered the beading gauge by itself didn't have a photograph, the illustration looked like it had been run up in Sketchup so I wasn't convinced.

Vann":15khrhgt said:
Base is retangular (square ends) 123.1mm long; 12.5mm wide; & 4.0mm thick.
The rebate along the top RH side (refer your diagram) is 2.35mm deep and 1.60mm wide.
There's a notch on the RH side to clear the cutter. This starts 43.1mm from the leading edge and is 12.6mm long and 4.1mm wide.
The rod is located 19.5mm (to centreline) from the leading edge and approx. 4.5mm in from the LH side. It is ø5.55mm and ~30mm long (high?).

Vann

Many thanks, just what I needed. I should be able to run up a beading gauge quite quickly. I had a stroke of luck finding the material for the pin. I thought I was going to have to sacrifice an old 7/32 drill to use the shank for the pin, then found a piece of 7/32 rod in my shed. I used to have some plastic in/out trays on my desk, plastic trays separated by four metal risers. I kept a couple of the risers to use as pin pushes when I chucked out the rest, found they're a perfect 7/32 diameter.

Regards

Jim
 
I have a complete Record 050. With the help of a friend I was able to establish that the shaving deflector is only needed with the tongue blade. However, we discovered that it is very difficult to get the shavings out of the way without the deflector. If you don't plan to make tongue and groove joints you won't need the shaving deflector. (As an aside, I noticed that the new tongue blades for the Veritas small plow plane come with a shaving deflector - so that may be further evidence that the shaving deflector is useful when cutting tongues.)

The beading fence is also a very specialized piece that appears to be only used when you are adding a bead to a ship lapped board like you see on beaded paneling. If you don't plan to make much beaded paneling, you can use your plane for all the other tasks for which it is useful without this piece either.

It is not surprising that the original owners of these planes either didn't notice when these parts went missing or deliberately put them "away for safe keeping" since they didn't need to use them most of the time.

Rick in Oakville (Canada)
 
jim_hanna":3eb9odwm said:
MickCheese":3eb9odwm said:
These come up frequently on eBay often without the blades or just parts.
Mick

The only way to get these parts seems to be to buy them with a plane. The one I have has all the cutters and is fine for normal grooving and beading so I don't really want to buy another.

The only e-bay ad I found which offered the beading gauge by itself didn't have a photograph, the illustration looked like it had been run up in Sketchup so I wasn't convinced.

Regards

Jim

Jim you are right, just had a look and whilst there are several planes without cutters and in various forms of undress none seem to have the bits you require.

Mick
 
Still a work in progress but thanks to Vann’s measurements it was fairly simple to cut out a beading gauge. I threaded the post to base connection for strength. All remaining is to fix the post and cut to length, grind the excess threads flush with the base and then a good polish. Not pretty or original but hopefully functional.

Many thanks for all the replies.

Jim

PS The beading gauge was simple, the chip deflector will need considerable trial and error to get the angles correct.
IMAG0288.jpg

IMAG0287.jpg

IMAG0292.jpg

IMAG0291.jpg
 
Hi Jim,

To hold the small blades as pointed by Dave, you need a special Screw.
When I bought my #50 it was missing.
I bought it on ebay from 'st.jamesbaytoolco'. On his web site you'll see that he sells a lot of spare parts.
But he only makes batches every once in a while. So I waited a long time to get mine.
In the meantine I also got the shaving deflector. But really you don't need this one.
Also note that the stanley screw threads are specials, so you can't make yourself one that fits.

I hope this helps.
Let me know if you want some measurement, as I have a #50 just like the one you have.

Cheers.
PS : It's better ton contact st.jamesbaytoolco by phone if you can.
 
.

I’d concur with the opinions about the two missing bits…. They are usually missing because all the previous owner(s) never used them.

At the risk of going off at a tangent, I have a couple of these which are very useful if you are using two different blade widths at the same time.
But I can honestly say that both my No: 50s (fairly new and not used much previously) worked indifferently when I got them and needed a bit of fettling before I could get the best out of them. This says a lot for the lack of attention to finish detail with many later-issue Stanleys.

The one area that is often overlooked in all combination planes is the two skates. In both my planes they were misaligned along their length and on one plane, not square to the fence. Scalloped milling marks were visible all along the length of both.
Unless you are hacking lumps out, a flat, square plane base makes a big difference to the accuracy of your work. To begin with, they were both very poor and did not cut accurately.

The fix:
You will need a small engineer’s square, a magic marker and a FLAT stone (diamond stone is perfect for this).

I put a 3/8” blade in and withdrew it as far as it would go. This is to fix the two skates in line. But you don’t want the blade protruding.
Set the fence about 1” off the skates.
Invert the plane and with the square, check the two skates for square, front, middle and back. Note where any square-on misalignment is.
Run a line off magic marker down both skates.
Fix the stone face up so that it doesn’t slip and with the edge slightly over the edge of your bench and the plane level and straight, run it down the stone.
Look at the clean gaps in the marker, check constantly with the square and repeat until you have two flat, straight skates, at right angles to the fence.
Finally, clean off any burr from each side of the skates.

Hope this helps.


.
 
Back
Top