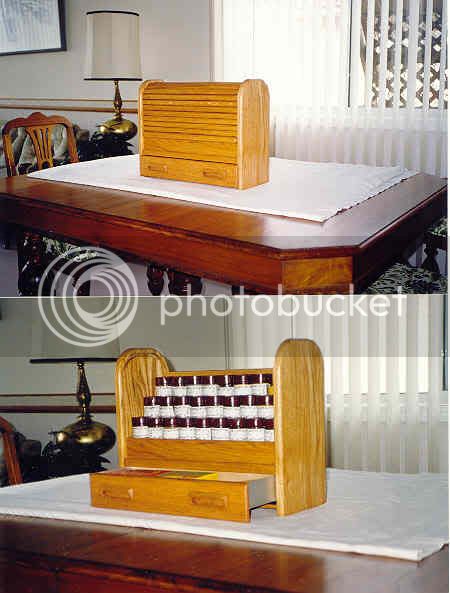
Uh oh, you guys have caught me in the midst of packing for a house move & all of my shop notes are packed & simply marked "shop" so do not have a clue which case has my notes. Any how, I can give you the basics & I will use the spice cabinet as an example. The inside distance between the ends of the cabinet plus the depth of the tracking grooves(1/4") means that the tambour must be the distance plus 1/2" in width. The slats are 3/4"wide & 3/8" thick. Taking 3/4" thick boards trimmed to length for the above width measurement, joint the board & run it through the router table using 1/4" round over bit. Run the machined board through the saw slicing off the slat. Repeat the process until you have enough slats plus some extras because it is likely some of the slats will warp or twist with the release of internal stresses when slicing them off the board.
Notice that the bottom of the tambour has a heavier slat which performs the function of a handle when opening & closing the tambour.
Make up a frame the width of the tambour but somewhat longer. One end of the frame the cross piece is the width of the tambour plus the width of the frame members. The length pieces are butt attached to this width piece & when attached the inside dimension is equal to the width of the tambour. The other end of the frame is open but make up a cross piece that is the same width as the tambour so that it will slide in between the side or length pieces. Attach to a piece of plywood.
The slats are glued to 10 oz. canvas. Use vegetable dye of a dark shade(I used dark brown). This will also serve to preshrink the canvas.Cut the canvas 1" shorter than the length of the slats. Lay a layer of wax paper in the bottom of the frame. I used yellow carpenters glue & rollered it onto the canvas & lay the canvas in the frame on top of the wax paper & centered. Now...lay in the slats except for the handle slat. Slide the open end cross piece of the frame into the frame and up against the last slat.
Take two bar clamps & gently tighten to close all voids between the slats.
Place a couple of pieces of wood lenthwise on top of the slats & clamp to provide downward pressure on the slats to ensure good contact on the canvas. Let dry 24 hours. Take the tambour out of the frame & placing it canvas side down on the edge of your workbench run it back & forth to "break" the glue between the slats.You now have a flippy floppy tambour. Set a double fluted plunge bit or a hinge mortising bit in your router table set to trim the canvas side of the slat ends only enough to even them all out flush. Do the ends on both sides. This will ensure that the tambour will run smoothly in the track grooves. Flip the tambour over
set the bit height to trim the ends of the slats to finished thickness to slide easily in the grooves. Now is when you glue and clamp the handle onto the bottom of the tambour. It does not run in the grooves but instead just nicely fits between the ends of the cabinet.
My tambour is red oak making it quite heavy. Hence, I had to install rubber bumpers at the end of the track because the weight would cause it to whiz around the track & "bang" against the wood stops I first installed & made a rather loud noise which I knew my wife would not appreciate. The rubber bumpers stopped that.
I should mention that you should do a dry fit of the slats in the frame before rolling the glue on the canvas so that you can run a piece of masking tape across the canvas and not roller on glue where the handle will be glued on later as described above.
I hope this answers most of your questions. Sorry that my notes are not right at hand for you.
Lee


