Spalted Sycamore Bowl: Practice Piece

UKworkshop.co.uk

Help Support UKworkshop.co.uk:

This site may earn a commission from merchant affiliate links, including eBay, Amazon, and others.

wizer

Established Member
Joined
3 Mar 2005
Messages
15,589
Reaction score
1
Went 'round to Blister's this morning to play. He kindly re-shaped and sharpened a couple of my tools and then chopped up some logs for me.

DSC_0427.JPG


We screwed one of the split logs to my face plate. But decided it would be best not to use it until I have taken the corners off on the bandsaw.

DSC_0424.JPG


So we rooted around in Allen's meagre ( :roll: ) timber supply and found a small piece of spalted sycamore.

DSC_0430.JPG


After it was mounted on the screw chuck, I cut the chuck recess for the bottom and started to shape the outside. We marked the rim of the bowl with a parting tool.

DSC_0429.JPG


I struggled a bit with shaping the outside of the bowl. It didn't turn out how we'd planned it. I'm not sure what the problem was. It just wasn't clicking with me.

DSC_0433.JPG


This is the shape we ended up with after some sanding and sealer.

DSC_0437.JPG


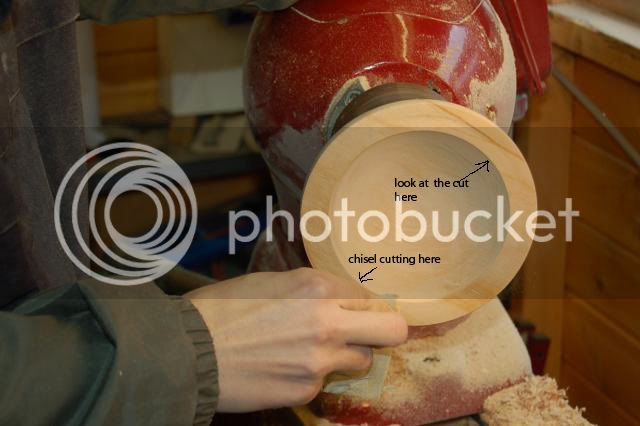
Shaping the inside went much better. I appear to be learning how to pick up the cut and follow it through evenly. Allen was nagging me to not look at the tool but the opposite side of the cut and I found that this helped substantially (when I did it).

DSC_0440.JPG


Eventually we got to a nice even finish, using the teardrop scraper to get a nice finish. Then I sanded it through the grades.

DSC_0442.JPG


Then on to waxing it with some briwax and buffing it up

DSC_0446.JPG


DSC_0449.JPG


Bit of an odd shape, but the missus was impressed. So I guess it's a winner ;)

I'm making slow progress but I think I'm getting there.
 
looks good to me tom, hope my first bowl is something similar, can you just explain what you meant by dont look at the tool, look at the other side of the cut, not sure why that is??
thanks
 
After you pick up the cut, if you look over to the opposite side of where the tool is cutting you can get a clearer view of what's happening. You can see clearer if your cut is going too deep or, if you are trying to shape in a certain way, it will be easier to judge which way to move the tool. Try it. It's strange at first but I've found that it helps.
 
Must be okay - it got the ultimate accolade
the missus was impressed
:D
Would I be correct in guessing Allens "meagre" timber collection is as meagre as his tool collection ? :wink:
And I can't believe he didn't have at least one saw to take the corners off the log for you..

Andrew
 
PowerTool":1pie57kj said:
Must be okay - it got the ultimate accolade
the missus was impressed
:D
Would I be correct in guessing Allens "meagre" timber collection is as meagre as his tool collection ? :wink:
And I can't believe he didn't have at least one saw to take the corners off the log for you..

Andrew

Vast. and that's just the stuff he's got stored at his house. He's got a lockup which is filled to the rafters :shock:

None of his saws are currently in commission.
 
wizer":15sat3bv said:
PowerTool":15sat3bv said:
Must be okay - it got the ultimate accolade
the missus was impressed
:D
Would I be correct in guessing Allens "meagre" timber collection is as meagre as his tool collection ? :wink:
And I can't believe he didn't have at least one saw to take the corners off the log for you..

Andrew

Vast. and that's just the stuff he's got stored at his house. He's got a lockup which is filled to the rafters :shock:

None of his saws are currently in commission.

of course you / he could just knock the corners off with his chainsaw then use either a roughing gouge or a round scraper to turn it down from an octagon. Or (small logs only) bore all the way through with a parting tool with the lathe turning fairly slowly - full face pro is a must if trying this - its a little hairy but i used to do all my blanks like that till i got a bandsaw last year (from blister as it goes)

I presume you have sealed the ends and cut surface on those logs he cut down for you ? (otherwise they will split before you have a chance to turn them)

re the bowl - thats not bad for a first go - i have several similar from my early days. - next time you could try to merge the outside of the bowl into the flat of the top in a continuous curve instead of having a line (a small round nosed scraper is good for that)
 
Thats a valiant effort Tom ... nothing wrong with that !
Don't know if t helps.. or if its what people would normally do as a matter of course... I find it helps me to look at the 'blank' for 5 minutes or so, before mounting to the machine.. see if the grain / figuring 'suggests' a shape.

No guarantees that what ends up will be anything like what I started off in the mind with ... but I find that 'sort of' helps sometimes with keeping to a general idea of profile..

HTH.

( Every time I see that Statesman, I drool ! what a lovely machine that thing is 8) 8) 8) )
 
big soft moose":xh09pu9t said:
of course you / he could just knock the corners off with his chainsaw then use either a roughing gouge or a round scraper to turn it down from an octagon. Or (small logs only) bore all the way through with a parting tool with the lathe turning fairly slowly - full face pro is a must if trying this - its a little hairy but i used to do all my blanks like that till i got a bandsaw last year (from blister as it goes)

I presume you have sealed the ends and cut surface on those logs he cut down for you ? (otherwise they will split before you have a chance to turn them)

re the bowl - thats not bad for a first go - i have several similar from my early days. - next time you could try to merge the outside of the bowl into the flat of the top in a continuous curve instead of having a line (a small round nosed scraper is good for that)

I suggest you don't use a Roughing Gouge on any face plate work. They are just a accident waiting to happen. The full and proper name is Spindle Roughing Gouge, I wonder why?

When roughing out face plate work stick with a decent bowl gouge, it will rough out anything for you, safely.

Also when you mount a square cut log half for a bowl, just use a bowl gouge to remove the corners. It is just the same as turning a square edged bowl, just easier as your taking the corners off.

Good luck with your practice!
 
indeed, a bowl gouge is what we started to use. However we where short on time and didn't fancy that sort of a challenge. So we reverted to a much smaller piece of seasoned wood. Which, again, we used a bowl gouge for all the initial cuts and shaping. A TD shaper was used to clean the surfaces and a parting tool used when forming the spiggot/recess.

We could have used the chainsaw to knock the corners off, but as we'd put it away and both of use have physical ailments, we left it.

That log is now sitting on my lathe and if it doesn't crack over night, I'll play with it tomorrow night.
 
TEP":2gpi7j8f said:
I suggest you don't use a Roughing Gouge on any face plate work. They are just a accident waiting to happen. The full and proper name is Spindle Roughing Gouge, I wonder why?

you are right mate - but ive had my big (1.5ins) roughing gouge reground with a swept back grind so it is essentially a giant bowl gouge - I use it quite a lot for roughing down big logs and i'm yet to have any problem - though i do keep the speed quite slow and bring up the tailstock if it looks like additional support is needed.

that said distinctly the easiest way is to zap it circular on the bandsaw - using a jig with a centre pin for the blank to turn on.
 
Hi BSM,

It's not the grind shape that is the problem on roughing gouges on faceplate work. It is the mounting tang in the handle. It is just not designed for any kind of dig/shock that you can get from end grain work. The least that will happen is that the tang bends, the worst is it could snap.

Of course this only happens with a dig in, but it would still be a lot safer using a b****y big bowl gouge :lol: I've never bent one of those.
 
TEP":5ehjsxld said:
Hi BSM,

It's not the grind shape that is the problem on roughing gouges on faceplate work. It is the mounting tang in the handle. It is just not designed for any kind of dig/shock that you can get from end grain work. The least that will happen is that the tang bends, the worst is it could snap.

Of course this only happens with a dig in, but it would still be a lot safer using a b****y big bowl gouge :lol: I've never bent one of those.

cheers tam - i'd not thought of that - though the tang on mine is pretty substantial - , and i supose the swept back grind does distinct reduce the chances of a dig in. Its academic for me these days anyway as since i got the bandsaw thats distinctly my favorite weapon of choice for reducing to the round.

i'll keep an eye out for a 1ins bowl gouge
 
You might have seen this picture before I post it whenever the discussion about using spindle roughing gouges on bowls comes up to show why it isnt a good idea.

john

 
Looking good Tom, seems like the round side is working out for you. Quick question, is it my eyes or is your spalted sycamore actually beech?
 
Ironballs":nqrzzxpg said:
Looking good Tom, seems like the round side is working out for you. Quick question, is it my eyes or is your spalted sycamore actually beech?

Have a look at the first two pics with the bark on. I don't think it's beech.

Pete
 
I'm pretty certain the label said sycamore. Am no expert ;)
 
Bodrighy":lkxmky9r said:
Ironballs":lkxmky9r said:
Looking good Tom, seems like the round side is working out for you. Quick question, is it my eyes or is your spalted sycamore actually beech?

Have a look at the first two pics with the bark on. I don't think it's beech.

Pete

Pete.. maybe I'm reading the O/P wrong ( tom could maybe confirm .. )
Aren't the first two pics ( logs ) a different piece of wood from that the bowl was eventually made from ?
The way I read it,.. the 'logs' were abandoned meantime, and the bowl came from blister's woodpile .. is that the right story ? :)
 
Back
Top