Some comments

UKworkshop.co.uk

Help Support UKworkshop.co.uk:

This site may earn a commission from merchant affiliate links, including eBay, Amazon, and others.

devonwoody

Established Member
Joined
11 Apr 2004
Messages
13,493
Reaction score
25
Location
Paignton Devon
Started up in the workshop the past few days, like clearing the covers and old carpets of machine tables and pleased to say they have come through this winter well.

However, wooden tenon gauge as seized up, I shall bring it indoors to dry out.

I am now starting my fourth season using the same planer/thicknesser blade ( which was sharpened by Ian when he was Dragon saws) . Over those past years the blade did get a nick almost the first week but around the 9" from table edge so not a disaster and I can plane the nick out. The machine is the SIP 01332 model and that must now be seven years old with just one belt replaced. (it does rattle)

Prepared a piece of black walnut yesterday using the newish bandsaw and then used the thicknesser not the planer to clean up, and that will be OK for tissue boxes I hope.

Made a higher MDF fence for the B/Saw one that will hold in place with hand sprung clamps and I will make some wedges in case I get any drift when blade changing in the future. The fence idea came from a link I saw this week on the forum.

Got in mind making a tissue box in the pattern of a chess board (like L.Nibs the other week) but 12mm squares, any tips greatfully received.

Finished off the kitchen spatula stand complete with Asda tools for the daughter, it awaits a varnish when weather warms up. (its minus 2C in Paignton at the moment)

See ya.
 
Hi Woody,

I made a chequer-board table top for a side-table.
I made sure the stock was square and sawed the separate pieces on my table-saw. Then I glued them together in the correct orientation inside a square frame/jig. I took a lot of time to ensure the jig was square. Basic I know, but it pays of being pernickety over this. I cleaned up with a sharp block plane. (My squares were all end-grain) It worked a treat. Maybe you could use the idea for separate pieces that are to form the parts of your boxes. Maybe you do it this way already! If so, pardon my egg-sucking lessons. :D

HTH :)
 
Benchwayze":2h8cwjnl said:
Hi Woody,

I made a chequer-board table top for a side-table.
I made sure the stock was square and sawed the separate pieces on my table-saw. Then I glued them together in the correct orientation inside a square frame/jig. I took a lot of time to ensure the jig was square. Basic I know, but it pays of being pernickety over this. I cleaned up with a sharp block plane. (My squares were all end-grain) It worked a treat. Maybe you could use the idea for separate pieces that are to form the parts of your boxes. Maybe you do it this way already! If so, pardon my egg-sucking lessons. :D

HTH :)


Thanks for your tip, I havent in the past had a preformer apart from my gluing up board which has a 90 degree corner, so I will bear your advice in mind.

In the meantime this morning bugger the frost, I have cut and prepared four 9mm thick boards in maple for a start, although my snoze is dripping.

see ya.
 
Cut 1/2" wide strips and glue together to make a striped board with equal numbers of each colour.
Cut that into 1/2" strips across the stripes, alternate the strips end for end and glue back together for the chequer board effect.

Just lately I have taken to giving surfaces a very light coat of finish before cutting and gluing. This has made glue squeeze out a lot easier to clean up and prevented those annoying little bits of glue that remain invisible right up until the finish goes on.

Order of events
Rough cut to size
Sand
sealing coat of finish (or sanding sealer if you prefer)
Final cutting to size
Glue
Sand even if it goes through the original seal coat
Final finish

hth

Bob
 
devonwoody":3qup0398 said:
Thanks, you do not seal the edges which have glue applied to I assume. :wink:

Indeed not!

If you follow the order of events, then any finish that might of strayed onto the gluing edges will be cut off in the final trim to size
 
Going to attempt to sand as you suggest but I think 12mm wide strips (8mm thick) will not be an easy option.

So 90 minutes of preparation got me to this state this morning, but I have had to put the black walnut into a straight jacket for a day, I can see some stress bowing going on.

The bandsaw fence finished and in operation (100mm high)

bandsaw fence 100mm.jpg


Maple prepared, no problems.

maple prepared.jpg


Plus the black walnut but it has bow stressed.

black walnut under stress.jpg


So put under some pressure for a couple of days.

under pressurew.jpg


see ya.
 

Attachments

  • bandsaw fence 100mm.jpg
    bandsaw fence 100mm.jpg
    85.6 KB
  • maple prepared.jpg
    maple prepared.jpg
    83.3 KB
  • black walnut under stress.jpg
    black walnut under stress.jpg
    84.7 KB
  • under pressurew.jpg
    under pressurew.jpg
    76.5 KB
Thanks Andy.

Started my usual planning process at 03.00 am this morning and now realise I have got to make a constructional plan so that I finish up with a box with the correct internal dimensions and also matching outside pattern etc. The process sent me back to sleep pretty quickly. So it will have to be an afternoon exercise.
 
Had a go at some dimensions and I am thinking of crying off.

See drawing below, because of internal measurements required and matching corners require exact outside dimensions using the 9mm thick boards I have prepared nothing seems to comply?

chessboard box dimensionsw.jpg
 

Attachments

  • chessboard box dimensionsw.jpg
    chessboard box dimensionsw.jpg
    141.3 KB
you need each external dimension to be amultiple of the square size.

if you picked 12mm squares (rather than 1/2")
Then a box 264 x 96 x 144 mm or 22 x 8 x 12 squares should work out

does that help?

Bob
 
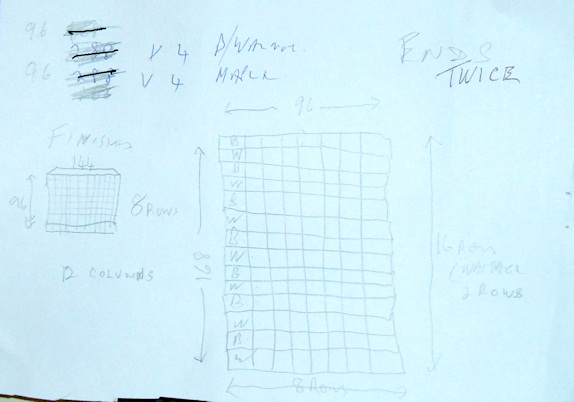
There are going to be towards 600 squares decorating this box.

End plan. sequence.

2012_0318chessboxplan10001w.jpg
 

Attachments

  • 2012_0318chessboxplan10001w.jpg
    2012_0318chessboxplan10001w.jpg
    72.9 KB
it may be close to 200 squares, but you will be assembling them in strips, so will be cutting them a dozen at a time. It will only be a step more than doing some of the striped boxes that you have done in the past.C'mon DW, we all want to see this one now!
 
John, if by going for an allowance for wastage, you are going to partly trim through squares, then the 'squares' on the joints will be come rectangles and look wrong to me.
In this application, total precision is required with the mitres cut exactly in line with the edge of squares.

Are you doing a chequer board top as well? if so you will need to consider the alignment of squares there too.

I have anticipated your next design

Diagonal chequer board patterns!!

Bob
 
9 fingers, I called that a harlequin :wink:

25w harlequin.jpg


I want the wastage so that when I cut the mitre on my tablesaw it will commence exactly on the line edge of a square and should follow down the 8 lines, I Hope.

Ends 12 x 8 = 96 times twice 192 plus wastage.
sides 8 x 22 = 168 times twice 336.

528 plus wastes.

Top bugger that.
 

Attachments

  • 25w harlequin.jpg
    25w harlequin.jpg
    66.8 KB
More panic attacks !

If I am going to have to cut strips over 22 times (for sides) I will lose 3.2mm because of blade, also another row of squares will be lost each time. That totals 66.6mm plus, and my stock boards were not cut with this wastage ever invisaged.

I will see what new timber I can find laying around for this particular box.

perhaps I can take up harmonica playing, I'm sure it would be easier.

http://www.wimp.com/harmonicacarnegie/
 
The black walnut has not recovered from stress, I do seem to have problems when I resaw timber down to 9mm thicknesses, its happened before.

So I will use the BW for short sides on future tissue boxes and try and sort out another dark timber for the chessboard effect at a later stage.

(also been instructed to get cracking in the garden) A cloche tunnel under construction with 2x1s and 4x2s underway at present.
 
Back
Top