simple router lift

UKworkshop.co.uk

Help Support UKworkshop.co.uk:

This site may earn a commission from merchant affiliate links, including eBay, Amazon, and others.

mike s

Established Member
Joined
16 Jan 2011
Messages
354
Reaction score
0
Location
epsom, surrey
hi
i am in the process of making a router table and im considering making a simple router lift like this:
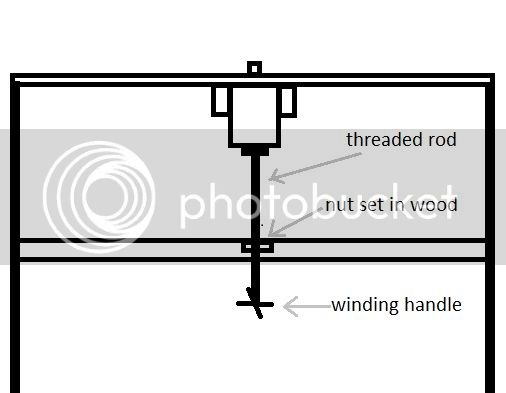
simplerouterlift.jpg


does anyone use a similar set-up?
thanks
 
I would think you need a second support for your threaded rod. As it extends I fear it would skew sideways. Just another board 100 - 150mm above or below should be enough. That assuming you are not attaching the rod to the base of the router in a secure manner.

Mick
 
thanks for the replies
the drawing isn't to scale, the threaded rod would really only be extending about 10cm from the shelf.
i have seen the bottle jack method, but each pump lifts the router quite a substantial amount - no micro adjustment
the scissor jack seems like the best option but the method i have drawn will cost me about £3 opposed to the £10 on machine-mart for the jack
what would be the difference in operation between the method drawn and the scissor jack?
thanks
 
your method will potentially give finer degrees of lift, the thread on a bit of threaded bar is finer than that on a scissor jack I'll bet

you'd be able to adjust the scissor jack from the front of the router cabinet...might be easier
 
im a teenager so crawling around on the floor to adjust the depth is no problem for me so thats not an issue :D
i think i will go with the threaded rod method and see how that works out until a better alternative pops up
thanks
 
mike s":287q4pb8 said:
im a teenager so crawling around on the floor to adjust the depth is no problem for me so thats not an issue :D
i think i will go with the threaded rod method and see how that works out until a better alternative pops up
thanks

for £3 worth of materials, give it a whirl. just make sure that you report back how successful it is!
 
Let us know how it works out. I'm interested wether you will need to lock the router in a position, how easy it is to wind up/down and how accurate.

Al
 
marcros":1bktlw5u said:
mike s":1bktlw5u said:
im a teenager so crawling around on the floor to adjust the depth is no problem for me so thats not an issue :D
i think i will go with the threaded rod method and see how that works out until a better alternative pops up
thanks

for £3 worth of materials, give it a whirl. just make sure that you report back how successful it is!

will do!


beech1948":1bktlw5u said:
Let us know how it works out. I'm interested wether you will need to lock the router in a position, how easy it is to wind up/down and how accurate.

Al

i will lock the router in position every time, doesnt take long and keeps everything rigid


dickm":1bktlw5u said:
Just one caveat - mind you don't close off any ventilation holes in the top (or bottom when it's in the table) of the router.

i will make a small platform attached to the bottom of the router that separates the router and the rod
as-well as ventilation ports, there is a variable speed nob on the bottom that needs to be accessible


thanks for all the replies!
 
I too use a scissor jack. It supports a router by the handles (I was concerned about blocking the air-flow, as a previous poster mentioned). The table is fitted to a 'workmate' style bench.
With the large wheel spokes fitted (see pictures) I find you can make quite fine adjustments without bending down too far - useful when you are trying to match the cutter hight to the workpiece on the table. My router has a built-in fine-height adjuster, which functions when the lock is applied; I find I rarely have to use it (the fine-height adjuster, I mean - I always lock the router).
Here are some images.
lift2_smallimage.jpg
lift1_smallimage.jpg


I'm sure your idea can be made to work, but watch out for blocking the air-flow, and stabilizing the screwed rod.
 

Attachments

  • lift1_smallimage.jpg
    lift1_smallimage.jpg
    145.5 KB
  • lift2_smallimage.jpg
    lift2_smallimage.jpg
    127.1 KB
Back
Top