SCMS laser upgrade

UKworkshop.co.uk

Help Support UKworkshop.co.uk:

This site may earn a commission from merchant affiliate links, including eBay, Amazon, and others.

Dan-K

Established Member
Joined
30 Jan 2010
Messages
148
Reaction score
0
Location
Staplehurst, Kent
I'm not sure if this really counts as a project, but it was fun anyhow :D

olly asked how I got on in tool reviews so I thought I'd post a few pics
Apologies for poor quality - taken on my iphone and my hall is no photo studio :lol:

I bought a Makita LS1013 (fantastic machine), but the price premium for a laser model was rather steep. However, I soon realised that a laser guide would make lining up on the cut line much quicker and easier. I only found two aftermarket laser options - the hub mounted ones that only work when the blade is spinning (I prefer to line up before cutting) and the laserkerf type that seem rather expensive for what they are... time for some DIY!

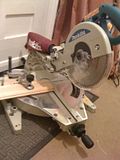
One ordinary looking LS1013...


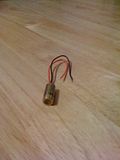
One 1mW laser line module from the Bay (£3.50 delivered). Plus a battery box and some spare wire, a switch and some solder....


Spot the upgrade :p


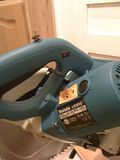
Ok, heres the switch (easy reach for my forefinger)


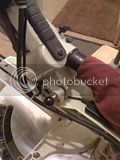
Wire down to the business end, and battery box out back


Lurking in the shadows.... :lol:


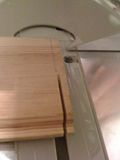
Cutting to pencil line


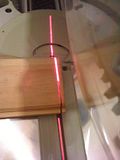
Laser aligned with pencil line - laser line is pretty much exactly the width of the kerf so I can see exactly where the blade will cut


I'm pretty happy with it anyhow :) I have a few improvements in mind so I could adjust alignment of the laser if it goes out of true, but its perfectly serviceable as-is.

Thanks for looking :)
 
Stimulating post!

Do you have a link to the laser vendor on ebay please?

I did a search but could not find one at the price you referred to.

Thanks

Bob
 
That does indeed look promising, nicely done. Most after-market lasers have been known to be temperamental but, you appear to have yours set up well.

Yes, I'd also like a link to the eBay seller's shop, please! :wink:
 
ok i cheated :lol: I actually bought 4 lasers as the postage was the same for 1 or up to 10 i believe. Still looking out for a shark tank tho.... :lol:

so it was 14 quid for the lot. came from a chap called sino13579. took a while to arrive but look reasonable quality.

However I see that 5mW modules are available now for not much more (cheaper if you get the 6 pack :D ). Should give a stronger beam I guess. I don't know if they are any good as its a different seller but if several are interested perhaps someone could buy a few and distribute?
 
Thanks Dan,

I see he is selling singles too -eg item 250603807272 for about £7

Possibly hardly worth the bother of buying a batch and re-posting/arranging payment etc at that price.

Bob
 
Great job. I could only spot the modifications because I know what the factory fit models look like. If anything I think your's is probably better, certainly a more convenient switch position. Out of interest how have you attached the laser to the machine? Have you devized some clever way of adjusting it to line up with the cut?

If you are anything like me though you'll be forgetting to turn the laser off in no time :D
 
So far it has been more of a proof-of-principle project i.e. to confirm that it can be done with a basic laser line module off ebay to the standard of a commercial offering (actually I like my solution better than either of the retro-fit commercial ones :lol: ). And also to give me a functioning laser line without spending weeks on it. As such the actual mounting was a bit of a bodge, being in a difficult to access place and needing to be aligned to shine straight whilst being mounted ... cue hot melt glue gun :oops:

I have plans to make a custom adjustable mounting for the laser on a wooden wedge for revision model 1a .... though I wonder how long my 'temporary' prototype will last! :D As my dad would say: if it ain't broke don't fix it :lol:

I'd be interested to see where the factory-fitted laser is located if you could post a pic?
 
As requested some photos of the factory fitted laser. I'd never really considered how the beam got from the top of the saw to the work piece before so I'm glad I had a look.

It's probably worth pointing out that the factory fitted laser doesn't shine on the cut line, it's about 1mm to the left. That felt like a real design flaw at first but now I'm used to it it's not a problem and probably benificial. I think if the laser shone directly on the cut line it would often be difficult to see exactly where the cut was going to fall due to the glare. To be honest though if I need to make a very accurate cut I don't use the laser, lining up with the teeth gives far more accurate results.

So, the laser shines through the top of the blade cover and down the left side of the blade. I believe you can just see the hole the beam comes though in the third picture.

I can't quite tell where you have your laser at the moment but I'm guessing it's up near the dust extraction. My only concern with placing it there would be the likelyhood of it getting damaged by dust and any little bits of kicked up debris.

Laser housing
scms_laser_1.jpg


Switch
scms_laser_3.jpg


Laser opening
scms_laser_2.jpg
 
Thanks for the pictures, very interesting.

Yes my module is in a recess behind the dust extraction. I'm not too worried about it being damaged as it it is a fully sealed laser unit so is dust-proof, it's tucked away in a recess, and its behind the dust extraction chute so chips etc should be directed up there away from it...if by some chance it does get damaged its only a few quid to replace the module :wink:

I'm surprised at the huge ugly switch - wonder why its so bulky :? I'm sure they could have put that lump elsewhere and just had a neat little switch like mine...

In terms of narrow laser line versus kerf-width one I'm sure I could get used to either. The module just happens to produce a line the same width as my blade so I have exploited that. The main thing for me was being able to switch the line on whilst positioning the wood and before spinning the blade up - I understand the cheap hub-mounted aftermarket units only work with the blade spinning, which was no use to me. And the Laserkerf alternative ain't exactly dirt cheap! :)

The laser line isn't as glaring in reality as the pictures make it seem. I can still see a dark pencil line under it. It may be a little more difficult to see cut lines from marking tools, I haven't tried that yet, but mostly my accuracy/tolerances are loose enough that as long as the marked line has disappeared under the red line somewhere then we're good to go! :lol: As you say, for really accurate work then lining up with the edge of the teeth is the ultimate. I just mostly don't need that level of precision.

Thanks again for the pics - its the big daddy compared to my saw :D
 
Does the laser improve matters for us old 'uns, with eyesight that isn't exactly 20/20?

And please... No cracks about Laser Surgery! :lol:
Regards
John 8)
 
.Hi John
I'd say no because my eyesight is not entirely good in itself,I don't use the laser because the pencil mark disappears within the laser light and the laser light is slightly thicker than the laser line.

I like to think if a machine is fairly accurate then why not be fairly accurate ie If I scribe a line then I want to cut dead on that line. :)
 
The best alignment setup for the CSM was the guy I seen who attached a spy wireless camera to his saw and aligned the blade to the pencil line via looking at a monitor then when he wanted to cut he'd look back at the machine,sure worked a treat but extravagant.
 
I've found the laser to be very useful for carpentry type work (fitting flooring, putting up stud walls etc). You can make a little mark on the edge of a piece, bang in on the saw and get a nice clean 90deg cut. For really accurate work though you need to turn the laser off as it tends to shine too brightly to see a scribed line.

With the laser on I would expect to get a accuracy of about 0.5mm (maybe 1.0mm on a bad day) with the laser off and lining up with the teeth I couldn't say how small the inaccuracy was, <0.5mm though.
 
I just took my laser off to have a look at it.

It would seem that if we were to glue two tiny pieces of plastic or even some tape either side of the light then we could narrow the lights beam by a needle width.

Edited: it would have to be a cap over the brass bezel as we need to align the beams straightness with the pencil line,if we just put tape over the end then the chances are the beam won't align with the pencil line straight.
The cap can then be turned on the laser so that it lines up perfect with the pencil line.

Take some tinkering but thats the way to get the beam thinner.
 
Back
Top