Router Table

UKworkshop.co.uk

Help Support UKworkshop.co.uk:

This site may earn a commission from merchant affiliate links, including eBay, Amazon, and others.

Pip

Established Member
Joined
29 Apr 2004
Messages
199
Reaction score
0
Location
W. Yorks.
About ten years ago I bought a Power Plus router, today I tried to fit it into a Wolfcraft Router table, all seemed o'k but can't get the router bit to poke through the hole in the table.
At the bottom of the plunge bars are black plastic collars to limit the plunge, will it be o'k to remove them? if so, how do I go about it? or must I buy a collet extension which seems to be expensive? as I only want to rout four grooves about 7 inches long, the router was supplied with a 8mm and a 12mm collet
T.I.A.
pip
 
I don't know about the Powerplus router but the only time I have seen such restricting devices on a router plunge was to retain it from plunging during shipping - at least one of my Festool routers had them for that purpose (think it might have been the of1400 but cant be sure) and in which case they should or even must be removed before use. I can see no usefulness of such a device EXCEPT maybe as a safety device if the router had the ability to plunge its collet so far that it would contact your work surface but I doubt it can do that since thats a fairly rare feature in a router (only the Triton routers and a few fixed base routers come to mind) - in which case remove them.

Generally people have to modify or butcher many models of router to get them to function well in a router table - removing springs, base plates etc. Just be sure your router is firmly attached to the plate - and ensure you are using a proper router table insert plate because few routers will plunge deep enough to satisfy if mounted directly under an 18mm table surface. Personally I dont like collet extensions unless they are exceptionally well milled - and even then, even the slightest play in the bearings of the router or the precision of the collet causing some runout (and its Powerplus so I'd expect some) will be greatly amplified by a collet extension - potentially dangerously so.

Its a rarely talked about fact that - by design, or lack of - often bits have to be sneaked a tiny bit further out of the collet than they should be to be used. I have a Trend DC400 dovetail jig, the cutters I use for it are also made by Trend - what irritates me is that when I set the height of the cutter as specified in the instructions I can only do so by slightly exceeding the safe marking limit on the cutter - even when using a Trend router. They make every single part of the setup and you still have to sneak the bit out the collet past the marking on the cutter shaft to follow the instructions and use it.

The truth is though, some of the cheaper or smaller routers just wont plunge deep enough to be much use on a router table. Ideally, wallet permitting, you should get yourself a Triton MOF or TRA router if you can - I think they are better in a table than even the Trend T11 though I doubt they would last as long in professional use.

You could always post a photo of your set up and then people could advise better.
 
Thanks for your reply glynster, looks like I've got an invitation to play! removing springs seems a good idea, won't need them if router is left in table, in fact will make it easier to adjust height.
If all fails I've got a little Bosch to use free hand, not as precise but we'll see
 
8mm and 12mm is a frustrating combination in the UK. We're mostly imperial for router bits (outside the industrial world), 1/4"(6.3mm) 1/2" being the common sizes. You can get a good range of 8mm bits from Wealden, but I've not seen inexpensive 12mm ones, although I don't patronise the big sheds if it's at all avoidable, and certainly don't buy tools there, so B+Q etc. Might keep them..

Regarding the adaptation: if you don't want to dismantle the router completely, check to see if those stockings are loose at both top and bottom. You might remove the baseplate, or failing that cut them off by heating a stanley knife blade on the stove (held in Mole grips!) And then cutting them off radially - no mess, no damage to the bars. The baseplate looks like it's held on in the same way my T11 one is: roll pins through the bottom of the bars (you can see the holes in the edges of the baseplate, in the pictures I've Googled (yellow PP router). These are not designed to come out again, as you can really only push those pins out (and there's nowhere for them to go as the holes are blind). Even if you did, you'd still have to find some new pins to replace them as they're not reusable.

But those stockings are to prevent sawdust gumming up the plunge action, and being upside down in a table, stuff will fall in rather easily. As long as you clean up religiously after each pass (vacuum all round the "top" of the router), it should be OK.

Bear in mind, too, that it was designed to function as-is: it may well be the case that it can't plunge any further anyway, even without the stockings. My first 1/2" router was an earlier PP model and it was frankly a complete pain in the table - hardly any plunge depth, the plunge lock kept slipping (REALLY problematic), the collet and bearings wore very rapidly, and finally the speed control died because of cheap components. And I had to melt the plastics round the trigger (and remove its stupid "safety" interlock) before it would stay switched on (essential in a router table).

I also have two little old Bosch routers (POF 500 &600). They have Swiss motors, and are capable of good work. You can make your own router table for them very quickly and easily:
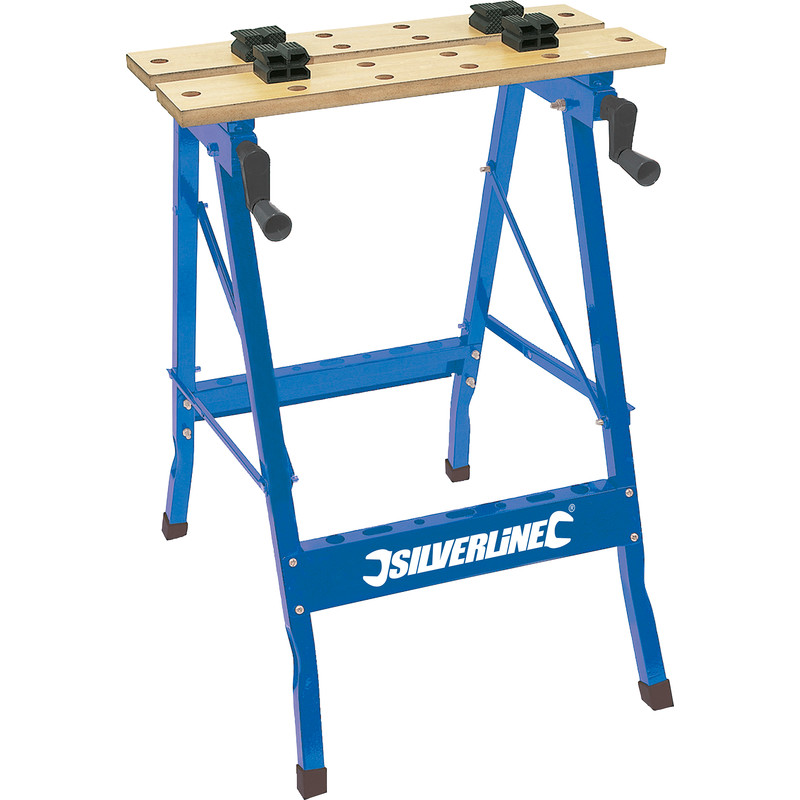
Take one of these:
12739.jpg

... or something like it. Remove the jaws, and replace them with a single slab of MFC from an Ikea shelf or a kitchen cupboard or similar. It doesn't need to be wonderful, just flat, and 1/2" thick or more (mine is 18mm - an old Ikea shelf), and fitting it is the last stage in the process. You do need at least 2" overhang all round when the jaw mechanism is fully open (which is how it should be when you attach the board).

Your PP router most probably uses M4 machine screws (countersunk, threaded full length) to retain the skid plate on the bottom, but the Bosch ones are probably M5. Mark the centre of the board, and fit the router there. Draw round the baseplate once you've fitted it, in case you need to rebate. Countersink the screw holes on the top side a bit generously so nothing catches.

You're done, pretty much. Screw the shelf onto the open, fully wound out legs and framework using the original screws. I'd drill pilot holes to ensure you get max strength fixings. Fit a wide, plungable bit to the router, and carefully plunge it through. Job done!

Fence? Just use a straight length of 3x2 clamped onto the top. It doesn't need to be parallel to anything, as it will always be "parallel" to the cutter (unlike a tablesaw). The accuracy depends on careful movement of the workpiece. If you are doing blind slots, that's called "dropping on", and you do it by taking several passes of increasing depth.

Start really shallow. The actual drop-on is the most likely point to wobble the cut. When slotting there's no "climb cut" involved (one side of the slot is climbed, the other isn't), but the cutter will first contact the wood going sideways, so there is a tendency to pull it off line. No problem if you're expecting it to pull. A really new, sharp, good quality cutter helps enormusly - blunt ones pull at the stock rather than cutting it.

Always experiment on scrap first. To control the length of a slot, I just use wooden blocks clamped to the table alonside the fence - slide gently along until you stop the workpiece against it. Measure carefully, and don't forget to allow for the radius of the cutter in the measurements!

You can scribble on Melamine, use masking tape or even permanent felt pen (but it tends to mark the workpiece) when I've got my experiments right, I mark things, in case something slips. I also use window fitters' plastic packers to get precicse movements of the fence in or out (when rebating particularly).

Regards,

E.

PS: If you feel you need to rebate the MFC piece for the router base, that's easy - you can freehand it, but start right in the middle of the hole and work out to the edges, so the router always has something solid to bear down on.
 
Eric, thanks for your reply, had a short play this a.m. removing the plastic collars didn't make any difference, the plunge bars have threaded ends and are secured to the base plate by screwing in and then locked in position by allen screws, it looks like they have to be unscrewed to remove the springs from the top end.
Have discovered a 1/2 inch collet in the case, so am ordering an extension, which will be used very very carefully (yes, I am chicken), luckily I won't be using it much.
Thanks again
pip
 
You should be OK trying out a collet extension - just go easy with it because by extending the collet length you are of course increasing the leverage on the shaft significantly and thus the force on the bearings etc. If you wanted to be sure then you might try a light pass with a bearing guided edging cutter like a roundover you will soon know if there is excessive runout - likewise, try say a 6mm straight cutter at a shallow depth (2mm) and then measure the resulting cut width - if the channel you have cut is no more than a little over 6mm you're doing OK. Just dont go doing heavy cuts (like with stile and rail cutters or single pass rebates) with a collet extension. Some people would say I am being overly cautious but, despite routers being my passion, I dont ever wish to feel too comfortable using them because I know that that is when they will bite - especially whenever I go "off piste" from the manufacturers intended use.
 
That's exactly how I'd planned to proceed, "Any Doubt, I'm Out" (my new motto)
pete
 
Just a thought: my long screed about a quick DIY router table was because you said you want to do some specific slots.

If they're shallow or narrow, your small Bosch router should be fine. It gets the job done, and that sort of very basic router table is hugely useful - really good return on both cost and effort expended (you do need some clamps too though).

If, however. the real issue is mounting your PowerPlus router to a table, then even with a collet extension you may stand to be disappointed. The problem is the amount of plunge you have (or don't have), much more than being able to change bits above the table.

I'd check that first. to see what you can actually get from the thing as a usable range of cutter height adjustment. This you need for general use.

If the plunge is too little, you may find a collet extension actually makes the shaft too long! If that's the case, don't waste any time on the thing - eBay it (there's evidently a market - see below), and get something sensible!

The other thing with collet extensions is that they put strain on the main bearing, and the normal collet. Router shaft load is asymmetric and the bearing is intended to cope, but on a cheap router it will be cost reduced - the frustration is that the routers with strong bearings are also the ones that usually don't need a collet extension!

There are also good and bad collet extensions - the cheap ones can be dangerous, and the good ones are expensive. There are a number of comparative reviews to be found on the web, and on this forum too.

For a quick one-off job, you might do just as well by running your small router along a batten or the edge of a thick board clamped on top of the workpiece. The only real issue with this is plunging smoothly. the plunge on my little Boschs jams (design flaw), so I get round this by tilting the router into a slot, pivoting on the flat edge of the baseplate. It's not ideal but it works fine if you rehearse it with the motor off.

There are also lots of other ways to do grooves: with hand planes, for example...

E.

PS: The T11 has 80mm of plunge officially, but you can get closer to 90mm by leaving off some of the depth gauge measurement system (unnecessary in a table). That's probably best in class, but you still realistically need about 60mm for general tasks, to allow for fitting cutters while the router is still in the table, and the difference between predominantly end-milling cutters (grooving and rebating) and those that work sideways (usually profilers of various sorts).

FWIW, mine was this model (actually Power Pro, NOT Power Plus, but both came from Screwfix or B+Q I believe):
$_35.JPG

Too light weight for a boat anchor, it's hard to see what it could actually be used for.
I pity the poor sap who paid 20 quid for that one on eBay!
 
Sorry folks, owing to numerous visitors and Hospital appointment will be Tuesday before I can answer,
C.U.L8R
pete
 
Back again folks! fitted a collet extension which sorted the plunge situation, but couldn't get the springs out, so using a length of timber to lever the router to the height and locking body in place, practised a few runs yesterday using 2 cuts to get final depth, worked o'k, just need to find finger boards now, or might have to make some.
Fence on bandsaw is next job, seen one on u tube that's simple enough for even me to make
Thanks for reading, bye for now,
pete
 

Latest posts

Back
Top