Roughing out wet wood

UKworkshop.co.uk

Help Support UKworkshop.co.uk:

This site may earn a commission from merchant affiliate links, including eBay, Amazon, and others.

Rewound

Established Member
Joined
27 Dec 2022
Messages
152
Reaction score
122
Location
UK
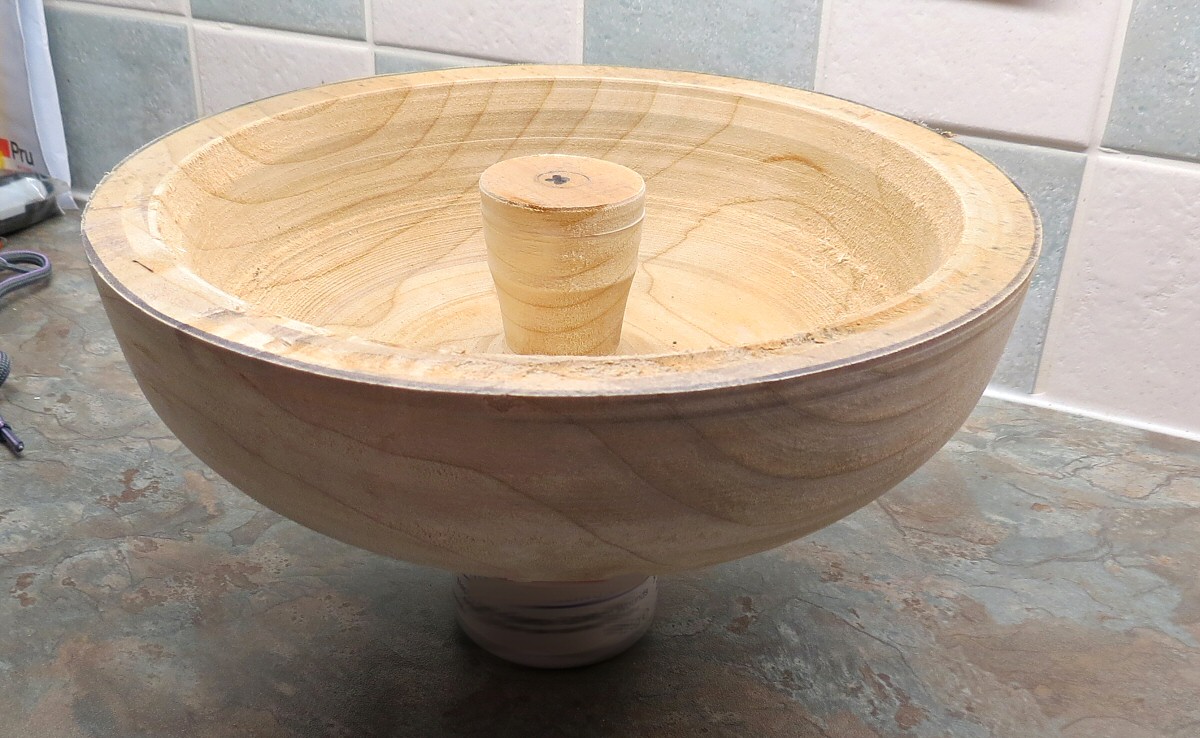
I am roughing out some sycamore from a tree I have just brought down. so its pretty wet.

Any advice on what sort of thickness to take it to, and is leaving a support in the middle worthwhile? On the hidden side I have a tennon for mortice type chuck (sorry don't know the correct name) will this go out of round when drying and become unusable?

xRO-5355.jpg
 
I think the standard is to leave it about an inch thick for every 10inches of diameter, the tenon will also warp so the first thing to do when it's dry would be to put it between centres and true the tenon, then mount it in the chuck and work on the bowl.
 
As above. The standard reply is to leave the thickness 10% of the diameter.
Tenon or spigot is the generally accepted name.
 
I think the standard is to leave it about an inch thick for every 10inches of diameter, the tenon will also warp so the first thing to do when it's dry would be to put it between centres and true the tenon, then mount it in the chuck and work on the bowl.
this is partly the reason I left the stump in the middle so as I could re-true the tennon, but not sure ow that would work, and without the stump, would it be even possible, and how?
 
As above. The standard reply is to leave the thickness 10% of the diameter.
Tenon or spigot is the generally accepted name.
that has been a lucky guess, it has a dia of 224 and I have it down to 20mm thick (9%)


as for drying out, (it is one week since roughing it out) I have kept an off-cut in the house that has went from 703 to 535 (24%) and the bowl that I have kept wrapped n an old tea towel in the outside firewood store has went from 1071 to 971g (9.4%)
I guess I wait until the bowl catches up with the offcut?
(I imagine it will loose 30-35% )
 
Last edited:
As above, and leave the tenon a bit oversize so if it goes oval and shrinks on one axis you can still get it round to fit your chuck.

Plus if its really fresh and wet you need to slow down the initial drying out or it may split, bag or cardboard box with some of the shavings to start with.
 
I've just cut down a maple ( couldn't be avoided ) same "family", but all the leaves were off so can't precisely identify the species. About 60cm diamtre at the roots and 30cm further up at the "top", height around 12 metres, ( 30cms up there, average 50cm ) all trunk ( tree surgeon left the job half done, owner offered me the wood to finish the job ) , I've cut it into logs of 50cm to 80cm for now, will be painting the ends and setting to dry under cover. So am interested in this, probably won't be turning ( no lathe at present ) but will eventually use for sculpture, some burls, not very big ones.Have n't measured moisture content ( will do in the morning ) cut down and transported yesterday.

I was there to cut and collect a lot of oak..much bigger bits 60 to 80 cm diametres total about 10 CM ) , and some parasol and other pine and maples.( about 5CM )

Personally I'd leave the "stump" in the middle, makes it more interesting than yer standard "bowl", give you some scope for some carving or decoration there. likewise around the outside of the rim , on the side below the rim.
 
Last edited:
As above, and leave the tenon a bit oversize so if it goes oval and shrinks on one axis you can still get it round to fit your chuck.

Plus if its really fresh and wet you need to slow down the initial drying out or it may split, bag or cardboard box with some of the shavings to start with.
so wrapping it a n old t-shirt was a wise move. as I understand it, rapid drying out in the beginning is a great danger. When you say put it in a cardboard box with its own shavings, do you mean the wet shavings from the roughing out, or dry shavings from another project?

I have another 7 of these chunks to rough out, so I would like to get this drying out bit right. and really get the whle process right, don't want to find next december I have made a schoolboy error with all of them

I am very new to woodturning so by all means explain in basic ladybird terms.
 
I've just cut down a maple ( couldn't be avoided ) same "family", but all the leaves were off so can't precisely identify the species. About 60cm diamtre at the roots and 30cm further up at the "top", height around 12 metres, ( 30cms up there, average 50cm ) all trunk ( tree surgeon left the job half done, owner offered me the wood to finish the job ) , I've cut it into logs of 50cm to 80cm for now, will be painting the ends and setting to dry under cover. So am interested in this, probably won't be turning ( no lathe at present ) but will eventually use for sculpture, some burls, not very big ones.Have n't measured moisture content ( will do in the morning ) cut down and transported yesterday.

I was there to cut and collect a lot of oak..much bigger bits 60 to 80 cm diametres total about 10 CM ) , and some parasol and other pine and maples.( about 5CM )
I done this last year after storm Arwin, cut out a lot of sizable chunks of Hornbeam, Beech, Oak, painted all the endgrain with bitumen, left them on the garage floor, and most of them split. The few I did rough out last year and allowed to dry slowly only one out of about 8 bits split.
 
Wet shavings..dry ones would ( IMO ) accelerate the drying out. When sculpting "fresh" best is wrap in wet rags and then loosely in a plastic bag.keeping an eye on from time to time, each time of working it , re-wrap and store cool, but not so cool that mould develops. Unless you want spalting.
The turners here ( stig etc ) will know more about storage for turning. .
I've never done the bitumen paint, here I use Lidl's version of hammerite, no splits so far, got some cherry , oak, chestnut, various maples, lime and some yew.
Big stuff worked fresh always splits a bit, hurts the aesthetics less in sculpture than in turning.Then again look at some of stig's split turnings and they work really well.

The only alternative is to store it for years and years, and then do what you can with the resulting air dried logs.

One thing I have found to get large pieces of well dried wood. The blocks that the fairground attractions are stood on when they set up, very old usually exotic hardwood, these days unobtanium due to over logging and hence on CITES lists..Carnies will often give them away or sell them dirt cheap.Same in boat yards, lot of exotic wood blocks used to prop up boats, or as weight in the keels, even the keels themselves, very good dense wood salvageable, negociate. Someone here posted just the other day that they got a mistaken block, timber yard thought was, and sold as oak, was greenheart.
 
Last edited:
idea's on using the microwave for drying......?
seen it somewhere....
try find a cool place here to dry bowl blanks in the summer......hahaha...
average 28-32ºC in the shade all summer thru.....

just cut a load small diameter Olive n Carob.....
left em 20% longer than norm, for the splits then painted the ends with metal type primer / undercoat...always in stock.....
this is old growth Carob cut 4 days ago.....slightly darker now than when first cut.....can be dark pink off the saw....need to paint it today....
IMG_9483.jpeg
 
Timing is critical when processing bowl blanks and once you start processing a tree trunk its best if you can finish the process in one sitting. If you have to stop at any point make sure you seal the endgrain of your logs or blanks.

Cut your logs to desired size, cut them into bowl blanks, rough turn them to 10% of the diameter (do not leave a chunk in the bowl), leave an oversized spiggot. Repeat for all the blanks, and store them in the pile of shavings while you rough out all the bowls. Once done you need to seal the endgrain to slow the drying process and hopefully avoid splitting. There are many different ideas on what you can use to seal the endgrain and you'll see the full range on youtube.
Personally I seal my blanks with lightly diluted PVA, usually two coats and this works very well for me. The rough turned bowls will dry fairly quickly, however, I tend to leave mine or about a year.

Good luck
 

Attachments

  • 4.jpg
    4.jpg
    51.9 KB · Views: 0
  • 5.jpg
    5.jpg
    46.3 KB · Views: 0
  • 6.jpg
    6.jpg
    56.9 KB · Views: 0
  • 7.jpg
    7.jpg
    45.2 KB · Views: 0
  • 8.jpg
    8.jpg
    53 KB · Views: 0
  • 9.jpg
    9.jpg
    40.8 KB · Views: 0
  • 10.jpg
    10.jpg
    52.9 KB · Views: 0
  • PB280126.jpg
    PB280126.jpg
    69.6 KB · Views: 0
Some great advice on the above posts. Personally, I have tried a number of methods over the years including sealing the end grain, packing in shavings etc.... which is basically playing the long game. However, because I wanted a more immediate finished product I used the microwave drying method. Which involved putting the rough turned piece into a microwave, setting power to 80%, then timer set to 60 secs (more or less depending on size of piece), take out check for cracks (if any hairline cracks appear apply CA glue), weigh ( every so often) ' let piece cool down then repeat many many times. The piece will still warp, but thats why you left all that 'meat' on! This method is very quick and if done correctly will achieve excellent results. However, my chosen drying method now is to use a wood kiln (actually a Beko Freezer see various vids on YouTube) I have posted pic's on previous threads about drying wood. With this method you still check for hairline cracks (say twice a day) and apply CA glue accordingly and depending on the wood, ambient temp, size and kiln temperature ( I use 49 deg C) you should have something very dry from 3 to 7 days. The vast majority of hairline cracks will appear in the first 48 hours or so, so you must be vigilant otherwise those cracks can develop into something that would be a lot more work on to rectify.
 
For sealing I'm having success with candle wax and a heat gun, I have around 40 blanks and several lumps still to round off that were cut from an Ash tree in January and so far not a single crack in the stuff I have put wax on, just don't tell the SWMBO, I had to use one of her Joe Malone candles, the maker space smells lovely now 😀
 
this is partly the reason I left the stump in the middle so as I could re-true the tennon, but not sure ow that would work, and without the stump, would it be even possible, and how?
Leave the centre mark in the tenon. As you have a flat rim all you need to do to re-true the tenon is press the bowl against a flat surface, eg a faceplate or disc mounted in the chuck, & use the tailstock in the centre mark.
With an irregular rim you need to make a chuck mounted spigot for the centre of the bowl to press against while using the tailstock in the tenon centre mark. You may need some material between the spigot & the bowl to create friction & prevent marks.
 
Back
Top