practical cap-irons - a question

UKworkshop.co.uk

Help Support UKworkshop.co.uk:

This site may earn a commission from merchant affiliate links, including eBay, Amazon, and others.

nabs

Established Member
Joined
24 Aug 2015
Messages
1,456
Reaction score
16
Location
Herts
having enjoyed the various cap-iron discussions in the past I am continuing to experiment with them to reduce tear out.

As I have said elsewhere although you can learn a lot from trial and error, one of the challenges of picking up skills on your own is that it is hard to be able to tell what is good enough vs good as possible.

So.. I have just smoothed this board for another side table and it has grain that runs in different directions - I have got the cap-iron to have an effect so that the shavings come out straight rather than curled and there is no obvious visible tear-out. However when I run my fingers over the grain that runs vertically in the pic below I can feel the grain, whereas the other bits are smooth. In these circumstances would you continue adjusting the cap-iron or try something else?

PS I took the photo at an angle to the light to better show the grain - it does not look as bad as this in reality, honest :)

PPS I plan to solve this problem with a bit of sandpaper but I am still curious!

SvLb6VkdvoG5RJVY9RgjbpweJuBvPerCggZBjdEykipmvLYtmkgm6DsnVuk
 
I think you will always feel some difference in the grain direction due to the structure of the wood, its like stroking a cat even one with very short fur will still feel better one way., hopefully the finish will fill in any imperfections and smooth it out.

Pete
 
I don't have enough experience of really high end woodworking to judge, but if I had got those lovely boards looking like that I'd be very pleased and be ready for some very light sanding and then a finish.
My understanding of it at a small scale is that the structure of the wood will always be a mixture of solid parts and small voids, so finish is used to fill in the voids. The first coat mostly drains into the voids, the second levels them off, leaving a smooth surface.
 
What you're seeing is normal . You can follow with some really light shavings to see if it will get any more uniform, but you've done a beautiful job thus far. Some of that grain is less dense or oriented right toward the surface, and you can't really change that.

Personally, like said above, I'd try finishing it as is and remove the hairy feeling after a couple of coats of finish so as to retain the wonderful liveliness.
 
A cabinet scraper or two are handy tools to have around for final finishing.

I'm inclined to the view that a few moments scraping is more productive than spending hours fiddling to find the exact cap-iron setting that a particular piece of wood will respond to. By all means get the deep tearout out with a smoothing plane, but pragmatism suggests a scraper or sanding (or both!) for final finish on some boards.
 
How something like this is done from a pragmatists point of view:
* you learn to set the cap iron at a certain distance where you know it's reliable. When you're smoothing and preparing the final surface, you do that once and then you do the following two steps:
1) you set the plane to take a relatively heavy shaving until the bulk of tearout or damage is removed (relatively - i measured this for the first time this week due to a discussion on another board - anyway, relatively heavy seems to me to be about 3 thousandths in something like oak or beech. It doesn't sound like much, but it's a big gain in time to be able to do it at speed without concern of creating any damage. Maybe it's 4 in something like cherry)
2) you back the cut off for a final pass or two (without adjusting the cap iron) and take a thin shaving pass or two to get the surface as nice as possible

You can set the cap closer and closer, but if it was set properly for the first step, anything that defies in step 1 probably won't improve that much if you set the cap closer. The problem at that point isn't the chip lifting, it's the quality of the shearing that's occurring, and that quality will be lowest when the grain is directly in line with the iron itself (e.g., running out to the surface at 45 degrees in a stanley plane).

This talk is complicated, the process is simple. If it takes less time to mash around the surface a bunch and then use a scraper a bunch, too, then something is wrong.

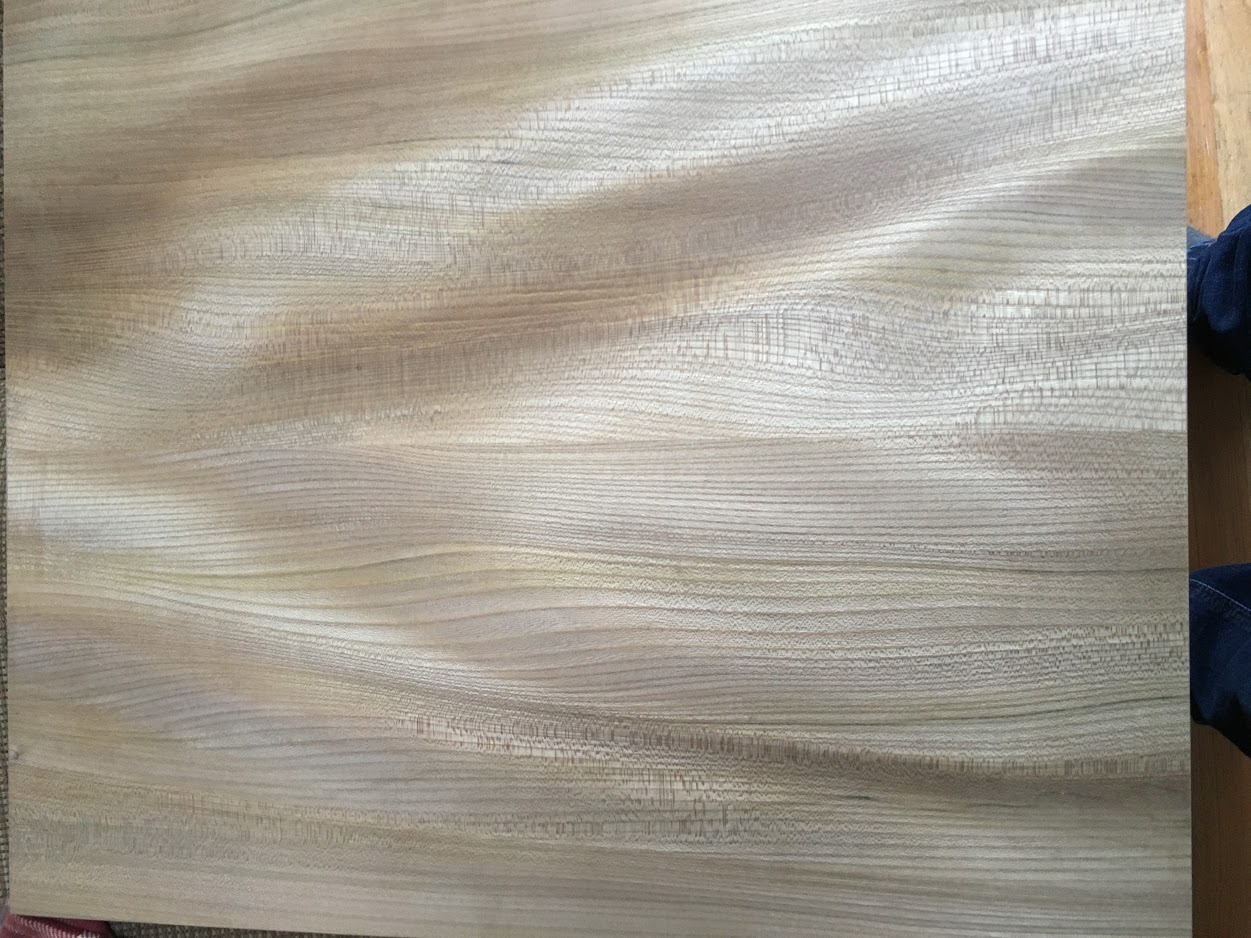
There is one last quality comment I want to take (and I'm assuming that someone will take my suggestion on this at some point, maybe nobody will) - once in a great while, you'll run into a ribboned board where the early wood is so soft and crumbly that it doesn't want to be planed. I've had various lumber guys tell me that's because the wood wasn't dried properly, but it happens. You sand that wood. But there is a further concern with such boards - that surface will absolutely not be durable at all. Stick your fingernail into it, you'll see what I'm talking about. It will wear very unevenly. Sometimes that can be a nice characteristic and sometimes not.

Let's say you have a board and you absolutely have to scrape an area like that, then follow 1 and 2 above, and properly polish a card scraper and do the work with light strokes rather than heavy. Burnish with shavings after, and if you've done a good job, there shouldn't be contrast between planed and scraped surfaces (which is potentially problematic).

Anyway, this should be the *easiest*, and the "pragmatic" move of adding more steps should not be. This whole thing is far more complicated to talk about than do, but keep my suggestion above in mind (and keep an eye on the early wood for crushing or crumbling). My suggestion is one where you want to be - one that you can do the work quickly, without risk, and without additional steps (and also without stopping to take the plane apart and reset the cap. I almost never reset the cap iron. Maybe 3 times in 5 years?).

For five years+, I've used a cap iron a lot and never measured it, but found earlier this week (after using a microscope) that I'm setting around 6 thousandths. That's not important, and it's more intelligent to set the cap iron and notice the chip straightened probably at about half of the set (6 thou gap, 3 thou shaving in harder wood, perhaps 4 in something like cherry). Judge by the shaving and the surface rather than guessing at thousandths. You will get to a point where it "looks" right when you set the cap. I am absolutely sure that my "Standard set" does not differ by more than a thousandth each time. I'd hate to take my iron to the scope to take a set of pictures to confirm that, but I'm sure it's true. How do I know? I could see that I'd set my cap just askew (slightly further at the left than right) when I measured last week. It's not something I'd correct in normal work. The cap set was one thousandth different or so by microscope measurement from one edge to another, and I could see it. That was a response to a different question, but it was interesting to quantify.

If it seems complicated, focus on finding the cap set that needs no measurement and allows you to follow the two steps above except for the most contrary and rare of woods.
 
My 2 bits: forget feeling the surface of bare wood to determine if it's smooth enough, use your eyes primarily. Since wood has an internal structure a surface that IS already good enough for finish application can still feel slightly textural and make you think it's in need of improvement. But the type of finish you plan to use, and how much of it you'll apply, is an important consideration.

If the plan is to just wipe on a few coats of BLO, Danish oil or any other penetrating finish the surface has to be as close to flawless as you can manage. But you can get away with a completely different level (like sanded only to 150, and fresh 150 at that) if you're going to build up a film finish since this easily swamps certain types of texture; only three thin coats of varnish will obscure sanding scratches that would scream at you if the wood were just oiled.

nabs":271qgdzz said:
I have got the cap-iron to have an effect so that the shavings come out straight rather than curled...
This isn't necessary. You can have shavings that are plenty curly or wavy, even wiggly if you know what I mean ("crispy bacon" shavings as they're sometimes called), while leaving a perfectly acceptable surface.

Already said but do remember it's not a requirement to use the surface left by the smoothing plane. It's not an everyday thing at all to be able to plane wood with difficult grain to this level, being able to is a high-end result! There's no shame whatsoever in finishing off with scraping or sanding, in fact it's more common than not. And no less a person than Paul Sellers doesn't even try to finish-plane every surface as he's openly stated many times.
 
All of it really depends on what you're trying to do. A period carver shouldn't sand. If you're making a TV stand or studio furniture, then it probably doesn't matter.

My opinion really doesn't mean much, except I am further down the road than most with the cap iron and have gotten it to the point that it's faster than hand sanders, etc, and learned also to blend in scraped areas with the planing so that I don't have to default to the lowest level of finish for the whole piece (which is a very real issue).

Unless you're doing something as part of fine period work or you have a high paying customer demanding a planed surface, it doesn't really matter. You as the maker, though, that's a different question. What do you enjoy doing? I hate sanding - asthma makes me hate sanding. The idea of turning my 30x30 space into a highly mechanized shop with all kinds of money wasting air removing fixtures doesn't sound attractive at all (plus, it wouldn't allow me to move the car into the shop in the winter from time to time). Planing takes all of those troubles out. Planing quickly means not doing things you hate, and something like a figured large door panel is a matter of a couple of minute to finish plane. No fishhook sanding surprises once you apply finish, etc.

re: the shavings, nabs has actually hit this thing right on the head - the straight shaving is preferable to one that accordions. The latter just means the cap is a touch too close, and you can get a good surface, but under some circumstances, you may not. The former should give you just as good of tearout control, and steps 1 and 2 above can apply (for the very thin shavings, the cap iron doesn't assist - for the shavings of 3 or 4 thosuandths - or even 2 in some cases - it prevents you from unpleasant surprise tearout).

Just as there is a bit of art to this, there's also the same art in a progression of scraping if you have to do more than a little of that, but I'm out for that discussion (I've got plenty of thoughts on it - getting the best surface you can in the shortest time without resorting to sanding and the cabinet of papers and checking and dust that ensues, but I've pretty much blown my forum effort molecules on the cap iron thing).
 
Dave, can you get Abranet where you are? I also hate sanding and don't want to buy a noisy power tool to do it. However, if you can put up with the noise of your vacuum cleaner, the Abranet hand pad on a hose to your vac is entirely dust free, quick and efficient.
The abrasive is fixed to a mesh which attaches to a perforated holder with Velcro. Airflow keeps the abrasive clear and sharp.
More info from a supplier here. I really recommend it.

http://www.axminster.co.uk/mirka-sandin ... sel=953288
 
thanks all for the good advice -- based on the above I gave it a light swipe with sandpaper and started applying the wax-oil.

Andy, it would never of occured to me to use my vac while hand-sanding - what a clever idea. How long do the abraisives last compared to sandpaper?
 
AndyT":3l8at07d said:
Dave, can you get Abranet where you are? I also hate sanding and don't want to buy a noisy power tool to do it. However, if you can put up with the noise of your vacuum cleaner, the Abranet hand pad on a hose to your vac is entirely dust free, quick and efficient.
The abrasive is fixed to a mesh which attaches to a perforated holder with Velcro. Airflow keeps the abrasive clear and sharp.
More info from a supplier here. I really recommend it.

http://www.axminster.co.uk/mirka-sandin ... sel=953288

Yes, we can. We're the US, consumerist pigs, so everyone sells everything here....

I have a local dealer near my parents, brick and mortar, that sells a whole bunch of mirka stuff. I sand fairly rarely, I'll admit, and do have a festool sander for when I do (admittedly, it's pretty good, but it doesn't take a lot to set off my asthma).

Thanks for the suggestion.
 
nabs":2mdncs47 said:
thanks all for the good advice -- based on the above I gave it a light swipe with sandpaper and started applying the wax-oil.

Andy, it would never of occured to me to use my vac while hand-sanding - what a clever idea. How long do the abraisives last compared to sandpaper?

Ages!
I stocked up on an assortment at a show a few years ago and still haven't run out. It's worth reading the reviews on the Axi site, and plenty of other mentions on here. The existence of this stuff is one of the most useful things I have learnt on this forum. :D
 
Is that not just the pores that you are feeling ?
You could definitely call that quilting 8)
I don't know if any of you folks pore fill your stuff, like what's done with instruments
Here's a good example f the luster that can be got with pumice
https://www.youtube.com/watch?v=BbEDj12Gc60

Don't know if french polishing furniture to this level is very sensible though :)
Tom
 
Ttrees":19ityipu said:
Don't know if french polishing furniture to this level is very sensible though :)
If you coat it with polyurethane it is :D

A full shellac finish is actually quite durable on the right kind of piece, after it has had a chance to fully harden, but obviously it remains a "coaster finish" on any table that'll be used for sweaty glasses or mugs of tea.
 
Wandering around David Baron's blog, there is a link to HN Gordon, the Australian plane maker. On that site, there is a short video showing the final cleaning up of one of their wooden planes with an HSS blade, used flat and ground to an 80 degree angle. The blade looks to be around 1 1/4" wide. The claim is that used this way, a smooth final finish is achievable, regardless of grain direction.

This must be similar to Bill Carter's idea of using old chisels, ground to a square edge.

I don't think that HSS is essential, and any wide-bladed old chisel, or machine scraper could be re-purposed. I suppose that an old plane blade could well work, with a handle fixed to it's top side. It is certainly a quick and cheap method to explore, in preference to the dreaded sawdust, and if it works on Australian timbers.
 
This is described in planecraft, also, shooting for an 80 or 90 degree edge. It sounds great, and it does work, but if you have something less than flat or that needs any significant work (or six somethings, like panels for a chest), you will be cursing quickly.

Bills issue is small work (with the chisel, which works wonderfully - even more so straight off of a decent grinder, it so fast on end grain that you can overshoot marks enjoying how well it works on something like cocobolo) such as cleaning up scrolls, etc, but you can get in trouble using it with furniture.

This is another area where a double iron is just better, as the wood has to be quite hard for something like that to leave a really good surface that doesn't need sanding or further scraping. Terry Gordon doesn't like that kind of talk when I've engaged him in discussion, but that's ok.
 
I will be off to the workshop later for a further play, but I don't see why say six panels for a chest would be harder work than sanding. At least you can be sure that you can go right up to a raised edge - or are you comparing with using a plane?

For very small carving work, I have made "chisels" from small round silver steel, hardened and ground to around 80 degrees. Ideal for getting into tight corners where the grain runs the wrong way.
 
Bedrock":1wqkcboi said:
I will be off to the workshop later for a further play, but I don't see why say six panels for a chest would be harder work than sanding. At least you can be sure that you can go right up to a raised edge - or are you comparing with using a plane?

For very small carving work, I have made "chisels" from small round silver steel, hardened and ground to around 80 degrees. Ideal for getting into tight corners where the grain runs the wrong way.

By that, I mean you're making six panels, entirely by hand, and that means any movement after glue up is corrected by hand. Not to mention, if you did hand work to get to that point, hopefully you did something that didn't create a lot of damage, and that left a level surface.

The scraper is a final surface preparation tool (and as he's describing, it works really well. It's sort of like installing a fifth wheel on a car to fix a flat tire, though. If you knew how to deal with the flat tire in the first place (which is much easier than adding a wheel), you'd not have to get to that point.

Once in a great while there's something you can't finish plane with a double iron. I mean once in a great great while, like ribboned/quartered cocobolo or something of the like where the earlywood is really soft and crumbles. Then, you still work to final dimension with the double iron and the tiny bit of issue left in the wood, you can scrape or sand easily.

This is far different than someone working with a wide spiral head planer, who can just run the panels through, sand or scrape them quickly and get the subject chest built before the panels have a day to move. Such a machine is quite nice, but I don't have one.
 
Back
Top