Parting bead groove - how thick is paint?

UKworkshop.co.uk

Help Support UKworkshop.co.uk:

This site may earn a commission from merchant affiliate links, including eBay, Amazon, and others.
Eric The Viking":3dbsfv3m said:
. . I love the look of sashes, but I really don't miss the maintenance of them......
A trad sash isn't going to need much maintenance for the first 50 years or so, as compared to modern stuff which would be replaced several times in the same period, and need maintenance in between.
 
Jacob - I thought that, but I thought you might have come up with another reason I hadn't thought of.
A trad sash isn't going to need much maintenance in the first 50 years or so? The wooden windows around me are often ripped out after 12 or 15 years if they haven't been repainted every 3 or 4, and if you're paying someone else you could have your upvc replaced after that time if needed for what that cost. I could show you a house with immaculate upvc windows that are 35 years old to my knowledge.
 
I'd agree with Jacob, as long as the woodwork is looked after as it should be. But then of course, that is maintainence, I suppose. Major repairs shouldn't be necessary if the woodwork is cared for. Although, we have to allow for modern timber being wetter than a wet thing! :D
 
phil.p":35xtpf1r said:
Jacob - I thought that, but I thought you might have come up with another reason I hadn't thought of.
A trad sash isn't going to need much maintenance in the first 50 years or so? The wooden windows around me are often ripped out after 12 or 15 years if they haven't been repainted every 3 or 4, and if you're paying someone else you could have your upvc replaced after that time if needed for what that cost. I could show you a house with immaculate upvc windows that are 35 years old to my knowledge.
Modern paints are sh|t without exception. Old joinery lasts because they used linseed oil paints. As soon as this is removed the remaining life span is reduced to just a few years and plastic becomes an option.
Luckily linseed paints are available - "Allback" and other brands.
There's also the problem of design detailing (which is a bit of a lost art) and a pointless tendency to use hardwoods
 
This has turned into a lively topic!!

Jacob - interesting to hear about the "trad" view. I'm fully aware you have spent your working life doing this sort of stuff and I'm a hobbiest with a totally different career but.... You have said that a properly constructed sliding sash is very well draught-proofed without any seals, and then you go on to say that I definitely shouldn't put seals under the bottom rail or between the meeting rails as these would prevent the condensation from draining. Surely these two statements are totally contradictory?? If condensation can drain then cold air can enter....?

I remember reading a post by you previously where you write about "passive dehumidification" as the warm moist air condenses and drains out. Surely that has to be replaced by cold air from outside though. It is interesting to consider whether the modern building regs insistence on air tightness is just not relevant for old buildings, but heating is expensive and isn't getting any cheaper!

With regard to paints and timber type, I spent a while looking at the linseed oil paints having read your previous posts, but came to the conclusion that they are just not mainstream enough for me and there must be a reason for the poor uptake. I'm also using sapele! We have a local joinery firm that is very highly thought of and they use sapele and modern paints so I have followed their lead. They have been in the game 30 years and aren't having any problems. They have told me that they sometimes replace other people's 5-10 year old softwood sliding sashes which are totally rotten. I suspect that there must be a combination of poor construction or painting and a lack of maintenance.

Horses for courses I guess and it's interesting to hear some different view points - that's the point of a forum!!
 
mikefab":12x2wlu0 said:
...t.... You have said that a properly constructed sliding sash is very well draught-proofed without any seals, and then you go on to say that I definitely shouldn't put seals under the bottom rail or between the meeting rails as these would prevent the condensation from draining. Surely these two statements are totally contradictory?? If condensation can drain then cold air can enter....?
100% draughtproofing and everybody suffocates. Building regs require permanent ventilation - the meeting rail gaps in a sash are just about enough for most purposes
...... linseed oil paints ..... there must be a reason for the poor uptake. ...
Not poor uptake in Britain until about 60 years ago. Nor in Scandinavia where the weather is more extreme and good paints are essential. But yes there are reasons; slightly slower drying, small range of dull (but trendy) colours, non glossy finish.
 
I have been renovating some Victorian sash windows (it's amazing what neglect they can withstand over the years).

This is what I have been doing, some of which may be helpful to the OP’s project:
1. Remove staff beads, sliding sashes, parting beads, pocket pieces, cords and weights
2. Remove box frame
3. Disassemble box frame and strip paint (the disassembly is necessary to allow routing of a new groove for the new parting bead channel as described below, but also makes the whole overhaul easier)
4. Repair/splice in any rotten sections in the box frame components
5. Overhaul sashes (extent of work here depends on condition of sash frames, glazing putty, old paint etc) – I have found that where necessary, it is quite easy to take the frame apart by extracting the old wedges, splice in any required new wood and reglue the sash (they won’t come apart so easily when someone wants to overhaul them in another 130 years’ time though…)
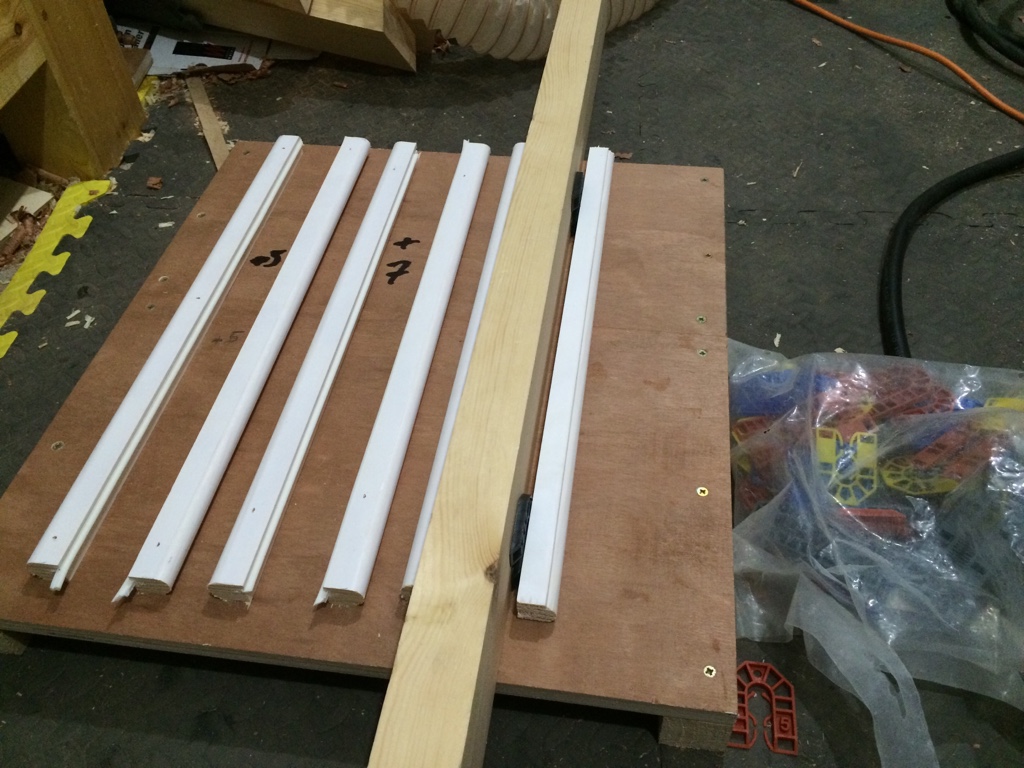
6. The seal system I have used is the Reddiseals sofseal bubble seal positioned as follows:
- In the parting bead – I use new Reddiseals 8mm parting bead with seal carrier. The parting bead is a push fit into a plastic channel (Reddiseals) for which a new groove is routed in the pulley lining (including the pocket piece). I cut the parting bead in two, with the join behind the meeting rail point, so that the seal is facing the closed sash only – not only does this avoid you seeing the seal when the sashes are closed, it also progressively reduces the friction as you open each sash. As the plastic channel is 10mm, this allows you to position the new parting bead as required having regard to the clearance required for the new seals (the OP’s suggested allowance of 2mm clearance for the seal sounds OK, but I did a little mockup with some samples that Reddiseals happily provide (I think I may have allowed a little more, but am writing this from memory – you don't want to squash the seal more than you need to, it will just add friction)
- In the staff bead, again only so far as necessary to seal against the three sides of the lower sash. I have been reusing the old staff beads as they are non-standard sizes, and I plane the width to fit, again having regard to the clearance required for the seal. Reddiseals sell various staff beads with the seal carrier already fitted.
7. I use Flexislide seal for the meeting rail.
8. Remake the box frame, ensuring the pocket pieces fit nicely and the wagtails waggle as required (a small refinement I have introduced is to sink a nut on the back of the pocket piece, with a hole drilled through the bottom of the parting bead channel so that I can insert a bolt to pull out the pocket piece for future access without the usual chisel etc damage to the lining).
9. Service the pulleys (usually involves dipping in caustic to strip layers of old paint – then I leave the brass unpainted and finally fix with stainless steel screws
10. Rout the groove for the seal in the outward faces of the staff beads. Check the staff beads for fit, lengthwise. I insert turned pattern screw cups pressed flush into the staff bead, for final fitting, where I use flat head countersunk stainless steel screws which look neat and unobtrusive.
11. Spray paint the assembled box frame with the parting bead slotted in the channel (I insert a slip of timber in the seal carrier to mask the channel.
12. Spray paint the two sashes (I do this pre and post glazing).
13. Spray paint the staff beads (again I insert timber slips in the seal carriers).
14. Reinstall the box frame, new cords (I like the red flecked cord from Reddiseals), sashes and beads.

For future repainting, it should be a simple job to take out the sashes, paint them and the box frame separately and refit the sashes.

Reading the OP’s points, the only thing I would question is whether you really need the flexislides on the sides of the sash. Also, I am not sure about the ‘P’ seal – I suppose my method involves only one roll of seal.

Just read the above and it may seem like an advert for Reddiseals…I have no connection, but their range is good.

Hope that helps

Cheers
 
Thanks scholar, that's really useful. Thanks for sharing your workflow. I hadn't realised that the sofseal bubble seal could be pushed in rather than slid in. That makes a big difference to the plan for painting. I guess having your PB in a plastic channel means that it is easy to remove after painting. Is that why you don't paint the SB in place on the frame?

Jacob - I take your point about ventilation! The likes of Mumford and Wood etc all show trickle vents on their windows to compensate for all the seals! I suppose that a trickle vent can be closed though...

Cheers
 
I forgot to say - the air tightness test is not about ventilation it's about insulation. The point being that if you have sheets of Kingspan all over the place behind plaster board all joints have to be well sealed otherwise the insulation can be bypassed by cold air and be totally inneffective. I've seen this in several places - one had icy cold air coming through the electric socket holes - doesn't sound much but on a cold winters day it's bad news. Another had a gap between plaster board and insulation in a roof but the gap was open at each end near the eaves and the wind could blow straight through behind the plaster.
We've got "leaky" windows here in a heavily insulated (and fairly well sealed) building but they seem to leak just enough for comfort and a reasonable rate of air exchange. If they were sealed there'd have to be vents somewhere else or you'd simply have to open the windows more often.
The leaky sash rail does 2 things; trickle ventilates and also drains off condensation, no further installations (or dehumidifiers) required!
 
mikefab":4sxnd682 said:
I hadn't realised that the sofseal bubble seal could be pushed in rather than slid in. That makes a big difference to the plan for painting. I guess having your PB in a plastic channel means that it is easy to remove after painting. Is that why you don't paint the SB in place on the frame?

The bubble seal can sometimes be slid in, but it is often too thick to do this, meaning that it is easier to insert it at an angle from side to side (if that makes sense).

Regarding painting the PB, I did seal the bit that sits in the channel, using some old preservative sealer I had; if you painted that bit, it would not go into the channel easily - it is a good fit without paint (back to your initial question about ho thick is paint...).
Regarding painting the SB, yes you want to paint it before fitting as you want it to be removable in the future (at least I did) without having to scrape off loads of paint.

I would offer some pics, but I am away for a couple of weeks.

mikefab":4sxnd682 said:
Jacob - I take your point about ventilation! The likes of Mumford and Wood etc all show trickle vents on their windows to compensate for all the seals! I suppose that a trickle vent can be closed though...

I agree you should not hermetically seal these [any?] windows - trickle vents are unsightly, get clogged up and people don't know how to use them. Whilst I said I have used the Flexislide on the meeting rails, in fact I have left these out for the time being as i wanted to see how the ventilation fares without them - it depends a bit on the fit of the particular sashes, but I will probably live without the seal here. Another variation is that some sahs windows have a parting bead at the head - mine don't as I think was common (and better-looking). This does not provide much ventilation gap though - unless your window is badly fitting, which of course mine are not (now!).

cheers
 
I agree with Jacob's observations that coincided with my last post.

(Actually, I think the issue with needing air tightness around the insulation is the need for water vapour tightness to avoid a build up of interstitial damp, but the main point Jacob makes regarding the need for ventilation in any living space is right).

Regarding wood and paint, I am in the middle of making some large garage doors, using Accoya. So far I am very impressed with its workability etc and it seems very stable. I will probably use it for any new windows and doors I do. The only limiting factor I have found is that you have to use PU glue which takes a bit of getting used to (if you are a Cascamite devotee).

Paintwise, the advice I have had is to seal all end grain with Teknos end-grain sealer, prime with Zinsser 123 Plus, then coat with Sikkens paint (I am using the Satura which gives a satin finish).

cheers
 
scholar":2itb7ul4 said:
....
(Actually, I think the issue with needing air tightness around the insulation is the need for water vapour tightness to avoid a build up of interstitial damp,
Both, but ideally the insulation should be tested before the plasterboard goes up. All ours had gaps filled with spray foam, was sealed around the edge of each panel (between studs) with mastic and all joints staggered and taped
Paintwise, the advice I have had is to seal all end grain with Teknos end-grain sealer, prime with Zinsser 123 Plus, then coat with Sikkens paint (I am using the Satura which gives a satin finish).

cheers
I know nothing of these paints but there's that ring of pseudo science about it somehow.
Brings to mind chats about PMT 111 steel versus cryogenically powdered kryptonite, micro bevels, grit sizes in microns etc etc :roll:
I've had specs in the best where someone has simply copied stuff from data sheets and specified paint thicknesses in microns, and other ludicrous details. I've had to ask them to confirm that it'd be alright to slap it on with a brush.
 
mikefab":35nurumn said:
Robin, thanks for the useful tips. Particularly about not profiling the top sash meeting rail - I had to read that twice then the penny dropped!

I have already got various seals following phone advice from reddiseals. Sofseal bubble seal for the beads, and sofseal P for the top/bottom of the sashes, inside of the outside casing and the meeting rails (which will have a strip planted on to overlap its opposite number and hide the seal).

The bubble seal wouldn't have worked easily for the outside case as it has to be slid into a track and therefore couldn't be installed or replaced post-assembly while the sofseal P is just pushed into a groove (as is aquamac 21 I see) so this will be easier for that location.

In terms of gaps I am going for the middle of the specifications ie sofseal bubble says seals a gap of 1.5-2.5mm so I am allowing 2mm per seal. The sofseal P spec is 2-5mm gap so I am allowing 3mm per seal. I was going to recesss the flexislides into 2mm grooves in the sash stiles then allow a 2.5 mm clearance per side.

Does that all sound sensible?

Thanks

I havent tried the bubble seal for the PB, so cant advise on gap needed, although my experience of seals generally is that it is surprising how much resistance they exert when applied all around a sash. I would experiment by grooving out a length of wood for parting bead and try a length of sash section and see how it slides or even screw some sash section to a board and mock up a whole window. Slightly too tight and your sashes will be very stiff!

The bottom sash is less of a concern as the position of the staff bead can be set to suit.

I have always fitted seals to PB, outer casing as well as edges of sash. This achieves a very smooth running sash, no racking, no paint rubbing.

I have always chosen the reddifin brush seal for sliding applications. I know the sofseal is popular but it seems mechanically a product designed for compression applications not sliding.
 
Thanks RobinBHM. Wise words about the mock-up. I had been meaning to do this and then decided to rely on the specs, but I know it makes sense really!
 
There is a lot of hype about paint finishes but little is ever mentioned about the design and detailing of timber joinery which is probably as or more important than the paint itself.

There is some information here

https://www.teknosonline.co.uk/product-manufacturers/

Its the guide to design and installation of factory finished joinery.

A couple of key points are:
3mm radius to external edges. A paint film doesnt have any build at a sharp edge so there is a virtual break in the paint film at this point increasing risk of premature failure

Problem with butt joints, for eg the face of a sash has 4 joints. What usually happens is the expansion of the sash rails eventually cracks the paint at the joint line, moisture gets in and paint will peel. The solution is a Vee joint which can be filled with a flexible filler.

A lot of joinery companies use Sapele, it is a close grained hardwood and not bad to machine. Ive always preferred iroko, same price but very durable, although needs some experience to machine. Currently I use iroko for framework and accoya for sashes. Douglas fir is a good choice but watch out for resin pockets.
 
My mother had a house built with iroko doors, windows, floors, skirtings and stairs. The meeting rails bowed and twisted, if we were lucky they both went the same way, if not they either clashed or else a gale could blow straight through them.
 
Well I've nailed some 500mm lengths of staff bead to a board with various gaps in between. I used a piece of approx 100x50 timber as my stile and used some plastic shims to set the spacing before nailing the bead in place and inserting the seal.
3e2c605d7674cb753390648ab02f1783.jpg

The original plan was for 2mm each side for the bubble seal, but I started with a 5mm shim (I.e. 2.5 each side). This was actually quite tight and the resistance was appreciable particularly when horizontal. Of course it might be with a 20kg sash and the weights that resistance wouldn't be noticed but it seemed a bit tight to me. 7mm was too loose, the "stile" was almost wobbling around. 6mm (3mm per seal) seemed to be the answer.

So thanks for prompting me to test this, it was worth it, they would have been way too tight with 2mm.
 
Back
Top