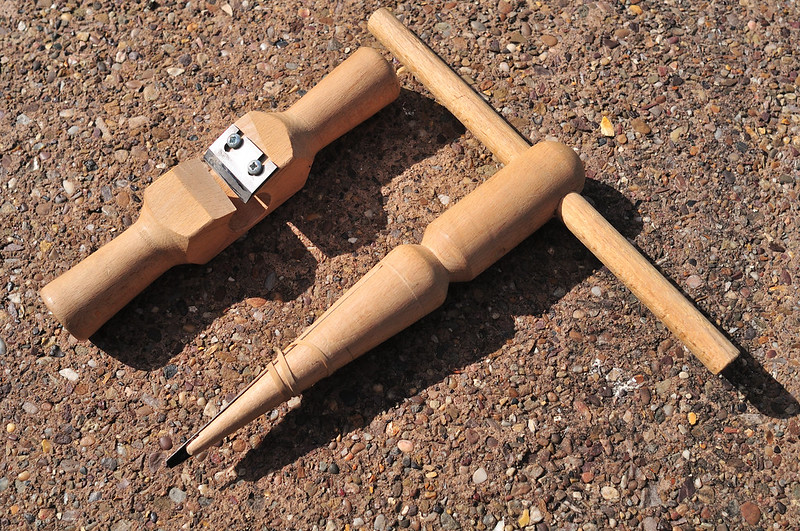
New saw bench with tapered reamer action.

UKworkshop.co.uk

Help Support UKworkshop.co.uk:

This site may earn a commission from merchant affiliate links, including eBay, Amazon, and others.

nabs

Established Member
Joined
24 Aug 2015
Messages
1,456
Reaction score
19
Location
Herts
following the spectacular success of my first saw bench build (see projects section) I am making another one!

This time I will be needing a tapered reamer and tenon cutter, which I will endeavor to make. I have some questions about how to make the tools, so please chip in with info and enjoy the forthcoming ineptitude.

I am following this report by Jennie Alexander:

http://www.greenwoodworking.com/SawStee ... eamerPlans

I dug out an old keyhole saw and it is happily the recommended taper of 6 degrees - according to Jennie there is no disadvantage to leaving the tooth edge, but I ground the toothed side flat anyway.

For the body of the tool I am using half of an oak baluster, the other of half of which I used to make some winding sticks. As per the pics below I have, after a fashion, created a roughly conical shape. I did this by ripping the baluster to 1 1/8'' and then using a plane to create the appropriate taper on 4 sides. I then planed off the arrises to create an octagon and finally used a block plane to refine the shape. It is not very precise but I am hoping this will not matter because it will ultimately be the saw blade that shapes the hole.

Cock-up #1 was that I cut the tool to length having created the initial 4 sided taper so the narrowest end was 3/8'', forgetting that as I planed more facets the thin end got thinner, the result being that the tool will now be only 11'' long (rather than the 16'' I was aiming for). Is this a reason to start again?

Question 2 - is there a better way to hold the work piece when shaping the taper? (c.f my heath robinson set up with hand screw)

Question 3 - any tips on how to mark out and cut the kerf to receive the saw blade?

cheers
kir7SmZdxhSM9XBLHwMUKd1WaLSiFRVLpXht4wGFh1CrR28_xwr07Q
 
Nice!

I have a suspicion that the answer to your question about cutting the kerf might be to do it while the wood is still square. :?

That would also provide an answer to your question about starting again...

However, this is just my guesswork. I'm pretty sure Pete Maddex has actually made one of these, so hang on till he posts for a proper answer. :)
 
Hi

I turned mine on the lathe and used my band saw to cut the slot, I just drew a middleish line and followed that.

It looks like you have enough of a square at the top to find the middle and draw a line to the tip, do that on both sides and saw down which ever way you have to hand.

You will need to cut one side of the slot to clear the shavings, even then they tend to get choked.

Are you making a tapered cutter for the legs?

Pete
 
I wouldn't have though keyhole saws were hard enough to be any use - all the ones I've used in the (very distant) past seemed to have been made of aluminium, they were so soft.
 
My blade was from an old carpenters square, it was far too rusty to use and had a Ebony stock.
They seem to be about the same hardness as saw blades, and mine works fine.

A V block would have helped you with plaining down, a long one is useful for rounding legs etc.

Pete
 
Hi, I have made two, the first one split, the second works just fine.

I think cutting the slot for the blade before tapering could result in a weird, un-even, taper. Especially at the thin end.

Question - 2.
Luckily I have a high vice, about elbow height.
A block of wood in the vice protruding about 1/8", 3mm or so, provides an excellent end stop for the taper.
The 'fat' end can be held in one hand with the block plane in the other.
The circularity? can easily be checked with washers, but as you say probably not necessary.

Question - 3.
This has a lot of answers, possibly all a bit tricky.
My solution was to trap the ends, one at a time, between wood of about the same thickness and mark a point on the taper half way across the gap/taper.
Draw a line against a straight edge the length of the taper.
Find two washers, or purpose cut holes, and mark diameters across them, probably before drilling.
Slide the washer onto the tapered stock and having aligned the mark, of the diameter, on the line made above the other diameter mark will be exactly opposite.
Grab the 'fat' end of the stock in the vice and, I used a hand saw, make a starting cut with the best side of the saw blade on the line above.
Do the same on the other side of the stock.
Jion the cuts in the ususal way. The saw cut will be skew to the plane joining the two marked lines, but will be across the centre of the stock.

My blade was a hard point saw. As Pete says the reamers tend to clog, fortunately they are easy to unclogg.

As a matter of interest I recon that a steel tapered reamer could be made from angle section. It doesn't need to be round in section, if the angled iron is 'square'
and the cutting edges are on the diameter. For me the difficult bit would be attaching a handle.
Still the one I have works very well on the few occaisions that I need to use it so I will probably not atempt a steel reamer.

Have fun, xy

Sorry if the width of this post is too great, the editor seems to have lost the ability to word wrap, or is it me?
 
Watching with interest :) I must confess, I was thinking about taking the easy route and buying a Veritas reamer.
 
thanks all

xy I did finish shaping the reamer holding it by hand, but it did not occur to me to use the vice to create an end stop (doh!).

In the end it was straightforward to mark the slot, per Pete there was enough left at the square end to mark the midpoint after which I clamped the square end to the bench and used a small block of wood (cut to the right height) as a mini movable fence to rest my pencil on.

I used this cheapo irwin japanese saw to cut the kerf and it was easy to keep it on track so long as I changed sides regularly (these little flexible saws are are brilliant - i am constantly finding things I could not do without it!)

I widened the kerf with a panel saw and the blade now fits. I'll fit the the handle tomorrow and see if I can get it to work!

Nick
PS the saw is steel - seems a bit harder than normal (unhardened) saw steel but it was possible to use a file on it.

PPS yes Pete I am going to try and make a tenon cutter - I suspect it won't look as good as yours!

PPS xy the problem you had with the editor happens when annoying people (like me) link to large photos on external sites - the editor does not know how to resize the image and stretches the window to fit them, thus resulting in your text disappearing off the screen in an irritating fashion

lZgmWZVVmgCM8iRqCtx-T180oaaaOBR6st3Hk10r1lg60ounz6HD4g
 
Nabs, from here it looks as if you it all cracked.
My reamer, and tenoner, look very much like Pete's. Not as artistically finished but basically the same. The only significant difference is in the tenoner. Mine has the blade bevel down, don't ask why it just felt right. As I don't have heat treatment facilities I use a standard 2" plane blade. The fact that the kit doesn't get used often means I can borrow a blade now and again. The blade is held to its body with a 1/2" coach bolt, cup square these days, with wing nut.
There is another thread about favourite shop made tools, using these two gives a real sense of pleasure. I'm not sure if is self satisfaction or delight in a well made 'simple' joint.
xy
 
... cont.

the blade is pretty hard and I could not get the burr to curl over with my 'burnisher' (a pin punch), so in the end I just filed and honed the edges at 45 degrees. It did work, but I think the dusty shavings that resulted indicate I have a bit of work to do on the sharpening side.

More seriously, I did a bit more browsing on the web at other people's efforts in addition to Pete's above, and it was clear I was never going to be able to hold my head up high in reaming circles with this tiddly effort, so mark II is underway and I hope will go some way to restoring the blow to my masculinity caused by mark I.

xy - I am planning to use a plane iron in my cutter too.

cheers!
VUVIXDE2d3gboRXGlqfAUYMes03vVr2DYI8bR_gW4bqgpS0Y0xaC9A


VaEjewUdq7E1lqjqlYmICMrAzxS-EkmZsP_cjyRJZzxwc40WUKXKwg
 
I finished the mark II reamer over the weekend - it took a while, but the majority of the time was taken trying to find my el-cheapo Irwin japanese saw with which to cut the slot for the blade. I turned the shed upside down trying to find it, only to discover it on the very shelf that I always put it on, but mysteriously the handle was now black whereas I am certain it was bright blue when I started looking for it!

I also had a go at a prototype 'taper plane' - there seem to be two options: create a handled version, ala Pete above, or make what is in effect a large desk-bound pencil sharpener. I chose the latter, and the basic idea is simple - drill a hole in a bock of wood (I used a 3/4'' drill) and use your reamer to taper the hole, then plane down to the top of the hole to expose what will effectively become the mouth of the plane.

I temporarily affixed a plane iron, but did not have much time to experiment as the unseasonably warm weather in the UK had created a temperature in my small shed that was close to the point where paper spontaneously combusts so I had to retreat indoors. Initial results were not promising - if I raise the rear of the blade slightly it cuts but a small shoulder at the fat end of the taper quickly gets created and prevents me from moving the wood forward into the tool. Twisting the blade slightly so it cuts into the shoulder created awful tear-out. Any tips on how to set-up this type of tenon cutter properly?

nabs
PS I made the cutter form a bit of fence post - is it pine? If so, is that hard enough for the mark II version?

phxshnFeUWMdKSFyBsI7dF2fOpgjpla8cLVnCXrPKjjRV-Fhb9bezQ


FuRom72WAcH2f43OEE1HYOIJ9xYcRSGQ5udI9z2D9yHXViaA0c7nDQ


to1G5zJOfedZz4RFrgU8C966sVGtl4AqKE9TcANmNByiVkNOpA8V1w
 
Judging from a commercial rounding plane in my possession, I think you need some camber on the blade. That should avoid the "shoulder" problem and let the iron cut sideways as well as ahead.
 
Mine cuts on the far end on the taper first and will leave a shoulder on the fat end of the leg if you go too far.
It might be that you are starting with a too big piece or the hole you reamed is too small, the rounding plane will only do a section the same width as the blade.

Pete
 
thanks all - I got my first effort to work after a fashion (putting a camber on one side of the blade helped - thanks Andy), but I managed to muck it up while making 'fine adjustments' so it no longer cuts. There does seem to be an optimum point where the iron meets the the top of the taper which I will have to experiment with. It is one of those things that would be a lot easier if I had a working one to compare with!

I made another one and on first try out it seems to be worse than v1, but I did manage to devise an effective way to hold the iron in place at least.

PS point taken about starting with a reasonably closely sized taper - i had naively assumed I could bung in a square bit of wood and use it like a giant pencil sharpener, but I suspect that -even when properly set up - they can only really be used to clean-up and refine a taper that is close to a fit already.
GxsP2JsOP3fE7fhhJ093tjv6w41UeKcK7Gzkj8v7UdiC5FKAMX0cQl4H2tsIujoADPBdZmIh0FfoTw82Mi_WuGoeRE236GU8kWVcwUgE6M3-5_VpySo3Ofr2-t8VzP34FJSA_bE

JvY6M03PYg0Hncwr2mJFUgA-7MOipUuIeEKxBtpRlrPpwS6aljpeYuGwxmRyjo48N80-8FKXM14AZGH7Q_xwG-M_2nnHKPsUlqf4fCCndyOfz1EGxUSM_jUuI0Okyuh7pVZjwwQ

dJCP33KKvb1hyYI4MCPhhKUGLmwx5ZVRYchmrBsAfu73Xg4hJcSrX1-8Sb10GCV9sx_CR5_oCnGE_UHl3ovwh2cVwQIlcrYlysCQtk_KhmepLtfvEfcvkMa0llhMa3hF4SweQ6E
 
I got fed up trying to get the giant pencil sharpener to work - I will have a go at the more traditional bevel-down design in the pics Andy shared at some point, but for now this project is on hold as I need to use the spare scaffold board for my new bench! Read all about it here:
english-workbench-build-t106594.html
 
Back
Top