New kitchen project

UKworkshop.co.uk

Help Support UKworkshop.co.uk:

This site may earn a commission from merchant affiliate links, including eBay, Amazon, and others.
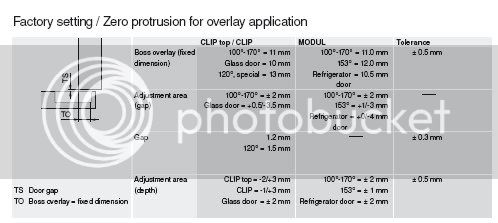
The wall plates are usually 6mm total depth so you need at least that. But if you put your groove 6mm in from the back edge thats a bit weak and there is a risk of the MFC breaking away.

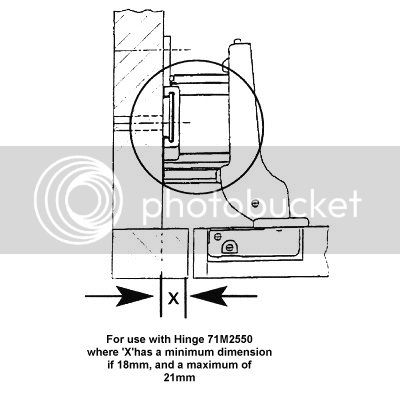
I usually put the inner face of the back panel 18mm in from the back edge if using white faced hardboard or 8mm MFC. If using a thicker back then about 28mm works OK on an 18mm board.

Jason
 
is the position of the wall plates critical - i guess you measure the inside dimensions of the back and fix the plates with this distance between them - but this doesn`t allow for much movement of the of the wall cabinet if you don`t get it quite right - perhaps i am worryîng about nothing! thanks for your responses
 
Hi Guys,
Does anybody know where i can source some concealed 35mm cup hinges for face frames? I have tried the hinge that Isaac Lord have but i don't like the gap it leaves on the hinge side of the door (about 1/4 inch) - this hinge fits to the front face of the face frame and i know that Blum do a side-mounted version, but i can't find a supplier -

Cheers,

Sean
 
sean_in_limerick":peb3wgpk said:
Hi everyone,
I bought some blum suspension cabinet fittings for hanging the upper units - my thinking being that this would save me a lot of time levelling everything because they can be adjusted in three directions - has anyone used these and if so, what do i need to do to the back of the cabinet to allow enough room for them. There is a technical drawing on the isaac lord website but i'm not used to reading these things and i can't decode it - can anyone help?

http://www.isaaclord.co.uk/prodList.asp?searchText=suspension+fitting&Searchmode=all

I use these all the time. The ideal dimensions are to use a 6.5mm (or thereabouts) back set into grooves in the cabinet sides. These groves should be about 18mm back from the rear edge (cut the cabinet top and base to suit, then you will be able to screw the back to the back edge of the top and base. The fittings require a small rectangular hole for the claw to reach through. The 18mm set back will allow a modicum of scribing should that be necessary.

Although you can use the wall plates to hang the cupboard on, I prefer the rails. With a run of cabinets I notch the back of the cabinet sides to fit over the rails, but not the end cabinets of course. The rail shares the load over a large nimber of fixings, and the holes used can be chosen to avoid buried cables.

John
 
sean_in_limerick":3dg8yd3f said:
Does anybody know where I can source some concealed 35mm cup hinges for face frames?
I presume that you mean these - my local supplier is Woodfit (although not the cheapest):

33.460N%20Face%20fix%20hinge%20C.jpg


As for cabinet hangers on upper cabinets I tend to use this sort of thing:

290.03.921P1.JPEG


290.03.921D1.gif


These are the Hafele ones although many other suppliers do similar stuff. They all seem to require a 16 to 20mm inset. The plus point is that the hanger is hidden from view, but the back is drilled to allow you to adjust the cab height from inside the cab after you've hung it. And as John says, run a continuous rail and notch-out the cab ends for it - that way you can span bad bits of the wall (especially on old houses or where going onto stud or breeze block walls) and add extra screws, to take the load.

If you know that a cab is going to carry a large load, or that the wall is a bit suspicious then hang it, level up, remove and add angle brackets at the bottom - a bit fiddly to mark and drill, but will add to the certainty of your installation. Once you've got the pelmets on a spot of paint will make the brackets disappear if you really are that fussy. If your cab. back is inset enough it is also possible to add a dowelled or biscuited brace across the bottom back (on the outside) and screw through this into the wall for extra support instead of fiddling about with angle brackets. Finally, don't skimp on screws and fixings. I use decent quality fixings (Fischer when I can get them) and hang my upper cabs on 2-1/2 or 3in screws, a signwriters' trick to reduce the possibility of pull-out.

Scrit
 
Sorry guys i was without access to my computer for a while - when i install those hinges you show Scrit, there is an ugly gap between the door and the face frame of about a quarter of an inch - is this normal?

Rgds,

sean
 
Hi Sean

All kitchen doors and drawers sit slightly proud of the frame. The Blum face frame lay-on hinges should mean that the doors sit 2.5 to 3mm proud of the frames as this drawing shows:

33.460N%20Face%20fix%20hinge%20Dim.jpg


Even conventional lay-on doors on a frameless carcass normally sit 2mm or more proud:

75M1550%20Dim%202.jpg


this table id from the Blum catalogue and refers to conventional hinges:

BlumHingeGap.jpg


If they didn't then the door would bind on the frame every time it was opened or closed. The drawers normally have a rubber bumper or two applied to the face of the carcass to act as a buffer.

Scrit
 
i must be slow, i'm not sure we are talking about the same gap, the gap that concerns me is when the door is closed, between the inside of the door on the hinge side to the front of the face-frame, i think this is TS in the drawings. Perhaps i have installed the hinge wrong? - i will take some photo's and post them. Just to be sure these hinge plates are installed on the front of the face frame?

Thanks again,

Sean
 
Yes, they are meant to be installed onto the front of the face frame. Blum have recently started to offer another type of face frame hinge in the UK, the Compact:

38N_209_184.jpg


These fit onto the edge of the frame, but they have very limited overlay. No idea who stocks them, though.

I would like to see a photo of your problem. The gap is indeed TS,. Also is your overlay a complete overlay or partial?

Scrit
 
i have a complete overlay - i was hoping for about 1/2 inch on all sides (and like a fool built my doors accordingly, so they ended up a little short in width because of the amount of room these hinges take out of the face frame on the hinge side.) - this was only on a unit that i built in my garage to iron out all of these problems, i will take a photo this evening

i am also trying out these - to see if they are any better

http://www.rockler.com/product.cfm?page=2281

sean
 
They may well be - as you can see Blum offer a different range in the USA (that particular hinge is a USA market item). The only thing to watch on the frame side mounted hinges is that the width of the face frame needs to be circa 35 mm or so (from memory - the drawing confirms this as 36 to 39mm). A more available alternative in Europe, if your face frames are fairly narrow, is to mount a conventional hinge on a tall spacer plate like this:

175H9190.22%2018mm%20Mount%20Plate.jpg


175H9190.jpg


All of the major hinge makers (Blum, Salice, Hettich, Grass, Mepla, etc) make these mounting plates (they go on the inside of the cabinet) although as you can see they are really designed for inset or "in-frame" doors.

Scrit
 
Woodfit do the blum one like in scrits pic, you can use them with overlap or inset hinges which will give a faceframe overhang of 9 or 18mm.

Used them recently on this
t1.jpg


t2.jpg


Jason
 
sorry for the lack of picture Scrit, my camera has shuffled on and i need to invest in a new one. I will be using the face frame hinges from Rockler as i mentioned above - i got a couple to test them out and they work and look great - and they couldn't be easier to install and adjust. My oak finally arrived from my local supplier - i am letting that sit in my workshop before i make a start on the p/t.

Just a quick question on hanging upper wall - corner units. The walls in my house are notoriously out of square- i measured last night where an upper corner unit will go and it's a long way off. I am not sure on how to keep the cabinet run on either side of the corner unit level. How do you guys deal with out of square corners?

Sean[/img]
 
sean how about buying a laser??????????

the other thing is to block out the wall, and use fillers afterwards.

maybe this is the time to use french cleats.

paul :wink:
 
a laser?

French cleats will just follow the wall i think - and i will still have trouble hanging the unit and keeping the cabinets either side of it flush- do i have to make the cabinet at some obscure angle to follow the angle of the wall or is there a simpler way to do it?

cheers,

Sean
 
ok the laser, even a cheap one will allow you to mark lines which
are the same level on either side of the corner, much easier than
using normal levels. :lol:

what most people do is fit a filler strip to cover these kinds of
problems.

remember that in most corners you will have wasted space, so
you can be creative in the way you hide it.a lot depends on the type
of doors you are using, but if they are solid it is easier.

in principle make the right hand cupboard go further into the wall
by the depth of the gap. but up the left hand cupboard as near as possible,
then think about a corner filler .

once installed, then cut the right hand door down, but hinge it on the right
hand side, that way when it shuts it will hide more of the gap. but remember to allow clearance to open it.

hope that helps more sean, good luck

paul :wink:
 
Hi Sean

Depending on how far out your walls are out you may need to pack out behind the rails although the type of hanger I mentioned will accommodate 8 or more millimetres out of plumb in 720mm - more than that is tough. The best way to hide the gap between the cab and the wall is to make and panel or frame and panel for each end of the run with a wide rear stile then scribe to the wall (washer and pencil to mark out).

Best way to handle corners (if not using a corner, L-shape cabinet) is to make your "blind" cabinet a tad short - so if you are usein a 500 mm wide door on the bland cab, make-it no longer than 1050mm despite having 1100 mm (in theory). That gives you room to manouvre. Also use a solid "packer" to giveyou an inch or so clearance. Or did you mean something else? Before starting have you laid out the ground plan on squared paper and planned out in 25mm "blocks"?

Using a laser level is all very well, but a length of clear poly piping (from a compressed air place, daity farm supplies outlet or the local pub if you know the landlord well enough) with water in it will work as a water level (the Stanley vial ends add about £25 to the cost and aren't worth it for a one off job). Th only downside is that it's a two man job - so you'll need to rope the missus in!) - upside is that it is more accurate than a laser level :shock:

Scrit
 
thanks again scrit - i have put a quick picture up of what i am talking about - it can be found here http://mediamax.streamload.com/Switchbo ... b11d890a05

i will be scribing solid panels to the end of the cabinet runs so hiding the gap at the end of the wall won't be a problem - i just can't get clear in my head how everthing is going to stay square and flush from the front - particularly important as i will be lining up face frames on all cabinets. - maybe i am worrying about nothing?

Sean
 
think you are worrying about too much. since almost all kitchens are
out of square, most people kind of do what scrit says, or just make
longer end pieces on the face frames.

paul :wink:
 
sean_in_limerick":1ns5jg23 said:
...I just can't get clear in my head how everthing is going to stay square and flush from the front - particularly important as I will be lining up face frames on all cabinets. - maybe I am worrying about nothing?

Hi Sean

There is a bit of a knack to putting in a kitchen. Firstly have you done a detailed scale floor plan? If not you can't even start. It will help you visualize where the cabs go and possibly foresee any fitting problems. Once you have the floor plan you need to lay-out the levels in the kitchen - basically you need to draw two lines round - one at the height of the tops of the cabinets (typically worktop height - 40mm) and the second at the bottoms of the upper cabinets with a third line at the tops of the upper cabinets if you have any full height cabinets. A rod assists greatly in doing this and the water level can then be used to check and correct everything for level. At this point chalk-mark the cabinets onto the wall so you have an approximate reference - again a rod is very useful for this as it reduces the potential for error.

Typically you are aiming for a worktop height of around 865 to 915mm (100-150mm plinth + 725 mm high base cabinet + 40mm top) as a "standard". If you build your base cabs on adjuster feet setting them level is a doddle providing you have a 3ft or 1 metre builders level. Start installing your cabinets from one corner and work out. Level the carcase side to side using the level, then rear to front, again using the level, then bring the rear up to march your line on the wall and relevel rear to front. Once you have the first carcass in the next one has one end adjusted so that it matches the first - butt the carcasses together and clamp-up with three QR cramps. Now level the other end. Screw the two carcasses together using either cabinet joiners or screws driven from both sides (2 to 4 screws per base cabinet side from each side). Continue going down one side of the kitchen until they are all in or you reach a gap - then work out from the corner unit in the other direction levelling and joining in the same way. I add face frames after the carcasses are in situ, especially if I have one frame running across two carcasses.

If you go that way about the base carcasses will all be square and level. Remember, check and recheck all the time. You are never going to make the cabinets fit the walls exactly, so don't worry about it, concentrate on getting the cabinets in plumb and square and level to each other - the worktop, tiling and scribed end panels will cover a multitude of sins!

Regards

Scrit
 
Back
Top