New home for my woodturning....update 9.12.10

UKworkshop.co.uk

Help Support UKworkshop.co.uk:

This site may earn a commission from merchant affiliate links, including eBay, Amazon, and others.
Thanks Ian

TheTiddles":3o4hohcv said:
I'd be terrified of putting anything steel in what could easily become a sewer...

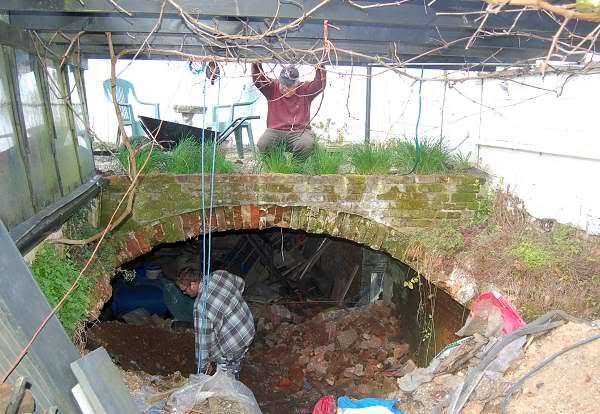
Its been there since 1785 and hasn't filled up yet(well if it did it drained away again :lol: ) When its done I'll put a hygrometer in there to test the damp over a week or two before putting my precious tools in.
 
Well its been a cold winter and nothing has been done to the new workshop. Now with it being spring I'm going to try to find a day a week to work on it :lol: Attacked it today :D

The worst bit of all has to be done, clearing the carnage near the entrance
workshop006.jpg

I'm the handsome young fella at the bottom, on top is my FIL,I'm clearing it a bucket at a time and hosting it to the top with the pulley.

Getting somewhere..
workshop007.jpg


By 3 o'clock I'd had enough. This was all hauled up bucket by bucket and after not doing this sort of work for a long time I am well and truly knackered :lol:
workshop008.jpg


JT
 
TheTiddles":19pa09vv said:
What does the rest of the plot look like then? I'd be terrified of putting anything steel in what could easily become a sewer...

Aidan

i'm with aidan on that one - how are you going to stop water running down the slope when it rains ?
 
:lol: :lol: Should get back down there Monday.

BSM not worried about rain, when the entrance is built a trench will be dug along the front of it and filled with stone to drain.

JT
 
As a retired railway man i can tell you how the underground stations and workshops under bridges are damp controlled .Curved corrugated sheet is fixed under the curved brick work with two gutters at floor level to catch and divert any incoming water (render will not stop it)to a drain. I hope this will be useful to you.
 
Not updated this for a while but the work is still ongoing on the 'bat cave'......
Here are the pics from yesterday for anyone interested.

FIL does the rendering as its not a skill I have, I do the mixing and carrying :(
rendering001a.jpg


The little side entrance has to go.I'm building the block wall up,another skill I don't have :lol: but at least it will be hidden by render!
rendering002a.jpg


Its got steps and everything now :shock:
rendering004a.jpg


JT
 
JT that looks considerably better than when you first showed it. I honestly thought you was bonkers. But I quite like it now. Just make sure you're getting the 'environment' right. Might be an idea to ask Mike Garnham his opinion on the best way to tackle it. He's over on TWH these days.
 
I honestly cant understand how it wont be damp all the time........

And I assume it was a lime render your FIL used?
 
wizer":364t1dst said:
..........I honestly thought you was bonkers. But I quite like it now...........

I am bonkers Tom :lol: The more I'm down there the more I like it 8)

As for keeping out the damp, after its rendered its going to be painted with a special tanking product for specifically damp proofing cellar walls and I'm putting in a sawdust/shavings burner to keep it warm and dry in winter.
If it doesn't work I'll tile it out and have an underground swimming pool :lol:

JT
 
Hi Johnny,
The cellar is really starting to look something like and when you get the stove in there should be no excuse for a spongy floor! I'm sure you know what I mean!!
FIL certainly seams to know his stuff and is doing a great job for you Johnny.
I will keep watching for the next installment so keep up the good work.
Regards,
Ian
 
Turn It In":2n2775wi said:
...........when you get the stove in there should be no excuse for a spongy floor!

Ian! spongy floor! me? :lol: :lol: It'll take a while for the shavings to get knee high in there and they won't have to travel further than the stove, so I may be able to keep up :lol: :oops: :lol:
 
Not updated my progress for a while. The rendering is done and yesterday the last bit of floor has been cast. The walls need to be waterproofed now with tanking slurry(the stuff we've got keps out water under positive pressure) The back wall has been done and is bone dry, the rest has had a coat but needs another 2 to get to the stage the back wall is at.

Here's me looking cold and wet yesterday finishing the floor! The mixer stand gave up the ghost so had to be used barrow stylee!
batcavefloor.jpg


JT
 
Back
Top