


Benchwayze
Established Member
Hi Roger,
Let me try to recall…
First off, I have Elu 177's and a later DeWalt version of the same Model.
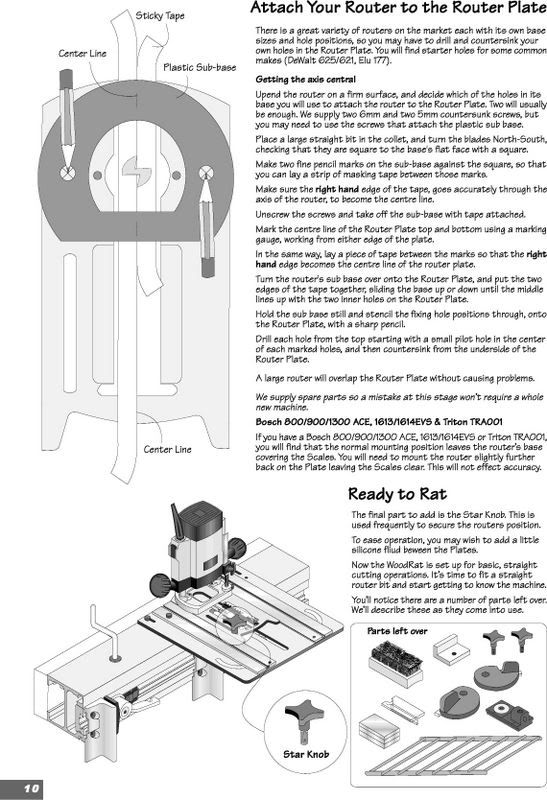
I scoured the manual, (A photocopied affair) but was still unsure I had the router in EXACTLY the right place, before I cut the hole to admit the cutter. This HAS to be concentric with the vertical axis of the router.
I could see no reference point in the manual. My enquiries with Geoff at Woodrat, elicited the response about having someone hold my hand.
I have been woodworking for 50 plus years, and I still cannot work out how to ensure the router is in the right place, before I drill mounting holes. Yes, I can use the the teflon base plate as a template. But how do I ensure the template is in the right place, before I cut the hole for the cutters? In other words, I can't find the exact centre of the plate! That is the problem I have. I don't want a plate with three or four trial cuts in it!!!
It might be me, but the Woodrat is about 8 years old now. Maybe things have moved on, since the photocopied manual I have.
I was considering selling the Woodrat anyhow, as I need a clear wall for it. I reserved space, but now, the space has been taken up by my Coronet Major (On castors, but nowhere to put that, whilst I work, except in the open air.)
Sorry to ramble on, but unless I can find the answer, an unused Woodrat will be up for grabs. :?
Cheers.
John
Let me try to recall…
First off, I have Elu 177's and a later DeWalt version of the same Model.
I scoured the manual, (A photocopied affair) but was still unsure I had the router in EXACTLY the right place, before I cut the hole to admit the cutter. This HAS to be concentric with the vertical axis of the router.
I could see no reference point in the manual. My enquiries with Geoff at Woodrat, elicited the response about having someone hold my hand.
I have been woodworking for 50 plus years, and I still cannot work out how to ensure the router is in the right place, before I drill mounting holes. Yes, I can use the the teflon base plate as a template. But how do I ensure the template is in the right place, before I cut the hole for the cutters? In other words, I can't find the exact centre of the plate! That is the problem I have. I don't want a plate with three or four trial cuts in it!!!
It might be me, but the Woodrat is about 8 years old now. Maybe things have moved on, since the photocopied manual I have.
I was considering selling the Woodrat anyhow, as I need a clear wall for it. I reserved space, but now, the space has been taken up by my Coronet Major (On castors, but nowhere to put that, whilst I work, except in the open air.)
Sorry to ramble on, but unless I can find the answer, an unused Woodrat will be up for grabs. :?
Cheers.
John
")