My new Workbench WIP

UKworkshop.co.uk

Help Support UKworkshop.co.uk:

This site may earn a commission from merchant affiliate links, including eBay, Amazon, and others.

Mikey R

Established Member
Joined
16 Oct 2008
Messages
283
Reaction score
0
Location
North Yorkshire
Hi,

Ive recently moved into my new house, so Ive finally got my dedicated workshop space in the spare bedroom. So, Ive been working on a new workbench to replace the old workmate. I thought I'd share some progress shots.

I wanted to base the design around the Roubo / Holtzapffel designs published by Chris Schwarz. I like the idea of the twin screw vice for gripping tapered pieces, it will be very useful for holding a guitar neck whilst supporting it from below using dogs in the vice and bench top. I will also add a simple end vice for holding boards whilst I plane the faces.

Heres what the room looked like when I first moved in, before any work had been done:

07112009022.jpg


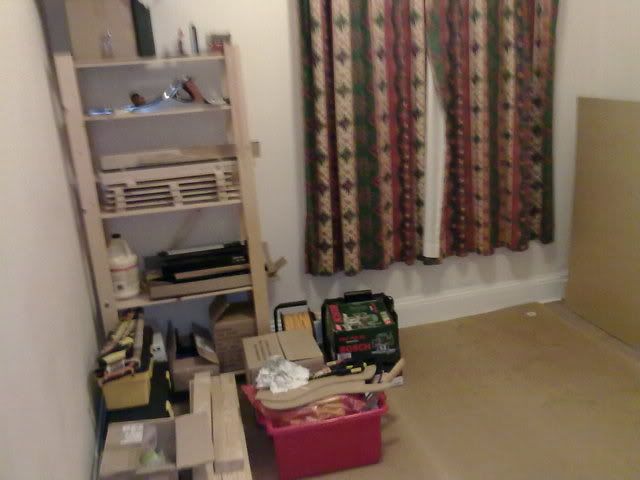
You can even see the floor.

To make up the legs and stretchers, I based the design around the knock-down Holtzapffel Workbench from the woodworking magazin blog. I used cheap rough sawn B&Q 2x3s and 2x4s as I would be doing the surfacing by hand using my Stanley no 7.

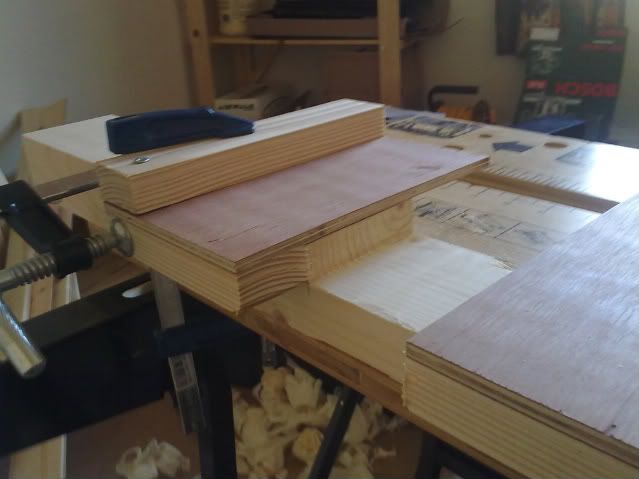
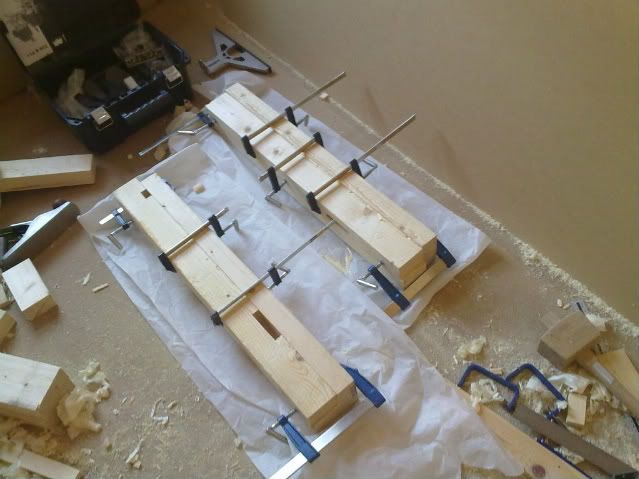
As this is the first bit of joinery Ive done, and becuase those mortices are huge, I was worried that I would cut them out of square. As I was laminating the legs, I decided to be creative and cut the mortices before laminating the pieces together. I started by routing out a rebate accross the grain, using a simple jig:

09112009025.jpg


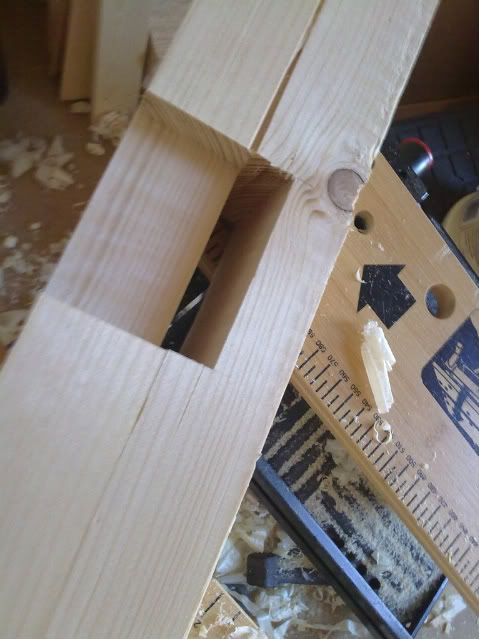
Then, when they were glued up, the mortice was ready and perfectly square:

11112009027.jpg


11112009029.jpg


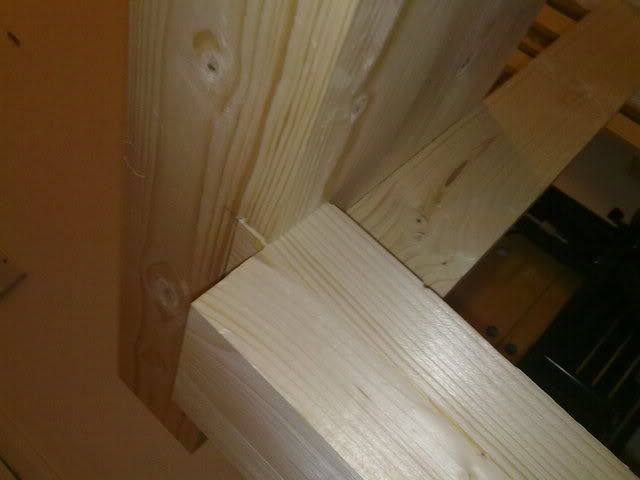
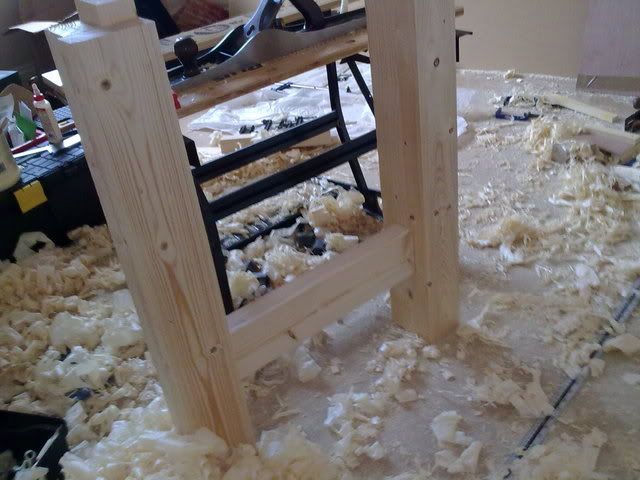
I then cut the stretchers, and was really pleased when my first mortice and tennon joint was perfectly square, if a little rough looking:

12112009033.jpg


The joinery for the short stretchers is permanent, glued and pinned using 10mm ash pegs. The pegs are probably overkill but its good to overbuild a bench. Rather then offsetting the holes like you do when drawboring, I simply clamped the assembilies together then drilled right through the mortice wall and the tennon in one go.

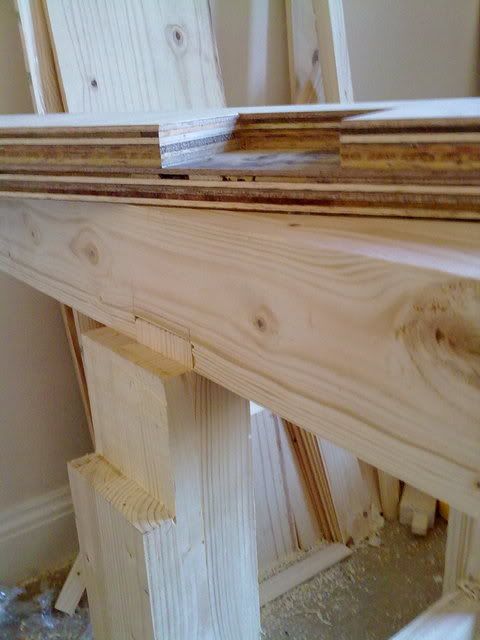
To allow the bench to be knocked down, the long stretchers are bolted in using 200mm long 10M allthread (please ignore the glue squeeze out on this pic - I said the joinery was rough!):

07012010229.jpg


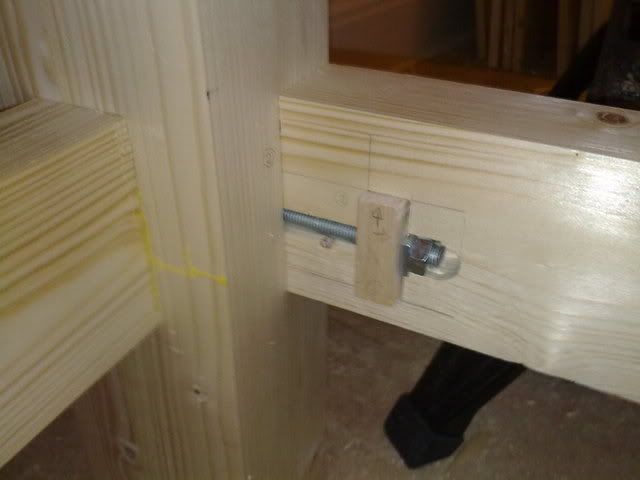
Rather than expect the end grain of the pine to hold the nut in place, Ive used small blocks of rock maple which should last much longer.

07012010230.jpg


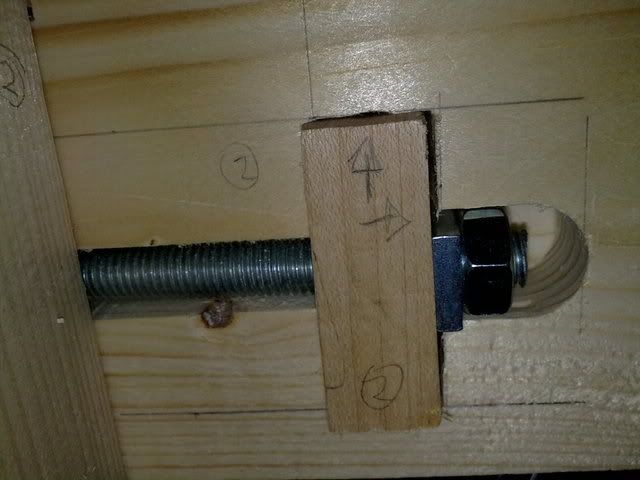
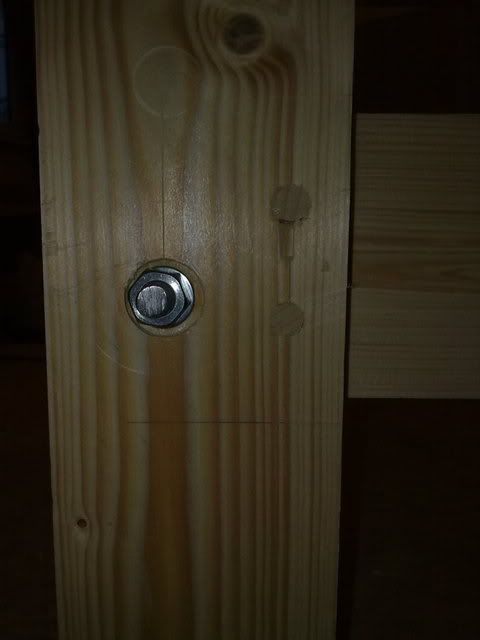
And a very dull shot of the outside of the leg, showing the nut for the allthread holding the long stretcher, and the pegs holding the short stretcher:

07012010234.jpg


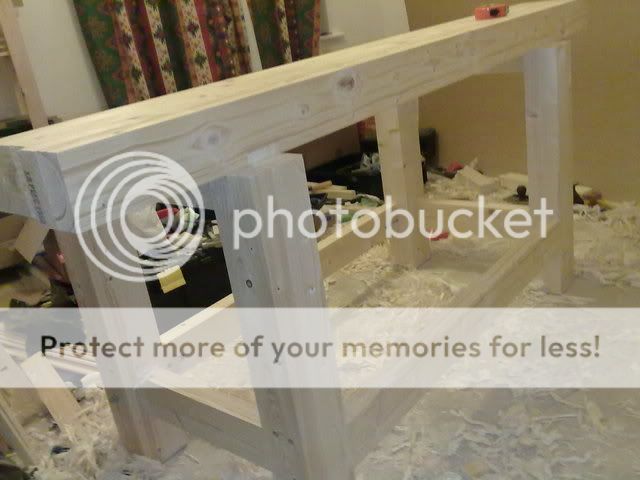
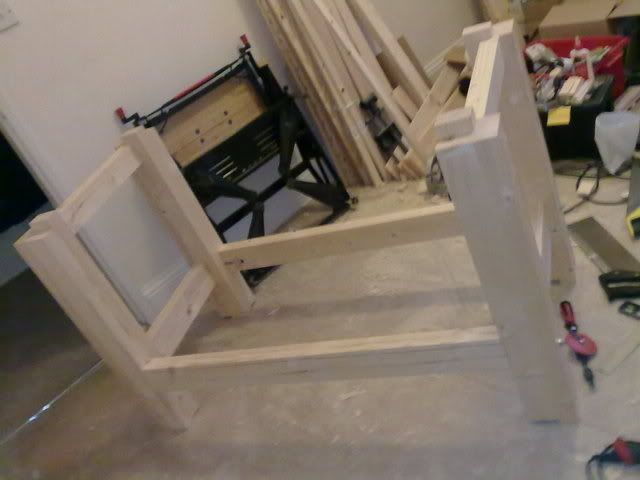
So heres where we are this evening:

07012010233.jpg


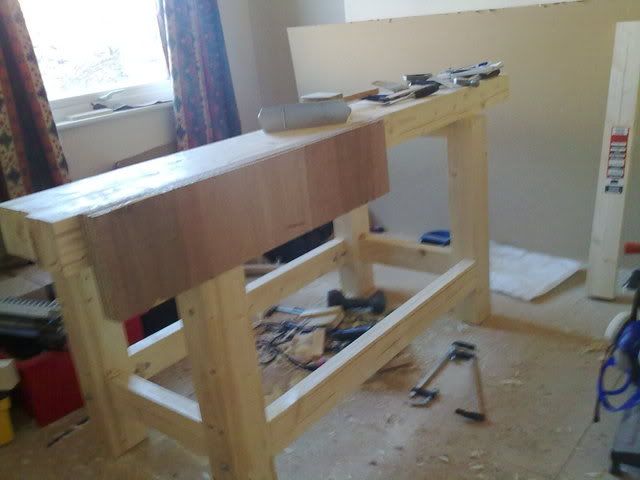
Now Ive got to decide how Im going to approach the top. I was going to use more softwood 2x4s laminated into a600mm wide top, but that would make a very soft bench. The vice jaws will certainly need to be hardwood.

I rather like how Boz did his bench top, so might look into that.
 
You've made a very good start, there, Mike. I like the tip where you placed a scrap of maple in the rail to protect the ends as you tighten up the bolts.

I also like the worktop idea. You'll save a small fortune over buying sawn, waney-edged boards. :wink:
 
Pine should be fine for the top. Sure it will bruise easily but it's a bench not a piece of fine furniture. Used to use one at work that was over 80 years old and it had a pine top. Go for it!!!

Vice jaws can be made from anything. Mine are Beech but I've seen MDF and Ply ones too so don't get too hung up on these little details, they can always be changed later if you need to.

Nice looking bench by the way =D> =D> =D> =D>

Richard
 
That looks great, I like the approach to the mortise, taking the pre production mortice one step further.

About using the bedroom, what sort of power tools are you hoping to squeeze in or not?
 
Really nice. I like the maple blocks as "helpers" for the stringer bolts. It all looks nice and solid.

I also like your indoor workshop as well - no "it's too cold" excuses for you :)

Boz
 
I like that tip routing a slot for the threaded rod.

I used 6x2 pine for my top, two pieces front then a 6x1 for the well, finally another 6x2 at the rear.
Hardwood top might be noisy in the house compared with a soft wood.
 
OPJ":qt0hik5b said:
I also like the worktop idea. You'll save a small fortune over buying sawn, waney-edged boards. :wink:
Richard Findley":qt0hik5b said:
Pine should be fine for the top. Sure it will bruise easily but it's a bench not a piece of fine furniture. Used to use one at work that was over 80 years old and it had a pine top. Go for it!!!

Cheers, Im going to go for the softwood top. Its going to be a little tough jointing that lot by hand but its all good exercise ;)

Richard Findley":qt0hik5b said:
Vice jaws can be made from anything. Mine are Beech but I've seen MDF and Ply ones too so don't get too hung up on these little details, they can always be changed later if you need to.

Yep, because Ive got some 2x4 offcuts, Im going to use those as jaws and line them with 18mm ply.

Chems":qt0hik5b said:
About using the bedroom, what sort of power tools are you hoping to squeeze in or not?

Not many - Ive got plans to get a bandsaw, but thats becuase it will be quieter than my jigsaw. I also want to do the occasional resawing. Also, maybe a small second bench with drill press and router table and that should be it.

Boz62":qt0hik5b said:
I also like your indoor workshop as well - no "it's too cold" excuses for you :)

Yep, theres more chance that I'll spend more time in there than when I had to work out in the yard. Dust could be an issue though.

devonwoody":qt0hik5b said:
I used 6x2 pine for my top, two pieces front then a 6x1 for the well, finally another 6x2 at the rear.
Hardwood top might be noisy in the house compared with a soft wood.

Im using 2x4s but oriented so that the top is 4" / 100mm thick. The thicker the top, the more sound it should soak up. Im glad to hear of other benches successfully made from softwoods!

DeanN":qt0hik5b said:
Hope the house is detached, or you'll soon have your neighbours knocking on the walls :wink:

Nope, its a mid terrace! :shock: But its a fairly DIY friendly place to live, on any Saturday morning you can hear power tools from at least 3 houses in the street. I was careful to pick a house with no children either side. I'll also restrict the power tool use to a couple of hours on a weekend.

Though Im having fun with the new router (I got the T10), I do prefer to do as much work using hand tools as I can. Whilst working in the yard I found its a better way to keep the neighbours friendly.
 
This week Im on holiday - at home :D - so Im taking the opportunity to get some work done on the bench.

I started gluing up with top before christmas, and made a bit of a mess of it, which is why I was thinking of using a kitchen worktop instead. Following the encouragement I got from the forum, Ive deceided to get on with the softwood top. It doesnt need to be pretty, after all. The top will be in two halfs, the front half will be around 95mm thick, the back half around 30mm thick, to save on material.

on with the front half. The staves are glued up with alternating heart / sap:

12012010261.jpg


Ive still got one more stave to glue on to make the front of the bench top, but before I do that I need to route out the square dog holes.

I then spent a few hours tidying up with handplanes. These 2x4s were pretty gnarley, I picked out the least bowed boards but none were perfect. I left the undeside a little rough as no-ones ever really going to see that, but made a slightly better job of the top side.

The top is located on tennons on the top of each leg. I routed out the mortices, then fine tuned with chisels to match the tennons:

12012010257.jpg


12012010253.jpg


12012010260.jpg


I wanted a tight fit as I believe this joint will be subject to alot of sideways force from using hand tools on the bench.

Heres how Ive left it for the evening:

12012010258.jpg


Its actually starting to look like a bench now! :D

It does rack a little if I shove against it, but it will certainly do for a few years. If it gets bad, I can easily add some cross bracing.
 
Mike

I'm amazed that you can make your bench rack a bit - it looks as solid as the pyramids! I bet it won't rack when you've completed the top and fixed it all together. It's looking really good.
 
Just one diagonal brace, or a sheet of ply, will prevent it ever racking. Do it now, do it once......otherwise you will never get around to it!

Mike
 
Ive been getting a little bit of work done on the bench over the weekend. Sorry for the low quality phone pics!

The face vice jaws have been laminated up out of 4 sheets of 12mm hardwood ply. The rear jaw will be located over the front leg, so I needed to recess both by 25mm:

31012010281.jpg


As it is, it fits very snugly:

31012010282.jpg


This week I spent a bit of my bonus and took delivery of my drill press, as always I got carried away and ordered the size larger than I really needed. However, it should last me and I shouldnt need to upgrade it:

31012010286.jpg


Now Im going to need some help: :)

For the vice screws, I need to drill two 44mm holes in the rear jaw and two 30mm holes in the front jaw. The 30mm holes in the front jaw can be drilled with a flat bit, no problem, drill half way from either side to prevent tear out.

Ive already pilot drilled the rear jaw with a 6mm bit - had to test the new drill - so what kind of bit would be good to dril these 44mm holes? Would a flat bit work? Bearing in mind Ive got a 650W drill press. :D

Cheers!
 
Ok, the best bit to use would seem to be a 44mm hole saw as this removes the minumum of material.

Im struggling to find any information on drill speeds with these - can anyone suggest a drill speed? I would guess I would need to bring the speed down as the diameter is large, like you do with a router, but I might be wrong?

p.s. Just noticed Ive been promoted to "Furniture Maker" - excelent! :D
 
Hi Mike
I would suggest something slow like 300-400 rpm or maybe even slower. A hole saw has a lot of teeth so a slow spindle speed will be better. Let the saw cut its way through as opposed to forcing it.

Just my opinion

John
 
johnjin":1phbzkli said:
Hi Mike
I would suggest something slow like 300-400 rpm or maybe even slower. A hole saw has a lot of teeth so a slow spindle speed will be better. Let the saw cut its way through as opposed to forcing it.

Just my opinion

John

Thanks John, I'll try the 320 rmp setting.
 
I got hold of a 44mm hole saw, I found that I had to reduce the speed to 270 rpm to stop it burning. That ply has a few layers that are way harder than others, is that normal?

The rear jaw of the face vice is attached with 100mm long screws into the bench top. I drilled the jaw (Im really enjoying the new new drill press!) and pilot drilled the bench top, then started with a screwdriver. I then realised that I could put a philips screwdriver attachment into my brace, and the job went a whole lot faster!

02022010292.jpg


The nasty glue squeeze out will be planed off when I do the final flattening of the bench.

I still need to take off a little material around the holes for the vice screw nut, it flares out a little where it joins the flange. Im planning on countersinking it with a router tomorrow evening.

Its really handy being able to do an hours work on an evening on a project. Without a dedicated work space, Id spend half an hour getting all the kit out, then half an hour putting it away again.
 
I think I am more impressed you managed to blag an entire room of the house for a workshop!

Does she have a sister?!
 
:D That made me laugh!

I actually separated from my wife last summer, which is why Ive now got a new house with space for a workshop. And no, thats not the reason, and no, I wouldnt recommend it. :)
 
Back
Top