


My wife mentioned her birthday bowl to one of the ladies at school and she asked if I would make a bowl for her.
She came around and had a look at some of the previous bowls (do any of you look at early bowls you were very happy with at the time and wince?) and we worked out her requirements:
1) a wood with pattern (she seemed able to see "pattern" in bowls with almost no grain but really liked yew and Padauk) so we chose a Padauk blank
2) the piece will be used to show off 5 duck egg sized stone eggs so should be more of a platter than deep bowl - max depth 15-20 mm
3) it will be placed around her shoulder height so the side view is important - she picked out a bowl which was fairly tall for it's height as an example
4) the platter should have some sort of inner rim to keep the eggs together in the middle and allow some of the wood to be seen even when the eggs are in place.
5) the inner area will be the same size as one of our side plates.
We will decide on the price when I know how long it has taken - this being the first time I've done this and I know I'll be slow and make mistakes")
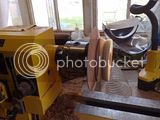
Anyway that's the requirements - this is the WIP:
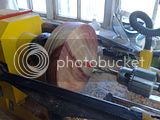
As the blank is only 5-10 mm thicker than the final platter and the depth of the disk is less than my screw chuck I can't use the screw chuck, so I glued on an oak piece after truing the block as much as I could using some cole jaws.

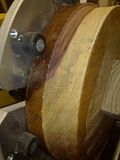
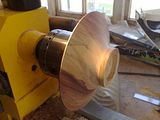
Having turned the oak down to allow my dovetail jaws to grip it I turned the blank around and started on the shaping. During this process the glue chuck failed. I think this was due to the chuck being on the small side for the size of the blank but probably more because I hadn't put enough super glue (gel) in the centre of the scrap and had turned most of it away
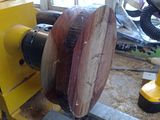
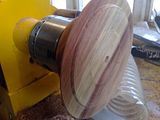
So it was back to the cole jaws to turn a dovetail fixing having modified the design to include the footing (but to reverse turn the majority of it away - losing the 5-10mm extra unwanted space from the foot in the process). I have to say this makes me very nervous as the final thing will have a very thin rim - ah well nothing ventured....

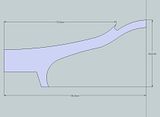
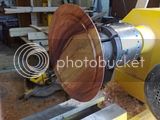
With the blank trued and some ideas sketched down in a scale sketch I knew that I had to not go overboard on the depth of the disk as I couldn't afford to lose any height from the top of the blank. To help me I drilled a 15mm hole in the top of the blank. I then turned the rim of the platter as this will be thin before it flares back up to form the inner rim. I was worried that if I go too far in to the process the rim could become unstable. This was an uncomfortable process as it required some pretty good understanding and visualisation of what the final inner and outer shapes were going to be.
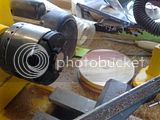
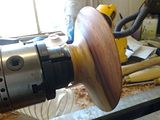
I also discovered that I had not considered the size of the actual jaws when working out how I was going to avoid using glue chucks. The non gripping elements of the jaws utterly obscured the bottom section of the bowl. The get around this I turned another dovetail socket in the top section of the bowl and re-mounted to shape the foot.
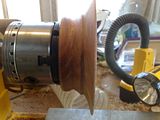
Having sanded (to 320 using the rotary sander) I then swapped the bowl around to finish the top section. For this bit I used some long nose jaws that I have to allow access to the foot area as I intend to apply the finish to the top and bottom at the same time, and obviously no longer have the socket in the dish section.
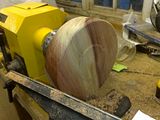
I have to say that with all the sanding to remove tear out the thickness of the rim has gone from the planned 5 mm to more like 2-3 mm :shock:. This does however still work and makes it look like an excellent piece of turning
As the client like the high shine (but still very tactile) finish on my wife's bowl I will be sticking with the Chestnut hard wax. So far I have applied the first coat with 320 paper. This was de-nibbed with 400 grade and the second coat applied with 400 grit. This was then de-nibbed after 4 hours with 400 and then polished by going through to 1000 as I could see sanding lines appearing after de-nibbing with 400. I suspect some are there from previous sanding however I am sure that some were from the 400 as they are no longer visible at 1000. The third coat has just been applied with a new sock and no sandpaper. I just went out to the garage and it is looking very glossy so hopefully it will not need sanding down again. EDIT: the gloss is fantastic but feels a little "coated" with the fingres dragging a bit on the surface. I will offer her the choice of this or knocked back a little with some sanding to remove the drag but will buffing give the shine without the drag?
I will take some more pics tomorrow, if only to record what happens before I attempt to reverse off the foot, catch a bit and destroy the work so far. :twisted:
I am considering buffing this bowl (and my wife's bowl) to increase the shin and remove any marks in the oil coat caused by attempting to remove excess too late (more than 3-4 mins after applying you can feel it dragging on the paper / cloth - so I fear there are marks in the finish coat) - firstly will this work on hard wax oil and secondly will it improve the finish?
Appreciate any comments as this is one heck of a learning curve and I need to get this out of the way as I will be attempting a "bowl from a board" in the next 8 days as a present for my Grandma using some of the last wood stored by my long departed Grandpa!
many thanks
Miles
She came around and had a look at some of the previous bowls (do any of you look at early bowls you were very happy with at the time and wince?) and we worked out her requirements:
1) a wood with pattern (she seemed able to see "pattern" in bowls with almost no grain but really liked yew and Padauk) so we chose a Padauk blank
2) the piece will be used to show off 5 duck egg sized stone eggs so should be more of a platter than deep bowl - max depth 15-20 mm
3) it will be placed around her shoulder height so the side view is important - she picked out a bowl which was fairly tall for it's height as an example
4) the platter should have some sort of inner rim to keep the eggs together in the middle and allow some of the wood to be seen even when the eggs are in place.
5) the inner area will be the same size as one of our side plates.
We will decide on the price when I know how long it has taken - this being the first time I've done this and I know I'll be slow and make mistakes
Anyway that's the requirements - this is the WIP:
As the blank is only 5-10 mm thicker than the final platter and the depth of the disk is less than my screw chuck I can't use the screw chuck, so I glued on an oak piece after truing the block as much as I could using some cole jaws.


Having turned the oak down to allow my dovetail jaws to grip it I turned the blank around and started on the shaping. During this process the glue chuck failed. I think this was due to the chuck being on the small side for the size of the blank but probably more because I hadn't put enough super glue (gel) in the centre of the scrap and had turned most of it away


So it was back to the cole jaws to turn a dovetail fixing having modified the design to include the footing (but to reverse turn the majority of it away - losing the 5-10mm extra unwanted space from the foot in the process). I have to say this makes me very nervous as the final thing will have a very thin rim - ah well nothing ventured....


With the blank trued and some ideas sketched down in a scale sketch I knew that I had to not go overboard on the depth of the disk as I couldn't afford to lose any height from the top of the blank. To help me I drilled a 15mm hole in the top of the blank. I then turned the rim of the platter as this will be thin before it flares back up to form the inner rim. I was worried that if I go too far in to the process the rim could become unstable. This was an uncomfortable process as it required some pretty good understanding and visualisation of what the final inner and outer shapes were going to be.


I also discovered that I had not considered the size of the actual jaws when working out how I was going to avoid using glue chucks. The non gripping elements of the jaws utterly obscured the bottom section of the bowl. The get around this I turned another dovetail socket in the top section of the bowl and re-mounted to shape the foot.


Having sanded (to 320 using the rotary sander) I then swapped the bowl around to finish the top section. For this bit I used some long nose jaws that I have to allow access to the foot area as I intend to apply the finish to the top and bottom at the same time, and obviously no longer have the socket in the dish section.


I have to say that with all the sanding to remove tear out the thickness of the rim has gone from the planned 5 mm to more like 2-3 mm :shock:. This does however still work and makes it look like an excellent piece of turning
As the client like the high shine (but still very tactile) finish on my wife's bowl I will be sticking with the Chestnut hard wax. So far I have applied the first coat with 320 paper. This was de-nibbed with 400 grade and the second coat applied with 400 grit. This was then de-nibbed after 4 hours with 400 and then polished by going through to 1000 as I could see sanding lines appearing after de-nibbing with 400. I suspect some are there from previous sanding however I am sure that some were from the 400 as they are no longer visible at 1000. The third coat has just been applied with a new sock and no sandpaper. I just went out to the garage and it is looking very glossy so hopefully it will not need sanding down again. EDIT: the gloss is fantastic but feels a little "coated" with the fingres dragging a bit on the surface. I will offer her the choice of this or knocked back a little with some sanding to remove the drag but will buffing give the shine without the drag?
I will take some more pics tomorrow, if only to record what happens before I attempt to reverse off the foot, catch a bit and destroy the work so far. :twisted:
I am considering buffing this bowl (and my wife's bowl) to increase the shin and remove any marks in the oil coat caused by attempting to remove excess too late (more than 3-4 mins after applying you can feel it dragging on the paper / cloth - so I fear there are marks in the finish coat) - firstly will this work on hard wax oil and secondly will it improve the finish?
Appreciate any comments as this is one heck of a learning curve and I need to get this out of the way as I will be attempting a "bowl from a board" in the next 8 days as a present for my Grandma using some of the last wood stored by my long departed Grandpa!
many thanks
Miles


