More Help with Problem Wood

UKworkshop.co.uk

Help Support UKworkshop.co.uk:

This site may earn a commission from merchant affiliate links, including eBay, Amazon, and others.

sooty

Established Member
Joined
30 Jan 2006
Messages
193
Reaction score
0
Location
Nott's
Yesterday I thought I would have a go at turning a bowl out of a piece of wood my brother gave me, It had been sat in the Boiler house at the factory where he worked for about 6 years (so should be dry?)

I started turning a piece of the wood when I was getting near the basic shape I switched the lathe off whilst I had a cup of tea, I could hear clicking and cracking when I looked at the piece of wood splits and cracks were appearing before my eyes, I quickly got some superglue and tried to stem the cracks.
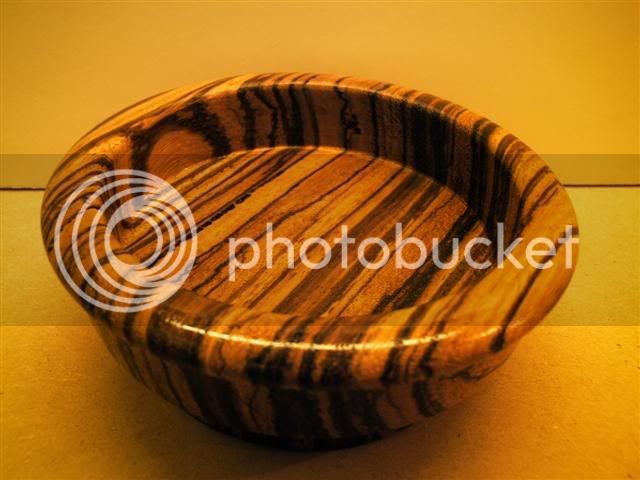
This seemed to do the trick so I carried on turning about 2 hours and 1/2 bottle of superglue later the bowl was ready for polishing but it looked a real mess and I was about to dispatch it to the bin when (swmbo) said you have come this far you may as well finish it
So here is the piece of tat

Phil


imgp0083nu5.jpg


imgp0082kc4.jpg


imgp0081hs6.jpg


In my mind it still belongs in the bin
My main question though is
(A) Why did the wood crack in sutch a way?
(B) Is there anything I could have done to prevent this happening or happening again in the future?
(C) Can you identify this wood? my brother seemed to think it was some sort of Apple (but you may know different!)I have included a couple of pics which may help

imgp0078hv2.jpg


imgp0079zz3.jpg


(D) lastly is there anyway I can release the stress in the wood so it wont happen again or should I just dump the log at the local tip?
 
The main problem appears to be that you appear to have cut a bowl shape in to end grain. This combine this with a super dry piece of timber (been in a boiler house I'm presuming it was quite hot) I would imagine there was alot of stress in the timber just waiting to be released. I always find turning into end grain is more effective if the timber is wet. It allows you to turn to a even wall thickness ensuring the stress has not got the chance to load up in the timber. In wet timber the stress is released gradually. In dry timber the timber can become "stress loaded" and will almost shatter before you eyes as soon as the stress forces can over come the mechanical strength of the timber.
 
Phil,
10 out of 10 for effort, listen to SWMBO & don't bin it. While I'm no expert, I agree with Russell, turning a bowl like that on the end grain is always going to be difficult. It may be easier to split the log (which will relieve some stress, and then cut into smaller blanks. If it splits like crazy, then i'm sure you would have enough blanks for about 100 light pulls, which will keep you busy for a while :) :)
I don't think it's apple; from the colour it could be, but I think there are too many knots (branches) for apple. I've got some in the workshop so will have a closer look when I get home.
Given the number of knots it it, and the fact that it looks a bit spalted, I think you've done an excellent job. I've been at this turning lark for about 9 months now, and I'd definately be happy with it. At the very least keep it in the workshop and use it to mix cellulose/thinners etc. That's what I do, and it looks a bit more rustic than one of SWMBO's jam jars :wink:

Twister
 
The wood/log looks more like a conifer to me, Leylandie possibly, It certainly had a rapid growth rate judging by the rings.

Just regard the bowl as having 'character' and enjoy the figuring.
 
scooty
You are being far far too hard on yourself, as it is a very good bowl.
Try putting it to one side for a little while ( say a week ) and look at it again, because it did not go just how you wanted it, you think its no good.

I bet you change your mind soon :wink:
 
Thanks to you all for the kind comments & advice I think I will put it on one side for the moment anyway
I have another piece cut ready to use (cut at the same time as the tat) and I think I will go with the advice to cut it in half and see how that goes

Phil
 
That's the spirit :wink:
Best of luck with it - let us know how you get on 8-[
 
Same as already been said - it's actually a very nice looking piece :D
And too many branches/too big growth rings for apple - think Chas has got it with leylandii.

Andrew
 
I think you have made a good looking bowl. :D
Chas, I think has identified the wood, I use it as fuel for the wood burner, your use is much nicer and the shavings would make good fire lighters. :whistle:
 
Sooty,

IMHO that is almost certainly a conifer of some type.

FWIW I always save the trunks of our Christmas tree (Nordman fir), and leave it dry for a year and then turn little wooden Chrismas trees out of it - my take on the "Please re-cycle your tree" posters than one sees around.

It isn't the easiest of woods to turn though - tends to tear rather than cut cleanly - got to keep the tools razor sharp!

Good luck with it!

Regards

Gary
 
Update as promised
I took the wife for a walk in our local woods to-day and saw trees with what looked like identical bark to the pictures I posted earlier in this thread and they were Scots Pine (does that sound about right).

The reason I did not think they were Leylandii is because the last time my Daughter visited (she lives in the Isle of Wight) she had just had a stand of Leylandii removed from her garden and she bought me a couple of pieces to try on the lathe, It is still a soft wood but is more workable than the other tat here are a couple of photo's of the leylandii done in end grain I still tends to split a little and you need sharp tools to keep a decent finnish dont know if you can see it but I had a small problem with tearout on the foot of the goblet.


imgp0089io3.jpg


imgp0088fl0.jpg


Now onto the Tat wood
I tried what had been suggested earlier in the thread i.e. cutting the original log in half so as not to go into end grain and to be honest it did seem to take some of the stress out of the wood, I did have a little trouble with the wood but to be honest I think that was my fault by going too thin on the sides of the bowl and when I started sanding one of the small knots fell out which I repaired with Araldite, here are a couple of shots of the bowl.
The pic's above may look very similar in grain pattern and colour but I can assure you the top pictures have a much warmer colour and smoother grain than the ones below.

imgp0086zc9.jpg


imgp0087lo5.jpg


The hole was in the right hand side of the bottom picture in the small cluster of knots.

I have decided not to throw the tat wood away and cut it into manageable half rounds I decided it will be worth keeping just to practice my bowl making skills I have some Laburnum and a small quantity of Yew which I want to save until I am more confident with turning bowls
(don't want to spoil really nice wood).

I am even warming to the Tat bowl and decided not to ditch it because I like the shape of the bowl more than the wood its made from!

Phil
 
I want to save until I am more confident with turning bowls

Oh,I'd say you were pretty good already - nice shape,nice proportions,and what fantastic grain patterns :D

What finish did you use on them ?

Andrew
 
Problem wood?

Best looking 'tat' I've seen in a while.... 8)

The first tat bowl has a charm of its own... let it live...
 
PowerTool":3hhnutn6 said:
I want to save until I am more confident with turning bowls

Oh,I'd say you were pretty good already - nice shape,nice proportions,and what fantastic grain patterns :D

What finish did you use on them ?

Andrew

Thanks for the comments!
As I have only been turning for about a month I have no confidence using the tools & I am very nervous introducing them to the wood, so much so that I only use 3 tools with the bowls a Gouge, Scraper and Parting tool.

I tried doing spindle work to gain experience! That was a disaster I took chunks from the wood, chopped the wood in half and had tools knocked out of my hands which made me hang onto the tools for dear life (grip of steel) which only made matters worse, and I lost all confidence.

My friend suggested I tried turning a bowl as he found it easier than spindle work.
Well so did I, I seem to relax more on bowl work and hold the tools more loosely, I have had the odd snag while working bowls but always found them recoverable, and as of yet have never had a complete disaster ( touch wood )

Its suprising what a confidence boost you get when you turn a shape you are pleased with!

To answer your question on the goblet I used Shellac Sanding Sealer then finished with Friction Polish I find this method really fast and easy to use.

On the tat bowl and the last one I used Water based Acrylic Sanding Sealer if you look at the first pictures of the Tat bowl you can clearly see black streaks running round the bowl, I got the same results using Acrylic sealer on the last bowl and had to re-sand the bowl from 120grit upwards to get rid of the marks!
I prefer to use the Shellac sealer

I would like to try Cellulose Sanding Sealer and also Acrylic Lacquer Spray

Phil
 
This was finished in Acrylic Lacquer Spray :-
Picture004Small.jpg


I've been turning (very) part time for about a year (nearly always have something else that needs doing,so don't get as much time as I would like)
so am still trying out different timbers and different finishes - but yes,friction polish is great stuff;good finish and easy to use.

Oddly enough,I started doing spindle work before trying bowl turning - found bowl turning quite scary to start with,but was always happy working between centres.Have learnt a lot from this forum,and although still very much a novice,am a lot happier and more confident as a result of the advice received.

Andrew
 
Power tool
Nice bowl, will have to get some Acrylic spray and try it.
Do you use it whilst on the lathe?
How long does it take to dry?
 
For the aerosol use - ensure well sanded,apply sanding sealer,then spray several light coats,20 minutes apart.
Have always taken things off the lathe,and sprayed them outside (I have an 8' x 12' covered timber store on the back of the workshop)
Think the bowl had four coats.

Andrew
 
Back
Top