Matching hall chair - Completed

UKworkshop.co.uk

Help Support UKworkshop.co.uk:

This site may earn a commission from merchant affiliate links, including eBay, Amazon, and others.

Glynne

Established Member
Joined
18 Mar 2007
Messages
1,479
Reaction score
15
Location
Sutton Coldfield
About 18 months ago I made a hall / console table with Dodge.
IMG_0263.JPG

Despite loving the the table and being pleased as to how it gives an immediate impression to the house (ha!), herself has subsequently acquired an old tatty church chair which she has placed beside my table - for practical reasons of keeping her handbag on and parking her rear end whilst she puts her shoes on!
So, I decided I would start to make a chair to match the table and "lose" the old church chair.

I have a small piece of brown oak left over from the project and a "slab" of London Plane / Lacewood so that was the starting point to come up with a design.
IMG_0225.jpg

Photo0144.jpg

When I say come up with a design, that sounds like a creative, intuitive process - the reality being me crawling around with a tape measure checking all existing chairs and then mocking up several possibilities using an Ikea stepping stool and bits of wood.

So with plans in hand, I started to rough out some components and the pictures show the current state of play.
IMG_0222.jpg

IMG_0223.jpg

The long lengths are the back legs / back stiles - roughly 40mmx 40mm and yet to be planed and shaped.
The short front legs have been roughly shaped as I had to cut them out with the tapers to maximise the small amount of wood I had.
I have enough plane for a front rail and stretchers but will need to use something else for the seat supports which will run from the front rail and into the rear legs / stiles.
As yet I havent decided on a seat but the thought for the moment is to use ordinary oak (i.e. straight grain) and stain it to match the brown oak.
As I rarely stain wood, any suggestions as to stains would be very welcome.

The WIP might take a while due to family birthdays (wife, son, daughter-in-law, son-in-law, grandson all in April) - and might take even longer if I muck anything up as I'll then need to buy some more wood as this is the last of my stock!

Any thoughts, ideas or suggestion very welcome.

Glynne
 

Attachments

  • IMG_0263.JPG
    IMG_0263.JPG
    182.1 KB
  • IMG_0225.jpg
    IMG_0225.jpg
    245.3 KB
  • Photo0144.jpg
    Photo0144.jpg
    109.1 KB
  • IMG_0222.jpg
    IMG_0222.jpg
    232.8 KB
  • IMG_0223.jpg
    IMG_0223.jpg
    249.2 KB
Looks good, I would but some more brown oak rather than staining it or have a padded seat.

I made 6 dining chairs but did them the easy way by connecting the back rails to the front stretcher, so you have no angled joints.


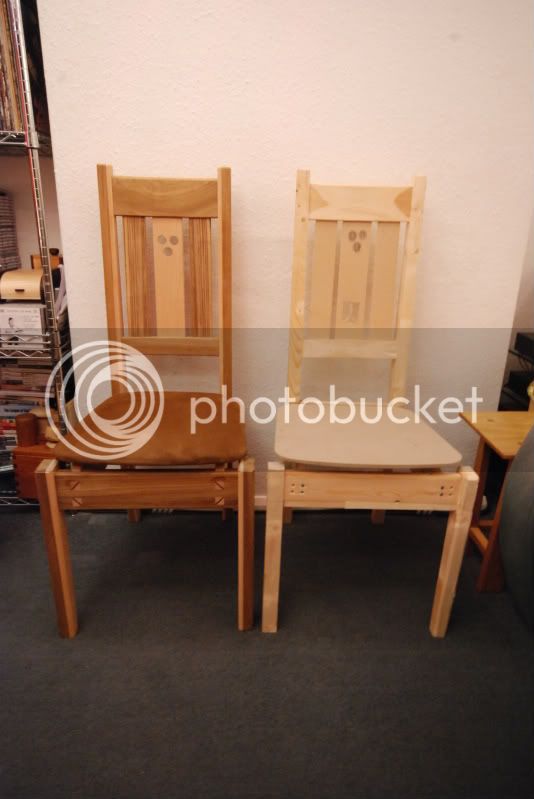
Its the one on the left :wink: , the one on the right is a soft wood mock up, very handy for getting the ergonomics right.

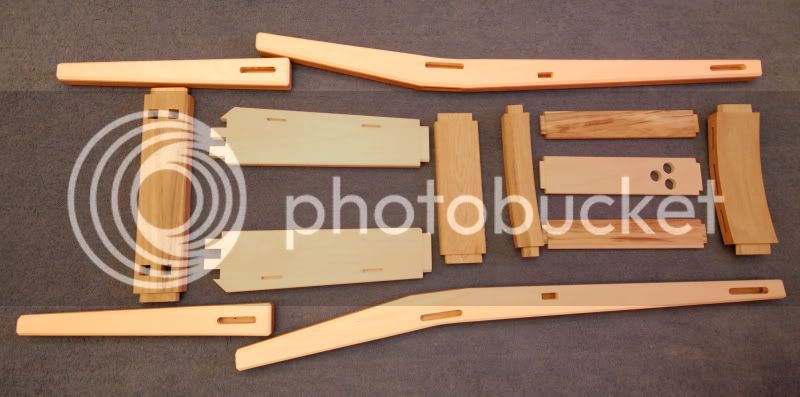
This is all the parts for one chair, I made 4 to start with then the other 2 a couple of years later.


Pete
 
Thanks Pete.
The design is similar only my back legs / stiles are closer together and I won't have through tenons on the front.
I know what you mean about getting more brown oak but given the panel I'm using is burr brown oak, I would struggle to match it anyway so I might just try with some of the tons of oak I have. As the seat will be screwed on I can always replace it if it doesn't work.
 
After a break of nearly 6 months (don"t ask) I've finally finished the chair.
I have to say I'm not very pleased with it for a variety of reasons which I'll mention as I post a some more w.i.p pictures.
IMG_1069.jpg

Back frame loose assembled.
IMG_1070.JPG

More detailed picture of the mortices for the side rails. I had a lot of problems with mortices in general as the lacewood was incredibly brittle. Even using a stand alone morticer the was an awful lot of breakout.
IMG_1071.JPG

Mortices for the bottom back rail. These were the exact size of the chisel and you can see some of the break out.
IMG_1073.JPG

As per my first post, I decided to use some oak for the side rails and this is the before and after staining. Pleased with the colour of the stain in matching the brown oak but the grain pattern is miles out.
IMG_1076.JPG

Back assembly all glued and cramped.
Pictures for the front assembly didn't come out very well and as essentially the same as the back, I've not posted them.
IMG_1080.jpg

Completed chair in situ (with table it's meant to match)
IMG_1082.jpg

Chair back with brown oak to match the table drawer fronts.
IMG_1084.JPG

Seat that some prat (i.e. me) managed to join the wrong side of a plank and hence got a huge disparity in the pattern!

Overall it is stable, you can park your bum on it and it does match the table - but I'm not very happy with it really.
In terms of learning lessons: -
Choice of timber
Whilst I wanted lacewood to match, the design was constrained too much by the size of the plank I had. This meant I had very little or no tolerance when cutting out the legs. The plank was also way too brittle which added to the problems of shaping, morticing and planing. I really should have bought enough new lacewood for the job.
Pete Maddox was also right in that I should have got more brown oak. I managed to match the colour but the grain patterns in the rails doesn't match.
Planning the build
I need to do this in more detail. The fact that I had an enforced break of nearly 6 months really exacerbated the problem and had I had a proper schedule, it would have been a lot easier to pick up after the break.
Tool set up
Having had a break but using tools in the interim I should have checked everything was set up OK. Morticer not quite spot on which was made worse by the brittle wood and the fence on my buscuit joiner was way off - so the seat is now a rub joint.
General care and precision
Probably worse than I usually am as I was becoming less happy as time progressed, resulting in joining the wrong sides of a 2 borads for the seat. The match would't have been brilliant anyway - but a lot better than it is.

So whilst not quite a disaster, not a success either.
As a lot of others have kindly showed their less than perfect projects I thought I would follow suit and hopefully someone can pick up from my mistakes.
 

Attachments

  • IMG_1069.jpg
    IMG_1069.jpg
    202.5 KB
  • IMG_1070.JPG
    IMG_1070.JPG
    210.6 KB
  • IMG_1071.JPG
    IMG_1071.JPG
    196.3 KB
  • IMG_1073.JPG
    IMG_1073.JPG
    202 KB
  • IMG_1076.JPG
    IMG_1076.JPG
    217.2 KB
  • IMG_1080.jpg
    IMG_1080.jpg
    245.2 KB
  • IMG_1082.jpg
    IMG_1082.jpg
    192.5 KB
  • IMG_1084.JPG
    IMG_1084.JPG
    248.1 KB
Hi Glynne

I like the design.

I bet 99% of the people who look at it wouldn't notice the faults, mind you I am the same I only see the faults.

You have got it finished that's a big thing to actually complete something rather than leave it in bits or cut them up for something else.

You have recognised where you went wrong so next time you you won't make the same mistakes.

Pete
 
Thanks for the kind comments Pete.
Yes I finished it and it's my first chair but I think I've only got the outline design right.
The back needs to be a lot higher and the seat seems a little angular in contrast to the table but at least it is a workable prototype.
Having told me I should use brown oak, guess what I found in my wood store? But having said that, the finish on the lacewood isn't good and so it would have been a bit of a waste of some really nice brown oak. I'm sure once herself batters it with her handbag and grandson climbs all over it I won't be too disappointed, but I'd rather see the faults both in design and technique as an incentive to improve next project.
 
Don't over criticize yourself, it looks very good.
Gets a thumbs up from me.
 
I like it too, as Pete said we woodworkers are our own worst critics and most people wouldnt notice any faults. Goes well with the table.
 
Whilst you may not be perfectly happy with it, just remember that nobody is ever going to look at it as closely as you do.

I really like your design, particularly the way that the thin back of the chair mirrors the lower rails on the table.

Well done :D
 
Back
Top