large bookcases finished, painted.

UKworkshop.co.uk

Help Support UKworkshop.co.uk:

This site may earn a commission from merchant affiliate links, including eBay, Amazon, and others.

Joe90

Established Member
Joined
5 Jan 2007
Messages
94
Reaction score
0
Location
Dublin, Ireland
Hi

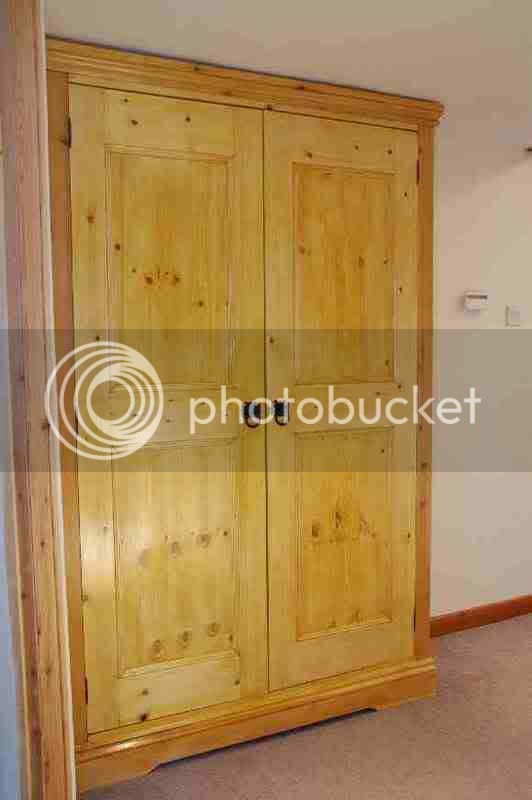
I thought I'd post a picture of my latest work, I am quite happy with it and the customer is thrilled, it matches an existing piece very closely. There is a radiator behind the lower cabinets on one side, hence the open grilles in the doors. The shelves are adjustable and have a decorative moulding tacked onto the front edge. Delivery was in five pieces for access and reassembled on site. It is manufactured in pine and finished in Dulux satinwood oil paints, 'white jasmine' which matches existing furniture...

Overall size about 9' wide by 7'6" tall, manufactured in solid pine.

Unfortunately the floor was well off flat and so the unit doesn't really sit properly but is ok. The right side could be raised by 10mm to 12mm which would make the doors absolutely square but then there is a gap along the floor, the customer chose to leave it as it for the moment... the doors open and close without catching or rubbing but they are 'parallelogrammed' (spelling? he he).

Has anyone a solution for the uneven floor??? (much appreciated if so)

bookcase1.jpg


Any comments or tips are much appreciated. (obviously I am just a proud woodworker showing off to anyone who'll listen, he he he... )

Cheers
Joe
 
Joe,
It's a very nice looking job. I reckon others are better qualified than I to answer your question on the non-level floor. I guess too that it might depend on whether the plinth is a separate item. I think the usual approach for built in stuff is to make these follow the floor line then to adjust the cabinet above for square afterwards. Your piece fills so much of the wall that it practically qualifies as a built in :)
 
Very nice =D>

As far as the eneven floor. I too am a bit concerned over the limited amount of ventilation you have to allow the heat from the rad to escape; unless you have some hidden ventilation :? . So I'd kill two birds with one stone and cut a rebate out of the base, that allows better ventilation and you can easily put a small fillet under one side to level the unit, which you must do. Level the unit that is :D .

Robe with rebated base.
Hallrobesmall.jpg
 
Very nice ! Erm , whats going on with the door into the room ?
 
Sorry to contradict you Chris, but usual practice is to level the plinth, and the put the cabinets on top of it. To cover the gap at the bottom either:
attach a piece of trim along the bottom, which only really works if the gap is small so that the mismatch doesn't show too much
or
Make oversized front and side panels for the plinth and scribe them to the floor.
plus
variations on those two themes.
 
Top Job, thats one hell of a bit of furniture? What was your turnaround on that? Also, what did you use for the backing?
 
that's a nice piece. would certainly suggest considering cutting out the
plinth to allow for greater air flow, and also make it easier to level.

the shape of the floor is why the modern kitchen unit has a removeable
plinth which you can scribe to fit, then use filler to cover the small gap left.

in the real old days one built the plinth on site, squared it, then attached the units on top. this ensures you are dealing with a smaller, lighter article whilst chopping things off, and also the top is square and level flat to the horizon within the room. with so many rooms sloping as well as not being level, it is important to have the bottom level within the enviroment so that your eyes are diverted from other potential problems.

you could of course use some of the plastic wedges that are available now, for instance from isaac lord, and then put a piece of moulding around the bottom to hide the join.

however overall, you are right to be proud, the paint finish looks really good. congrats

paul :wink:
 
Excellent Joe, how did you paint it?

What equipment and paint type/layers did you use?

<Ian concedes that we have some very talented bods on this forum>
 
Hi Joe,

That looks like a nice piece, could I ask if you used a commercial plan or did you do the design yourself.

I am looking for some plans of large bookcases myself.

Sorry I wouldn't dare to advise on the floor thingy, I think there's some good answers above 'tho.
 
Losos":3okmxrvq said:
Hi Joe,

That looks like a nice piece, could I ask if you used a commercial plan or did you do the design yourself.

I am looking for some plans of large bookcases myself.

Sorry I wouldn't dare to advise on the floor thingy, I think there's some good answers above 'tho.

If you want a commercial plan, 'Our Norm' has a set of library plans at the NYW.
 
Making a few assumptions here, so I may be wrong.

I guess the lower half is two units, in which case the plinth went on after placing those in position. If so remove it, level out your units and make a new plinth scribed to the floor and reattach.

Not keen on the radiator behind the unit, as said before if possible either turn it off, or get more air in but don't think that will help.

Dom
 
Hi...
Thanks for all the nice comments, I was amazed at the response. I suppose I should explain how I ended up making furniture... I had the opportunity to purchase the contents of an existing (commercial) workshop about 3 years ago (on pretty good terms) so I took it.
It's been very hard work getting to where I am now because I had no real cabinet making experience at that time but now I can work a normal number of hours per week and it's great. My cabinet making has also improved although I am in no way a master... I am eager to improve and some day will make it to the top! (hopefully :? )


Newbie_Neil, no I didn't use the sagulator... but I have viewed it, it is excellent, amazing really.... I just try to keep the shelves under 1200mm and they are usually ok.


Keith Smith and others, no, I don't have any hidden ventilation. :oops: ... hope it's ok in the future!!! The grille in the doors is about 50% open space so that seems like a lot to me but I do defer to greater wisdom. At this stage I was just going to leave the unit as it is in terms of the base... :roll:


JFC, don't know what's going on with the door??? It seems ok to me... maybe you mean the style, yes it does look like a barn door or something with the diagonal supports... reminds me of a joke...
Are exit doors on the way out? he he he :D 8)


ByronBlack. I suppose it took around 25 hours for the cabinet making and maybe another 20 hours for painting, these are guesses but are close enough... on price I charged around £1,200 which I reckon is a very low price but I feel the price is fair considering all the factors including my limited experience and some things that are less than perfect, i.e the non scribed base and possibly inadequate ventilation... I used red deal 8mm TGV pine from packets for the backing... I always use it for drawer bottoms and cabinet backs. It's the brand with the green christmas trees on the cover.


engineer one. Now that I know how to make and scribe the base I may do it for future jobs... but I find working away from the workshop is annoying and would push the price up, customers always want things to be cheap. :cry: I always seem to forget some tool or other....


kafkaian. I use Zinnser shellac base BIN primer, two straight coats, no spot priming, then two top coats of an oil based eggshell paint, Dulux for this. I use (white coloured) fillers between the earlier coats as knots and stuff in the pine require it... the TGV backing is also sometimes a bit dodgy... some sanding between coats as well. The finish was hand painted using a 50mm or 75mm brush. I have posted a question about spray applying painted finishes in the 'finishes' forum.


Losos... the customer actually provided the design, a hand drawn picture drawn nearly to scale, it was excellent, probably the best customer drawing I have received... I then drew a 2D drawing to scale and that was that. The vertical fluting, the archatrave blocks and the cornice all matched an existing piece so there was little for me to do, he he happy days! :D


DomValente and others. I am very embarrassed to say that although the base was in two pieces the plinth was also in two pieces and attached in the workshop, the join is basically invisible but I am embarrassed because it seems this was a stupid thing to do. :oops: ... well, i live and learn... the customer was happy and suggested that I do it in this way so that they can move it when they extend the room next year.
If I scribe the plinth to the floor how do I then cut along the line??? using a jigsaw? or a belt sander? or even a hand saw or a coping saw? or a fretsaw or similar?
Is the ventilation really such a serious issue? and are the grilles in the doors wholly inadequate? I really would have thought they would be ok, I will advise the customer to keep the heat very low and only raise it up very gradually if at all.... :?

Once again, cheers everybody... I have learnt a lot! :D

I will be with this customer again over another smaller job so I may well make some changes and advise her on the radiator issue... I may even cut out the plinth or go the whole hog and level and redo a rebated plinth, then I'd have some piece of mind! :wink:
 
Joe be careful not to undercharge because when you do you undervalue your work and word will get around that you are cheap.
You'll find yourself in a Catch 22 where you don't want to seem expensive.
Agreed that this may be your first customer, try telling them that this is a special price because you really like them, with the proviso they don't tell others how cheap it was.
Unless of course you don't mind working for less :)

Dom
 

Latest posts

Back
Top