It's 'Help an eejit Day' again. 110 'infill' advice please!

UKworkshop.co.uk

Help Support UKworkshop.co.uk:

This site may earn a commission from merchant affiliate links, including eBay, Amazon, and others.

Bm101

Lean into the Curve
Joined
19 Aug 2015
Messages
4,322
Reaction score
717
Location
Herts.
I say 'infill'.... :roll: :oops:
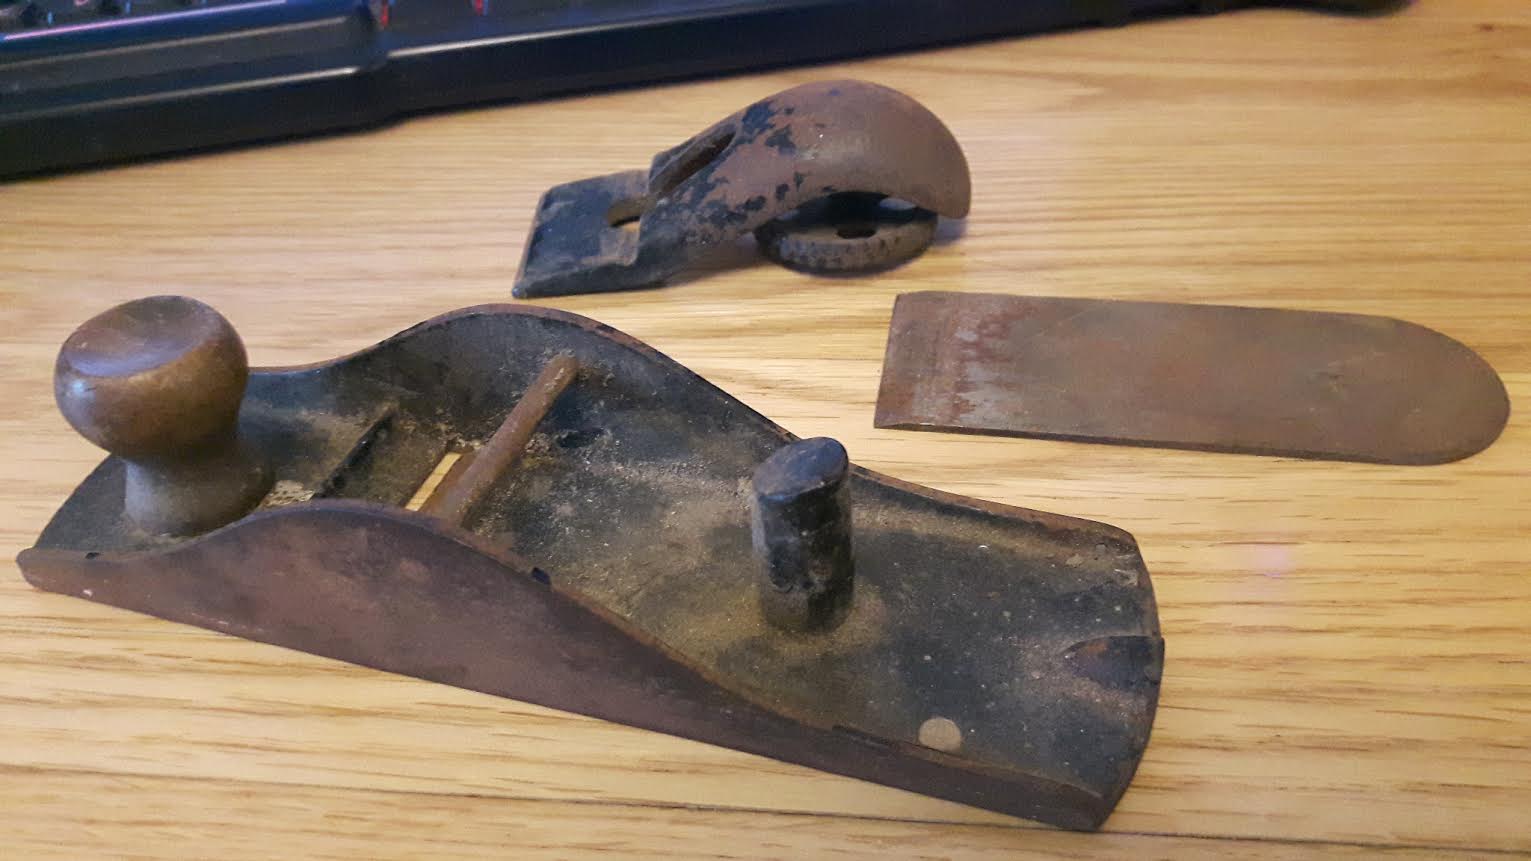
I got an old stanley 110 in a job lot a while back. I think it's a stanley 110 at least. It was in a bit of a state. While a lot of the other bits went into the rust bucket and got cleaned up for some reason I chucked this one on the desk next to my pc and there it sat for a while. Then one night, some months back, I found I found a well known thread (I won't name it because it doesn't deserve to be dragged down in any sense to be associated with anything I can manage) on here about making a proper infill plane. About two hours later and full of the naive hope of the beginner, immune to the rough edges of experience I glanced down. My eyes settled on the 110.
The rest is obvious I suppose.
Yeeeees. I can hear you laughing at the back...

Onwards and upwards.


yZlqg38.jpg


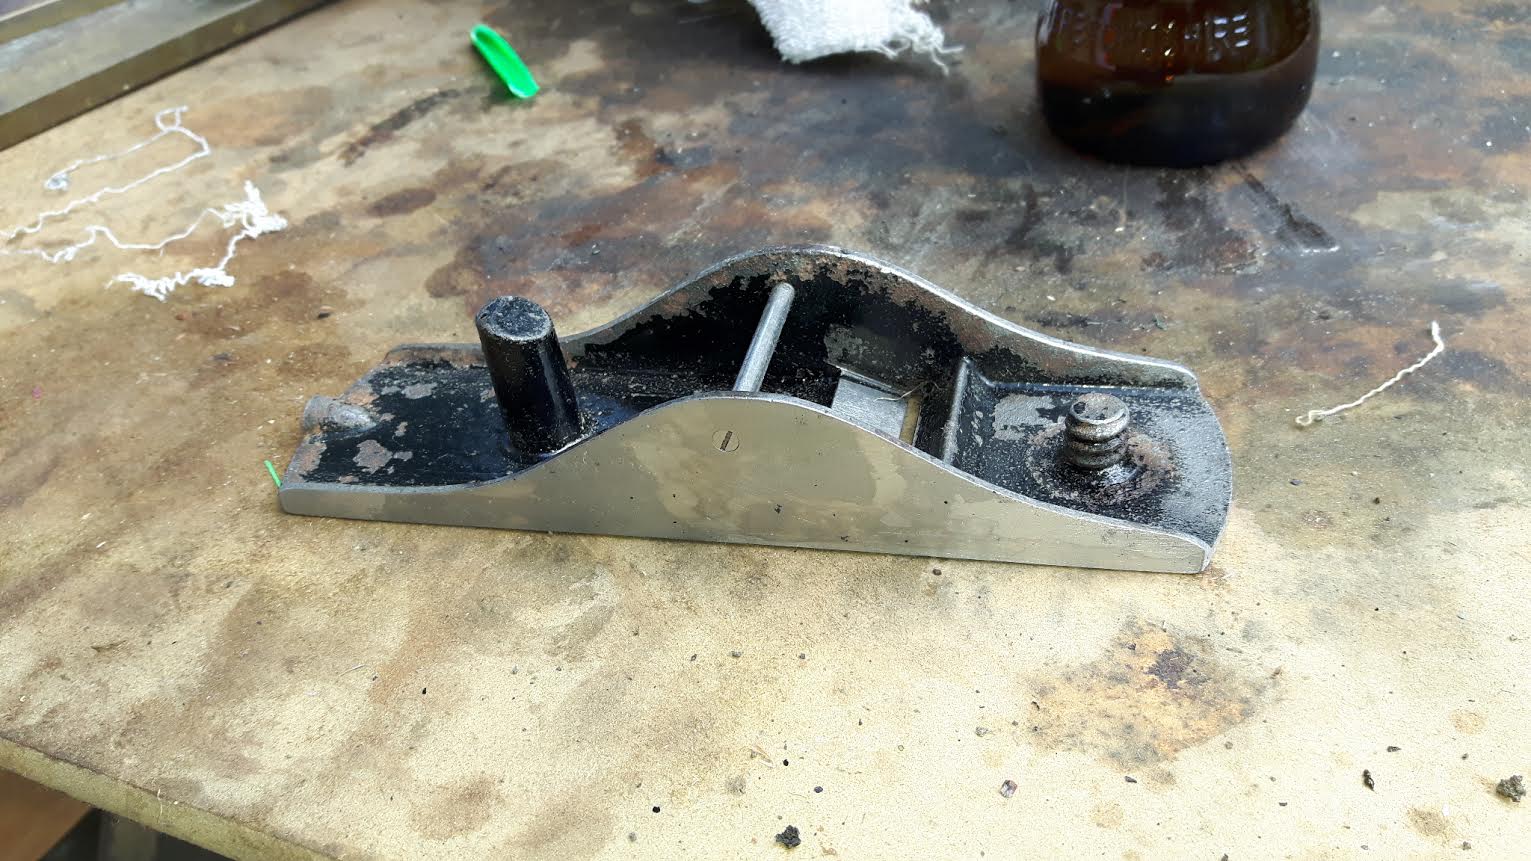
After a dip and a clean.

0Q9TI3z.jpg


8df25sE.jpg


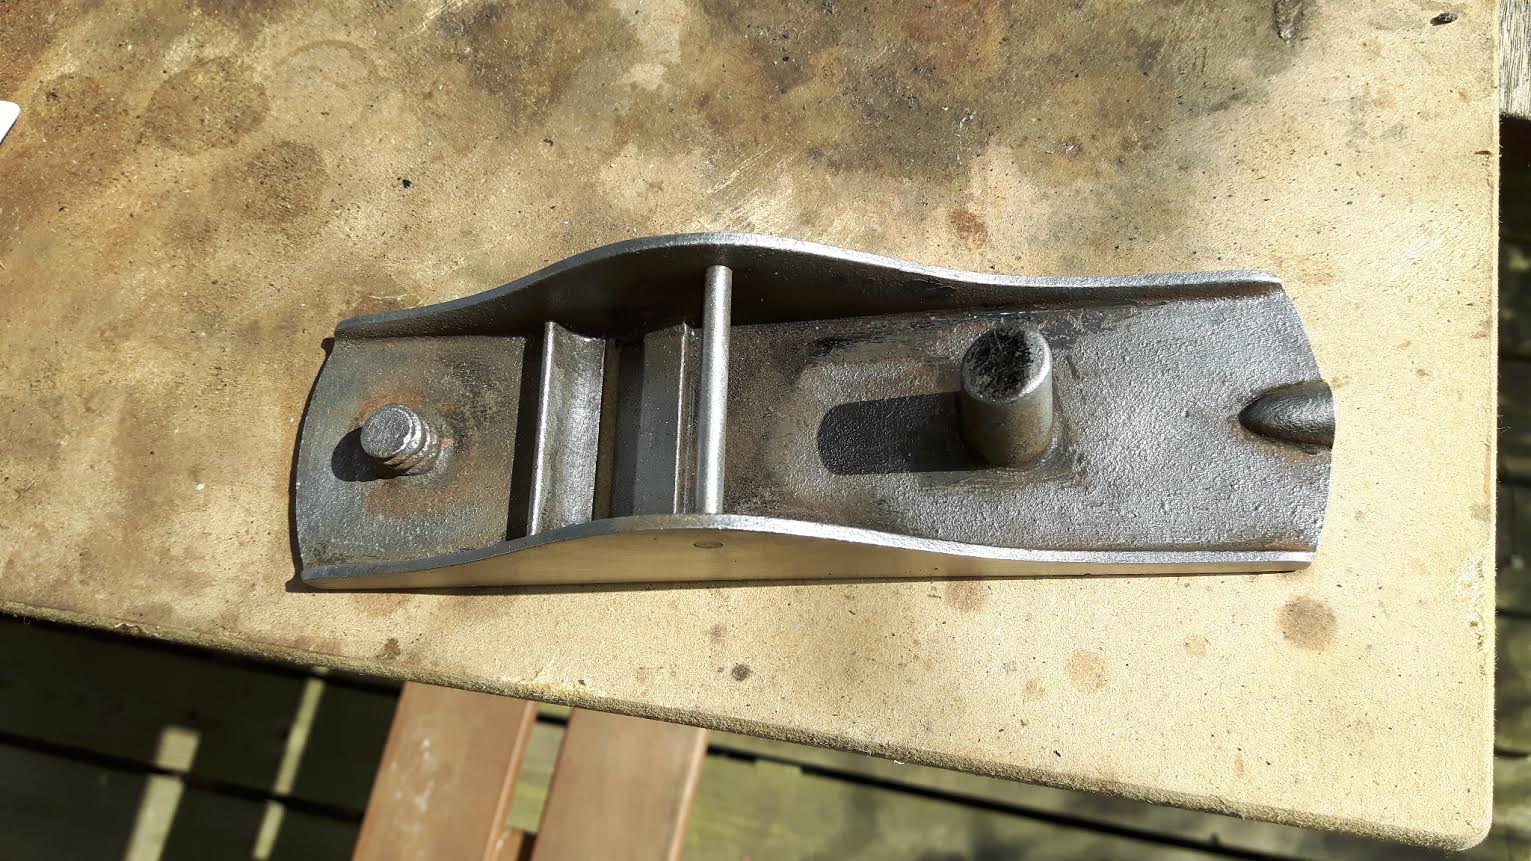
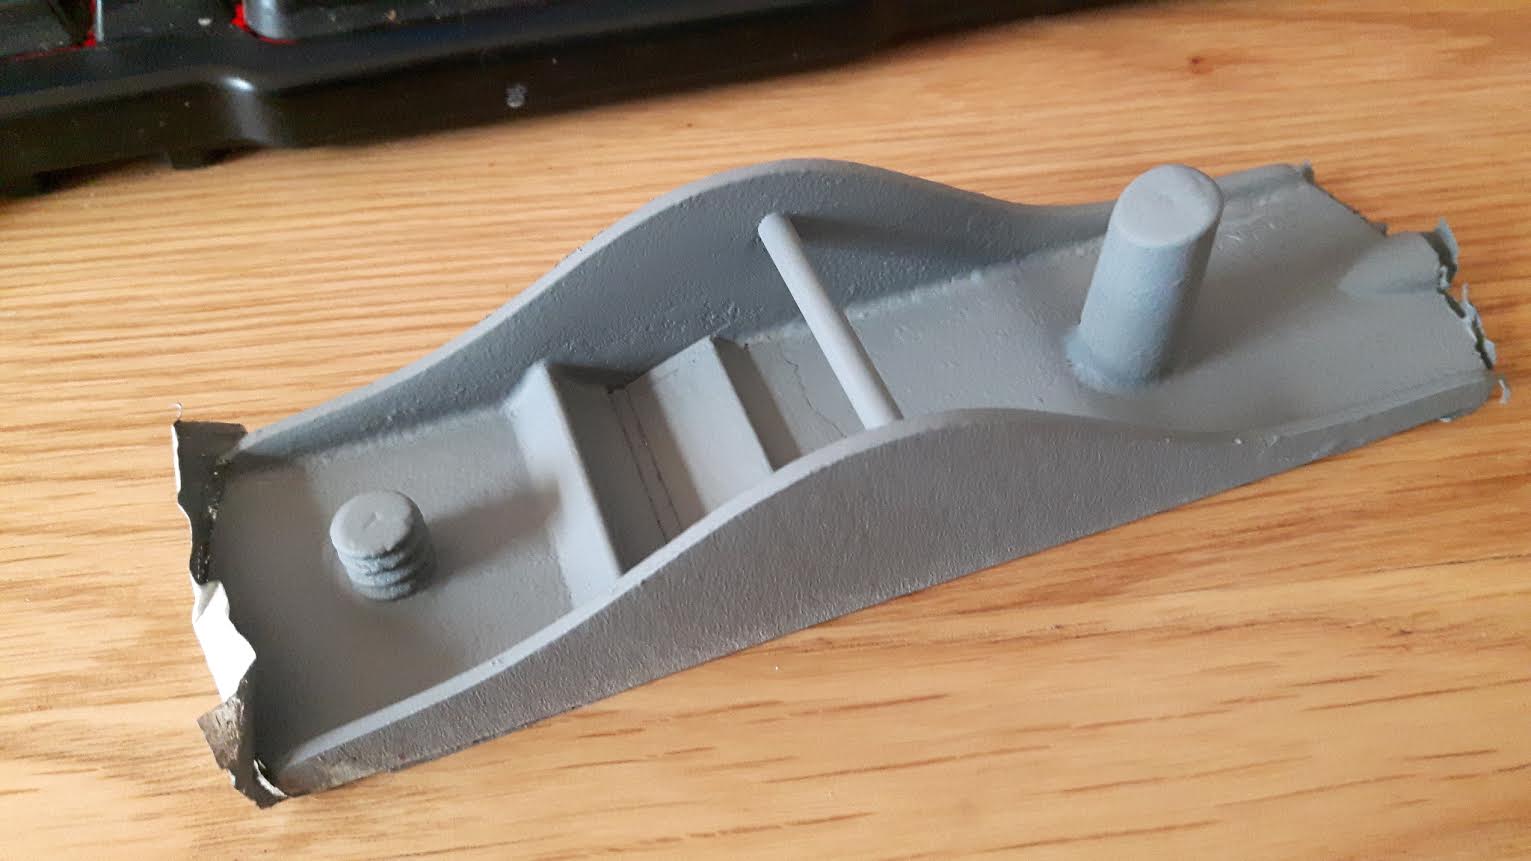
Now, here was my first mistake. I set about undercoating and painting it although I only actually wanted a tiny section above the mouth to be painted eventually. Bear with me.

SghQmUg.jpg


Live and learn. :|

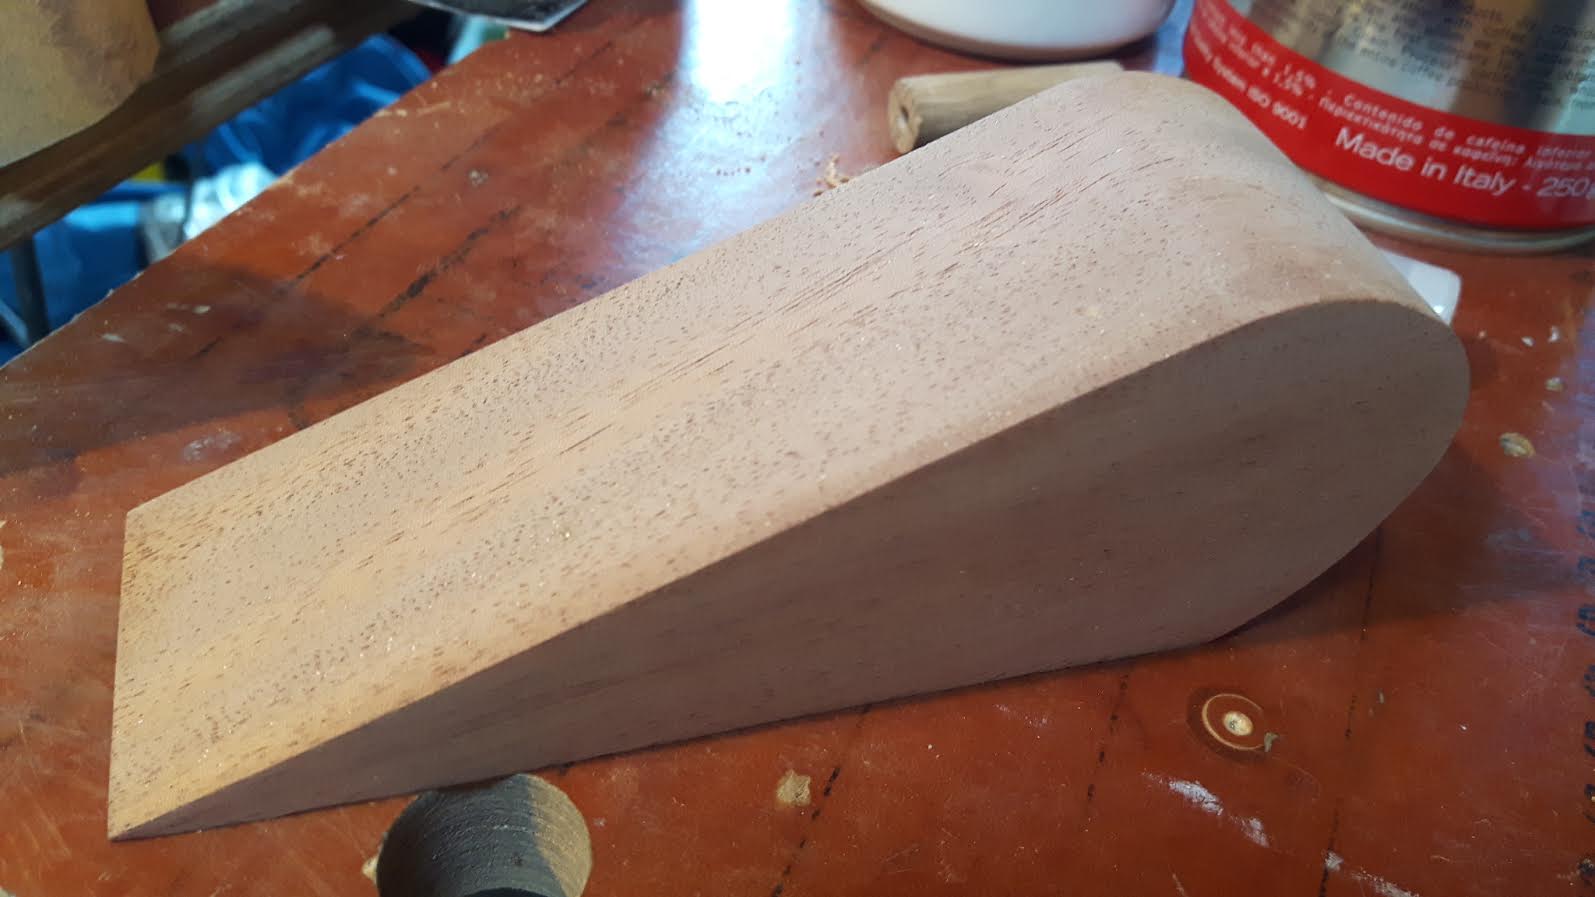
I started cutting the wooden bits. To save time I cut them from a 5" block of mahogany on my top of the range Evolution chop saw. I then spent about a day trying to get the cuts squared off.... Lesson learned, again. You can hide a few mm out of square on a window sill. Not when the wood has to be cut this accurately. So the chop saw was shouted at and demoted and lost all shore leave. That'll teach me for not having more faith in my handsawing abilities.
Measuring the angle from the mouth to bed the wood in correctly was done by wizardry and jiggerypokery. And a little bit of luck.

PeMccen.jpg


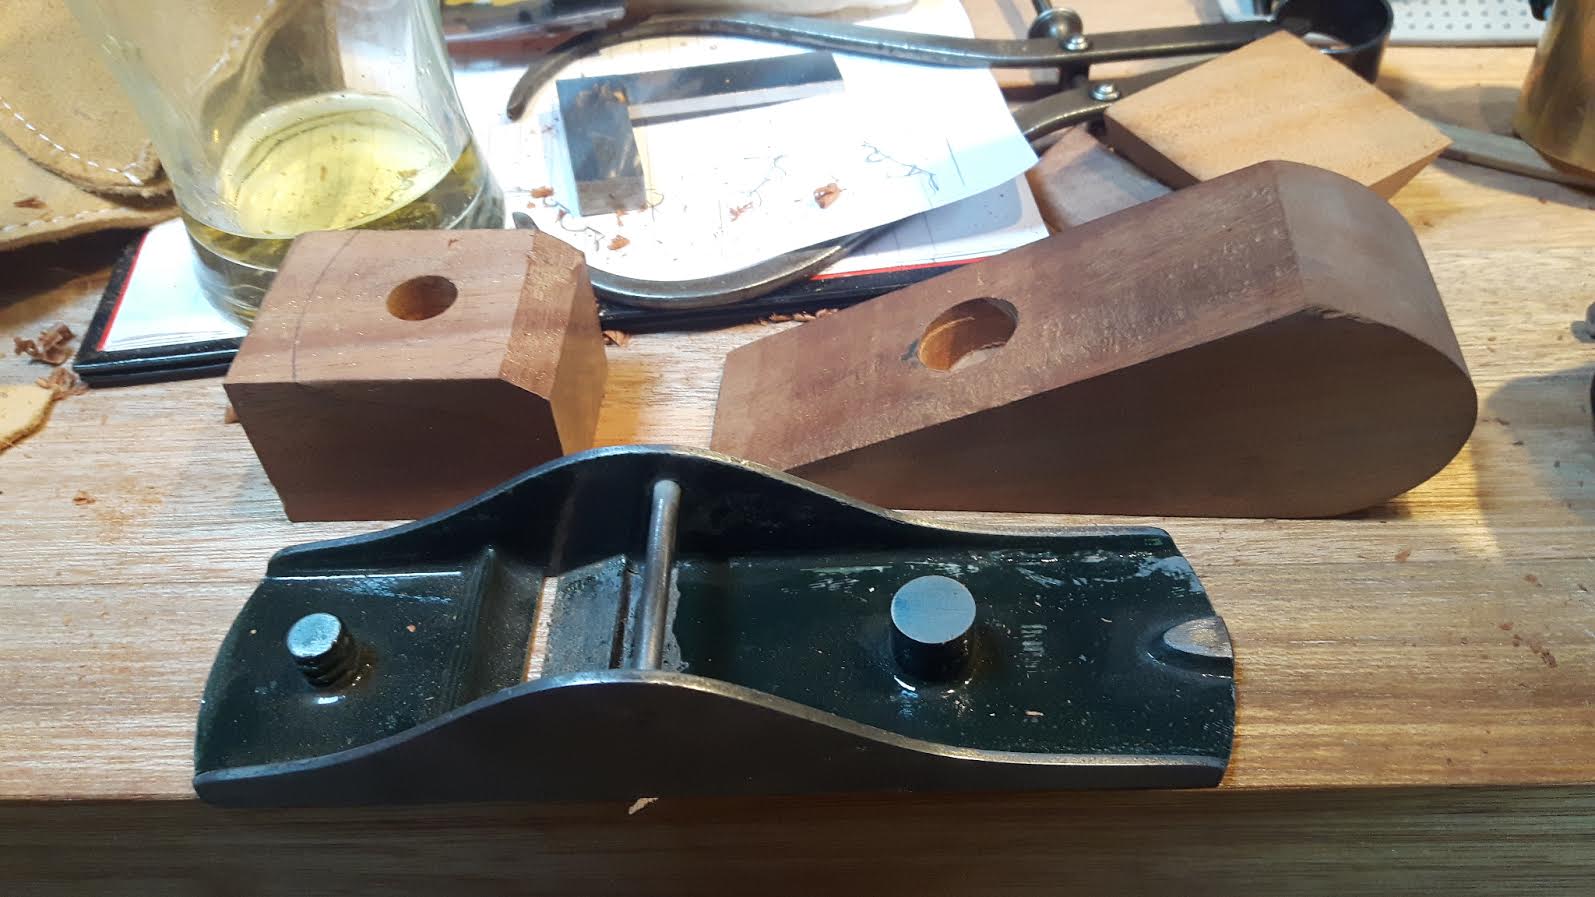
I cut the rear bit off to fit then drilled holes by hand with forstner bits (thankyou Benjamin!), the plan is 1, they will provide stability for the gluing of the handles and 2, i'm possibly planning on laying in a thread and a brass screw of some variety. To hold stuff in place, but also for looks and razzle dazzle. 8)

4oUtyxp.jpg


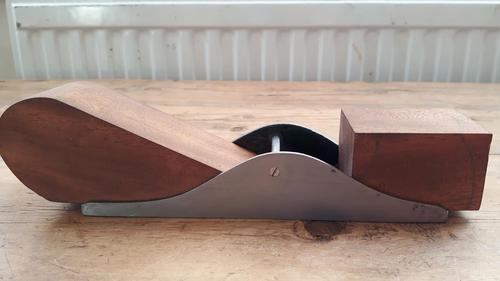
Tons more work to do and loads of ways that I might still mess everything up.

E2d2ypS.jpg


So. The real reason for posting.
I had a sudden thought that I need to get the blade now before I do any more work trying to fettle it all up. That way I can work with real error margins.
I think its a 1 5/8" blade. I was planning on a QS workshop Heaven blade originally. But it seems that's not available. Hock, Clifton and Veritas all do the right dimension blades. But of course they are all super pricey. Any ideas? I'm mostly after an off the shelf solution though perhaps cutting down a thicker wood iron is not out of the question.
Also and more importantly (in fact the whole reason for this post), I want to shape a brass lever cap to wedge under the bar to secure the iron. (I'm nowhere near being able to drill pivot pins etc). Would the lever cap/screw be man enough to hold the iron in place without some form of wedging? Chip breaker? If it's a 3mm blade? I think I might be able to shape the lever cap to act as a chipbreaker. Any ideas?!?


I'd be grateful for any knowledge you can throw this way.

Cheers as always

Chris
 
A few questions:
- Do you have a drawing or sketch of what you want the finished plane to look like?
- What metalwork tools and facilities do you have?
- What is the width of the mouth?

A few initial points:
- If the iron is bevel up you will not need a chip breaker.
- A good iron can be made from gauge plate (O1 steel).
- I would aim for mechanical methods of attachment rather than glue.
 
rxh":k40pu32l said:
A few questions:
- Do you have a drawing or sketch of what you want the finished plane to look like?
- What metalwork tools and facilities do you have?
- What is the width of the mouth?

A few initial points:
- If the iron is bevel up you will not need a chip breaker.
- A good iron can be made from gauge plate (O1 steel).
- I would aim for mechanical methods of attachment rather than glue.

Thanks for the reply.
Erm... no plan as such.... I have it fairly squared away in my mind. Does that count? :D I want to round off the rear handle to some extent so it's comfortable in the hand. The front knob, I'd like to square off a bit if I can pull the accuracy off. Might need to buy a scraper to finish.
Metalwork tools, a few files and a clarke belt sander. Drills etc, the usual but that's about it.
The mouth is clean and has the space to open up for a thicker blade.

Good news about the chipbreaker. That means I can use a thicker bit of brass for the cap. Thanks for that. I was getting a little worried about fitting it all in.
I'll have a look at gauge plate. Hadn't thought of that. Ty.
I had thought of using epoxy and screwing through the sides then filing the heads flush. Bearing in mind what you say I'll go with that.

Thanks again.
Chris
 
I wouldn't even attempt to perform something so tek-knee-cull, but your OP made me giggle, so I kept on reading. Please keep posting and don't change the style - if you don't achieve everything you want with this plane, then comedy writing might be just round the corner =D>
 
Bm101":3p9dqzbw said:
I had a sudden thought that I need to get the blade now before I do any more work trying to fettle it all up. That way I can work with real error margins. I think its a 1 5/8" blade. I was planning on a QS workshop Heaven blade originally. But it seems that's not available. Hock, Clifton and Veritas all do the right dimension blades. But of course they are all super pricey. Any ideas?
I'd get a Faithfull iron. I'm very happy with how my one performs and I have a mate who has two and he has no complaints either.

The 912 is the one to get if you need 1 5/8". It's six quid from Amazon Prime.

Bm101":3p9dqzbw said:
Also and more importantly (in fact the whole reason for this post), I want to shape a brass lever cap to wedge under the bar to secure the iron. (I'm nowhere near being able to drill pivot pins etc). Would the lever cap/screw be man enough to hold the iron in place without some form of wedging?
I think it's either a wedge or a lever-cap/screw-cap jobbie, not both. If you're after a wedge that makes it easier as you don't need brass.

Bm101":3p9dqzbw said:
Chip breaker?
Bevel-up planes don't have cap irons.

Bm101":3p9dqzbw said:
I'd be grateful for any knowledge you can throw this way.
I presume you're after some great performance, that's the usual goal with doing a wooden infill of any type? I think ideally you should have an adjustable mouth for something like this but regardless, to improve how it works on awkward grain you want a steep bevel, well over the 30° honing angle that is commonly used.
 
Thanks Ed, I'll take a look at the Faithfull irons.
Appreciated as always.
:D

Edited after taking a wander down to pick my lad up from school and having a think.

I want to make the brass lever cap, not a wedge. I recently did a bit of working brass to make a drill handle and I really enjoyed it. If I don't need a cap iron, great. Cost goes down! But here's the rub (quite literally in fact). The way I pictured it I could cut a channel in the wedge/handle for the cap screw. This would add lateral stability if a bit of a clunky solution. Not needing a cap iron for a bevel up blade then surely the only thing keeping the iron in place is the dual friction of the brass lever cap, acting as a chip breaker at one end and the screw at the other pinning to the bed.

Bear with me here. :D

If that's the case then don't I need an iron with no slot cut out. A solid blade if you like? In fact the last thing I need is a blade with a slot milled out. Am I right? :| Anyone know a good source?
The back bed is 25 degrees, with a 25 degree blade I should acheive a 50 degree angle, about right for a block plane configured for difficult grain?

Thanks again!
 
Bm101":1kzgyjet said:
The way I pictured it I could cut a channel in the wedge/handle for the cap screw. This would add lateral stability if a bit of a clunky solution.
Jamming a wedge of wood into a tapering recess in a block of beech is a bit of a clunky solution to keeping the cutter from moving but it seems to work okay :D

A brass cap won't act as a chipbreaker, it'll be set too far back for a start and anyway a chipbreaker mates with the flat of the iron, it's not above the bevel.

You could certainly use a flat piece of tool steel as your iron. I don't think having a slot will cause a problem but if you'd prefer a solid iron go for it. I think the only way you'd be happy with the cost of it would be to make the iron from scratch though, unless you can salvage an unslotted old iron from a car boot find.

Bm101":1kzgyjet said:
The back bed is 25 degrees, with a 25 degree blade I should acheive a 50 degree angle, about right for a block plane configured for difficult grain?
That's what some sources say. But I'm not convinced the extra 5° is enough to give a big jump in performance. York pitch smoothers commonly had a very tight mouth, and of course that alone can begin to conquer tearout when working difficult grain. For a narrow plane like this I think it's worth going full on and trying a steeper honing bevel (microbevel), as I did on the Stanley block plane I restored recently.
 
Ha ha, yeh. Ok I get your point. I meant for my purposes not reinventing the woodplane! You know what I meant! :D Seems it's a moot point anyway.
So, like British Rail ...we're getting there. In a disorganised chaotic mismanaged shamble but getting there.
Im a little nervy about cutting steel and then grinding by hand with files at 25-30 degrees accurately but then again, Who Dares Wins Rodders. I'll have a look for an off the shelf solution first though just to save the nerves/back/time.
Cheers Ed, your input is always appreciated mate.
Regards
Chris
 
Bm101":13mm2523 said:
Im a little nervy about cutting steel and then grinding by hand with files at 25-30 degrees accurately but then again, Who Dares Wins Rodders.
The initial cutting to width is what would give me pause, forming the bevel manually not so much. It's a doddle. Dodd-le. It doesn't have to be accurate per se, it just needs to be uniform (relatively) and fairly square since you can tweak it later when you go to actually sharpen.

You don't need to file it, although in many respects it is the easiest way to shape the edge if you have a suitable file. You can just go to your sharpening stones same as if you were sharpening. Your muscles will have all the right memory to get the angle about right (no need to sweat getting it dead on 25°, a few degrees off doesn't matter) and as the steel won't be hardened yet it'll be the easiest bevel formation you'll have ever done.

I have a feeling this is all Interesting But Irrelevant though Chris. I just scrolled up to the top of the page to log in and looked at the first photo again. I couldn't help but notice the original iron lying on the table behind the casting (I'm quick that way). A bevel is already formed on it of course. And it's even solid like you would prefer.
 
Thanks Ed. It's possible I can get the width precut I suppose. I'll have to check later. Cutting square worries me more than the bevel as you say. I have a parkside grinder come to think of it. Take it slow with a bowl of water nearby to keep it cool, could be pretty quick. Files and stones to finish. Eternal optimist. It's half done already lol.
I have the original blade but it's thinner than a supermodel on a bikini diet. I want the extra couple of mm on the blade to justify the rest of the work and time on the plane and hopefully the results it provides. So far this has cost me pennies. Even with the brass and steel I'm hoping it will be just a few quid. No one likes throwing money away but it's becoming a weird personal challenge to keep the costs down on this.
 
Bm101":134dji8s said:
Thanks Ed. It's possible I can get the width precut I suppose. I'll have to check later. Cutting square worries me more than the bevel as you say.
It's getting the sides parallel that would concern me, square's relatively easy (especially as only one end needs to be square). Just use permanent marker to colour the steel, strike a line, grind to it.

Bm101":134dji8s said:
I have a parkside grinder come to think of it. Take it slow with a bowl of water nearby to keep it cool, could be pretty quick.
No dunking needed Chris, if you were making an iron from scratch the major shaping would be done with the iron in an annealed state so it doesn't matter how hot it gets during grinding.

Bm101":134dji8s said:
I have the original blade but it's thinner than a supermodel on a bikini diet. I want the extra couple of mm on the blade to justify the rest of the work and time on the plane
Okay fair enough but are you willing to pay for a fat iron, just for the look of it? Because a thicker iron might make little difference to the performance, possibly none at all.

Sounds like you wouldn't be happy paying more for a thick iron than everything else combined, multiple times more at worst. I certainly wouldn't be. So if you must have it to be happy with how the plane looks here's a tip you almost never see: epoxy a piece of mild steel to the existing iron to build up the thickness.
 
Thanks Ed, missed your reply, sorry. I hadn't thought of the steel being annealed re. the grinder. I really am that new to metalwork. :oops: But I have the internet on my side! *blows tiny victory trumpet.

So I stumbled down the rabbit hole again and did some serious research. Re: I looked for some solutions over a couple of pints of Jack Ratt award winning scrumpy. :D I'll give you three guesses where I ended up.... No. Not unemployed and in a hedgerow you cynics! Back on UKW. You have to love this site sometimes.
From rxh's advice I started with 01 gauge plate. Sometime later I'd formulated a plan. Of sorts. I can get 40 mm plate off the shelf or 1 and 5/8" cut to order. Need to email them to ask the price for that but 40 mm it probably is then. Close enough.

Then I looked up hardening. :shock: 700+ degrees?!? As my breathing got a little panty i thought ....hold on... Uncle Huw! Think about it! Really short, stocky, big beard liked a few beers and a good fight now and then... Metalworking's practically a Family Tradition. Probably.
So with thanks to Pete Madex (Thanks Pete!) the burny bin and a hairdryer it is.
Colour check the blade as best I can wack it in oil, wipe, then in the oven for a hour and a half to temper. Probably with a roast chicken to save on the leccy. :roll:

Job's a good un!
What could possibly go wrong?

SAulNNU.jpg
 
:lol:

Bm101":216z4dg7 said:
Colour check the blade as best I can wack it in oil, wipe, then in the oven for a hour and a half to temper. Probably with a roast chicken to save on the leccy. :roll:
A man after me own heart! If you quench in motor oil do make sure you do more than wipe off the steel, use WS first then thoroughly wash it before it goes in the oven or you won't enjoy your chicken.

And anyway you might want to degrease so you can polish up a section to check the tempering colour.

Bm101":216z4dg7 said:
What could possibly go wrong?
Actually heat treating is pretty much as simple as it sounds for basic stuff and if you follow directions closely you can get it right first time. For small pieces and thin sections one blowtorch and a couple of nested tin cans is enough to reach the right temperature range, even with butane.

On the off chance you don't get the steel hot enough before quenching the first time you can usually try again at least once and possibly multiple times without the steel becoming too decarburised.
 
Thanks Ed. I really appreciate the time you've taken to help out.
 
A barbecue is good for heat treating irons. Dusk is a good time so the red heat shows up. When it is hot enough a magnet will no longer stick to the iron (thanks to Racers for that useful tip). I quench in used cooking oil as it doesn't make a filthy smell like engine oil. Holding the iron vertically when lowering into the oil is said to reduce the risk of distortion. The oil may well go on fire but you can easily put it out with a metal lid. Wearing suitable PPE is obviously a good idea. The iron will come out blackened and it is best to clean it up with abrasive paper before tempering in a domestic oven.
 

Attachments

  • IMG_2204C.jpg
    IMG_2204C.jpg
    212.5 KB · Views: 1,019
O1 steel can be cut by hacksaw and filed in the annealed state (as delivered). Scribe a line on each side at the desired width, saw outside the line, then file down to the line, finish by draw-filing.
 
The paper wrapping of the gauge plate (O1 steel) has tempering instructions:
 

Attachments

  • IMG_2027C.jpg
    IMG_2027C.jpg
    239.4 KB · Views: 1,016
Brilliant tips rxh. Many thanks! I'll order the steel today. I'm looking forward to trying this now I have to admit.
 

Latest posts

Back
Top