how do i make a truly flat lamination

UKworkshop.co.uk

Help Support UKworkshop.co.uk:

This site may earn a commission from merchant affiliate links, including eBay, Amazon, and others.

dirtydeeds

Established Member
Joined
23 Nov 2006
Messages
194
Reaction score
0
Location
kent
I need to make door stiles 150x34mm thick (finished). my source material is 170x20m par (finished size) american kiln dried oak

for a lot of complicated reasons the stiles have to be PERFECTLY flat


im very new to lamination. so i need your help

first

how do i make the lamination perfectly flat because although i can thickness timber i havent learned how to remove a bow

second

what is the best glue type for lamination

im not considering lipping the edges at the moment
 
dirtydeeds":2vxteeoq said:
although i can thickness timber i havent learned how to remove a bow

Normally this would be planed out first on a jointer (surface planer)or by hand, then this flat "face" side is used as a reference face for thicknessing. Hey presto, parallel straight sides.
 
thanks for getting back mark

jointing and thicknessing isnt the thing that eludes me, i can get 4 fully square edges

but some timber remains bowed even after that process.

how to explain what i mean.............?

lay a piece ive worked, on the chosen wide "face" on a flat surface, and either it is hogged in the middle or it rocks end to end


its removing this bow and or laminating in a manner that removes the bow that eludes me


the reason for considering lamination is that i have noticed that when i laminated a piece of 18mm oak and a piece of 10mm stock (last week first ever lamination 1200 long)

after removing it from the clamps it had removed a lot but not all of the bow.

i had clamped the lamination to a piece of flat large section meranti
 
It sounds like you are not surface planing properly to start with which means you never have a flat surface. If you don't have this flat surface then thickessing will just produce a board of constant thinkness but not actually straight.

The approach I take is:

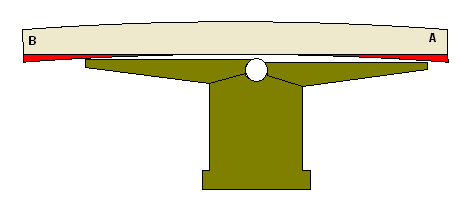
Find which way the board is bowed and position it so that as far as possible, the ends are in contact with the planer and the middle is bowed upwards. This can be tricky if the board is twisted as well but the trick is to then feed the board through the planer without letting it rock or pressing so hard it flattens the bow out. Repeat this until you have one flat side. This is probably the hardest part and can require the removal of a lot of wood if the board is badly bowed but as far as I know it is the only way to get it flat.

Next, place the board with the flat face against the fence and joint one edge. You now have face side and face edge.

Step three is to thickness the board to give two parallel and hopefully flat surfaces.

Finally, I rip the board to width on the table saw and joint the final edge.

This works for me.

Cheers
Mike
 
It's a perenial problem I'm afraid. sadly just because a board has been planed dead flat on one side doesn't mean it will remain so, even without the added complication of removing material from the other side when thicknessing. The problem is that any material removal will tend to release stresses in the timber. Most people (myself included) seem to have adopted a policy of "sneaking up" on the finished size. This involves basically 2 parts to the process:

1) Try to remove an equal amount of material from both sides. This will help to "balance" the timber in that the stresses will be released equally from both sides resulting in less movement.

2) Stop a little shy of your finished size and wait a day or so (more if poss) with the timber stacked and stickered in an environment as close as possible to it's eventual home. Then plane to finished size once the timber has relaxed into it's natural position.

Lamination can work but is usually used for the opposite purpose i.e. locking in stresses to create curved work. Using the technique for straightening I can imagine would be rather hit and miss since it relies on matching boards with equal and opposite tendencies as well as equal and opposite defects (bow) to begin with.
 
dirtydeeds,
I am reading it that your timber is already dressed all round, and that you have to use it more or less as is. You can't take a 10mm bow out and still finish up with a 20mm thick piece.

What I'd be trying to do is this.
* My flat section I was clamping to would be thick enough to not get pulled out of straight itself.
* I would lay the laminations alternately bow up then bow down, so they neutralise each other as much as possible.
* In an extreme case and if the appearance did'nt matter,I would try a few shallow saw cuts on the inside face of each lamination (staggered of course, don't put two cuts together.

If you have access to a jointer, laminate first and then joint and thickness after. Again this depends on if you are making a feature of the laminations.

Mike uses a jointer the same way that I was taught to. (Mike, I've seen guys doing it bow down and they seem to manage OK, but it's a bit hit and miss for me). Here is a sketch that I did once to illustrate it. Take a few cuts at "A" then swing end from end and a few at "B" till it sights straight.

planer.gif


Cheers
Bill
 
Back
Top