Hardening a new plane blade

UKworkshop.co.uk

Help Support UKworkshop.co.uk:

This site may earn a commission from merchant affiliate links, including eBay, Amazon, and others.

Bedrock

Established Member
Joined
12 Feb 2014
Messages
286
Reaction score
2
Location
Hampshire
Nearly finished shaping a new O1 plane blade. Previous results have been fairly good, but not always consistent.

Question - harden then grind primary bevel, which seems most logical, or primary bevel then harden?

I am intending to use vegetable oil which worked well the last time, but any other recommendations for oil or water hardening?

Mike
 
While quenching blade can be bent. If you have a belt sander, harden then grind the bevel. Else grind the primary bevel but left 0.5 - 1mm thickness on edge than harden it.
 
Partially cut the primary (or file, whatever you like) before heat treating. I wouldn't cut it all the way, but you can probably get away with it if you want to - chancing additional warping.

Vegetable oil for me, too. Preheat it a little bit (presume you already do that) so that you get good heat transfer from the iron to the oil. I don't know exactly what a little bit is, but if you've got nothing to reasonably heat it safely, take a junk iron and heat it and quench it in the oil a couple of times (a piece of mild steel would work fine, too) and mix the oil.

I have always partially cut the primary bevel before hardening and never had a problem. George Wilson (a toolmaker) advised me to cut the entire bevel afterward, so I've never had the stones to cut the entire bevel all the way to a fine edge due to fear of additional warping.

Oil only. If you quench O1 in brine or water, you're likely to end up with a broken iron. Same with W1 if it's thin.

I've never done a laminated iron, I would suppose that's the only reliable way to quench something so thin as a plane iron in water. Razors are oil quenched, also, in what would seem like water hardening steels.
 
Do most of the bevel before you harden, leave about 0.5-1mm.
I would try to polish the face as well O1 can have some deep grinding marks in it, takes a while to remove them as I have found out.
Vegetable oil will be fine I use old engine oil, because I have a lot of it.

Pete
 
+ 1 about the grinding marks, they can take a while to remove so best done before you harden. I use vegetable oil, far cleaner than engine oil.

Not tried it myself but have been advised you can temper it a little bit afterwards if required by boiling in water. No idea what hardness you'll likely to get though.
 
When I made my rebate plane, I used peanut oil and then ground the bevel. It really didn't take long at all. I suppose if you are cutting a 3mm thick blank it may be different.
 
woodpig":209ho7xn said:
Not tried it myself but have been advised you can temper it a little bit afterwards if required by boiling in water. No idea what hardness you'll likely to get though.

Not hot enough to temper. You need to reheat to something like 220-240; either a very hot domestic oven or gentle blowtorch to the "bees wing" just past dark straw colour.

The main issue with grinding first, IMHO, is decarbonisation of the thin cutting edge, needing it to be ground back again to good metal, rather tgan distortion. The advice to grind most of the way leaving 0.5 - 1mm edge is the way.
 
Sheffield Tony":csi8yg6y said:
woodpig":csi8yg6y said:
Not tried it myself but have been advised you can temper it a little bit afterwards if required by boiling in water. No idea what hardness you'll likely to get though.

Not hot enough to temper.

That's what I thought initially but several people confirmed it takes some of the initial hardness away so I expect we're both wrong. :wink:
 
Thank you all for your advice. My logic suggested that if I ground to full primary first, then the thin edge would end up a different hardness, as you have confirmed. I like Pete's advice that I leave 0.5-1.0mm unground, before hardening.

As a result of other posts, the cap iron will be a home-made"Clifton" type 2 piece. I started hand filing the groove last night. Interesting, so far using a timber guide piece clamped at right angles seems to work fine and keeps the edges of the groove crisp.

PS Pete, have recently started the blackberry jam - superb.
Mike
 
Thanks Mike.

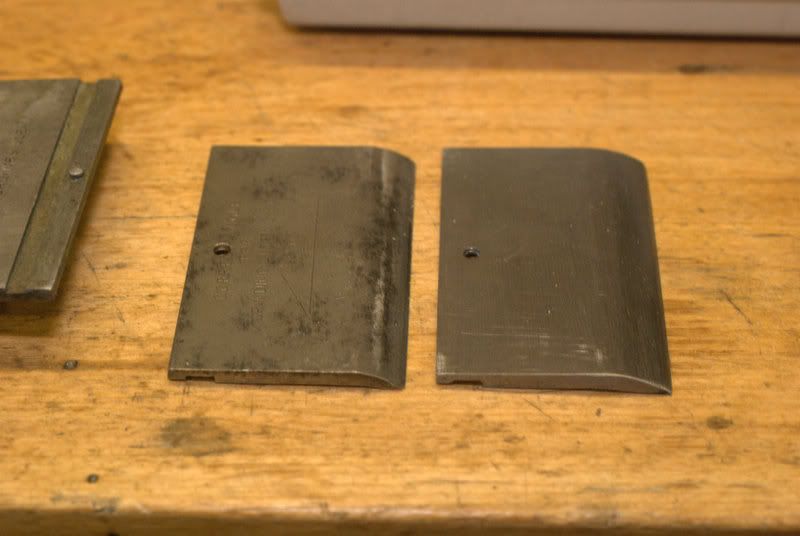
I made a cap for a stay set cap iron, I used a hacksaw to start the grove.


Mines on the right.

Pete
 
Pete

How important do you think the pin is? I have no issue with fitting one, but is it's purpose to help hold the two pieces together, or is there something more subtle?

Mike
 
I am avoiding the parallel blog re thin irons, for obvious reasons.

However, if you have say a 3mm. thick iron with an ideally designed 3mm thick Stay set or similar cap iron, do you effectively have a 6mm thick blade? I appreciate that the shape, mating and position of the cap iron has an effect, but I did not want to open that can of worms again.

With some trepidation
Mike
 
For temperig two 1 hour cycle at 200 C in an domestic oven should be enough. Boiling waters temperature too low for tempering. For decarbonisation if you can find an anti-scale compound, it would help.
 
Bedrock":16gtyrhc said:
Pete

How important do you think the pin is? I have no issue with fitting one, but is it's purpose to help hold the two pieces together, or is there something more subtle?

Mike

I remember readiing to use a small dab of silicone caulk to keep the two pieces together. May have been a David Charlesworth tip. I don't use anything on my "Stay-Sets", as I free hand sharpen and hone, and the piece cap makes it very simple.
 
Bedrock":2hgmk858 said:
Pete

How important do you think the pin is? I have no issue with fitting one, but is it's purpose to help hold the two pieces together, or is there something more subtle?

Mike

It holds the grooved joint apart which seem the wrong thing but it would be difficult to get both ends of the cap sitting level, so a single point of contact alows the edge near the blade to be clamped flat because it can pivot on the pin.
The groves are just to stop the cap from moving up and down.

Not just a simple thing is it!

Pete
 
Back
Top