Gate build help required please folks.

UKworkshop.co.uk

Help Support UKworkshop.co.uk:

This site may earn a commission from merchant affiliate links, including eBay, Amazon, and others.

Mreagleeyes

Established Member
Joined
25 Oct 2009
Messages
191
Reaction score
0
Location
London NW9
I recently posted a thread asking whether a Domino fixing would do the same as a Mortice & Tenon joint.
https://www.ukworkshop.co.uk/forums/gate-build-mortice-tenon-or-domino-t42030.html
Thanks all for your response's.

So I have the timber and it's all ready planed up and ready to go. However a "Chippy" friend has said that to construct gates of the size I need, I would require a diagonal stretcher to remove the possibility of 'Sagging'.

I am going to use a standard Mortice & Tenon method and may try a Fox Tenon (thanks Mike H) to eliminate the water penetrating the end grain of the joint.

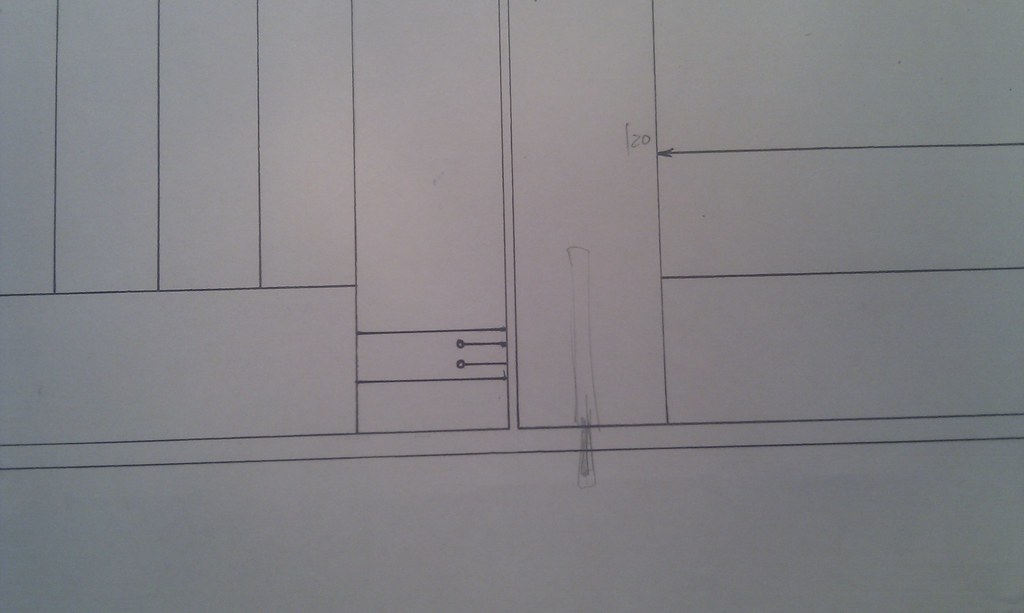
I have enclosed a couple of pictures from my drawings, not the best quality but hope you get the idea.

A few measurements.
Each gate.
The width will be 1110mm, height 1720mm. I am using 150mm x 70mm for the outer Carcass and the panels are 20mm in thickness and will sit in a routed groove in the carcass.
I will dowel the Tenons allowing 2mm difference in the holes to 'Pull' it all together as well as TiteBond III and some heavy clamping.

I'm fairly sure that the because of the tenons size and the fact they go through 150mm they will be more than strong enough.

The timber is European Oak.

I've been wrong before so hoping you guys that have made them before maybe able to help.

This is showing the Two gates, the one on the Left showing the Panels and the one on the Left just showing the Carcass assembly.
4748593489_3a1e2ac26f_b.jpg


The detail of the M&T. Not to size, was simply drawn on to show the client.
4748591937_51f571337f_b.jpg
 
Two points to begin with. Any tenon is likely to permit water entry, it goes with the territory I'm afraid. I normally use PU glue as this seems better at sealing any gaps that may exist.
The vertical panel timbers would be better as T and G to allow for movement, also I normally run them straight to the bottom as this eliminates a further water trap.

Roy.
 
Hi

The construction of the gates are absolutely fine IMO, however i think if the gate posts aren't concreted in correctly they will move under the weight of the gates, as they will be very very heavy when complete. It maybe a thought to to put a head in on the frame/gate posts to brace them off each other to eliminate any caving in of the posts.
 
The construction will obviously be as that for a door (re: the M&T's and spacing etc.) - I don't think you'll have any issues with sagging. I recently'ish made a door that was about that width and a little taller.. - not had any issues with sagging\racking and the damn thing weighs 60-70Kg!

If it's your 1st ('ish) set of gates I would do regular tenons - you get plenty of goes to test fit, etc. even with wedges. :wink:

HIH

Dibs
 
Hi
Couple of points really. First, the drawing shows no haunching and the position and width of the tenon is not ideal, you could have done with wider bottom rails, 9"/10", and twin tenons, maybe you could glue up and widen? here is a quick link i found in a hurry which gives you some idea, http://www.geoffswoodwork.co.uk/mortise01.htm the method of wedging is not one i favour myself, i prefer to have the wedges to the outer edges of the tenons, the type you show can be used, but not my own first choice for work of this nature.

I would also add a mid rail myself, again barefaced tenon to allow boarding to runover, i would also have a bare faced tenon on the bottom rail and run the matchboarding over and through to the bottom cut line of the stiles. This then does not allow water to get trapped on top of the bottom rail where the matchboarding sits.

Bevel all top edges and bottom edges{forms a good drip} on the mid/bottom rails to allow them to shed water. And i would most certainly be putting in diagonal braces, they will most certainly drop without them.
Hope that helps a bit.
 
Based on my own not that dissimilar gates in Iroko there's maybe something to be said for blind tenons - i can't really say as i don't have the experience, but the exposed ends on mine soak a lot of water and tend to grow mould.

The maker (a professional window outfit) sealed them with silicone, but it doesn't seem to have added much.

Definitely give some thought to the path to be followed by water running off, and make sure there's nowhere for it to gather as it'll otherwise probably soak the timber. Horizontal rails placed face to face behind the planking seems to trap water in the gap too.

Another area that gets wet is the exposed (horizontal and upward facing at the top end) end grain shoulder on the sheeting/planking where the tongue is formed to engage in a groove in the inside faces of the rails. It was maybe worsened (?) by being chamfered by about 4 x 45 deg. There's maybe a fix for this (maybe even just making sure the end grain is well filled with varnish or whatever), but i don't know what it is ...
 
You may want to take a close look at this diagram. It takes a bit of unravelling, but all the details that others have mentioned are included.

http://i915.photobucket.com/albums/.../ac353/GraemeMoores/FLBBasics.jpg[/img][/img]
 
If I understand your drawing correctly I agree with Ian, what you are showing is a wedged through tenon. A fox wedged tenon is always blind, it's a one shot deal putting them together so it's worth the effort to do a trial one on some scrap first. If done correctly they will fit tightly and once assembled they will never ever come apart.
 
Why have the side rails extend all the way to the top? Wouldn't it be better to have the top rail extend over the side rails, so avoiding horizontal end grain exposure to rain?

picture of what i mean

223085831.jpg


Might wanna do the bottom rail like this (tongue/groove) instead of the routed groove you suggested, this won't keep any water captured. You can just see it in the lower left hand corner of this picture, sorry for the lack of better pictures:

374276584.jpg


I've also used epoxy glue on my gate project, very strong and totally water proof.
 
Regards the comment of the top rail extending over the stiles {rails are the cross members, stiles are the verticals} and the proposed bottom rail detail shown, all of these suggestions are more akin to making small cabinet doors, not medium, large joinery projects. Looking at a lot of the comments, you should be looking to traditional joinery methods, not to cabinet making ones. After all doors, gates etc have been made for a few hundred years, now everyone seems to want to think they have some new idea to improve it. A lot of what has been said would leave any joiner with a smirk on his face.
Regards glue up, any construction needs to allow for seasonal movement, and the correct construction and glueing should always make allowance for movement during these periods, so, as in the case of tenons and stiles, glue should be applied to the tenon close up to the shoulder only allowing for shrinkage of the stile itself.
There are a number of good books on the subject, it may pay you to have a look through before chopping out anything.
There is a reason joinery and cabinet making are seperate trades, both look to different techniques, or ways to which they are applied.
 
Another advantage of chamfering off the top of the bottom rail is that it doesn't give any toehold for the little bleeders -- sorry, children - too swing on.
 
Hi Mark. It's an interesting topic this one, in that the one thing that's very clear from my own gates (the professionals that made them weren't very professional) is that seemingly insignificant design issues can cause a lot of trouble - especially when the weather gets involved.

Is there a proven joinery reference book for outdoors gates, doors and the like you know of?
 
The vertical panel timbers would be better as T and G to allow for movement

They will be. The idea is that they are 'floating' inside the carcass to allow for swelling and movement. I have seen people that run a bead of silicone over this area but not sure that will do much after a British winter.

The construction of the gates are absolutely fine IMO, however i think if the gate posts aren't concreted in correctly they will move under the weight of the gates, as they will be very very heavy when complete. It maybe a thought to to put a head in on the frame/gate posts to brace them off each other to eliminate any caving in of the posts.

I'm using M10 anchor bolts in to the brick work on either side and have used this method before and not had a problem, they will be concreted in to the ground but only by a few inches.

Couple of points really. First, the drawing shows no haunching and the position and width of the tenon is not ideal, you could have done with wider bottom rails, 9"/10", and twin tenons, maybe you could glue up and widen?

I am not going to use a haunching as I think the face surface will be more than fine, I may be wrong on that. It's a large surface area that the two faces meet at. The tenon is just showing the place that it will go for the client, not to scale or anything.
Thanks for the link, very useful.

i prefer to have the wedges to the outer edges of the tenons

I don't get what your saying here. Do you mean I should have the wedges not at a division of '3' at the tenon end?.

If I understand your drawing correctly I agree with Ian, what you are showing is a wedged through tenon. A fox wedged tenon is always blind, it's a one shot deal putting them together so it's worth the effort to do a trial one on some scrap first.

That's the reason I'm going with the through tenon, not sure I am in a position to take the gamble of doing a Fox tenon. I would always have doubts about it simply collapsing one day in the future.

Why have the side rails extend all the way to the top? Wouldn't it be better to have the top rail extend over the side rails, so avoiding horizontal end grain exposure to rain?

I'm using the through tenon technique and if I was to have the top rail running the full length I would end up with the tenon face in direct contact with the elements. I could always add a blanking piece to the top though. This would be fine if I was going to use the Fox tenon technique. It's also not the traditional method.

A lot of what has been said would leave any joiner with a smirk on his face.

:wink:

glue should be applied to the tenon close up to the shoulder only allowing for shrinkage of the stile itself.

Should I be concerned with the wedges failing under the movement of the timber if I was to only glue the shoulder faces?.
I plan on running dowels through as well. I am not sure of what offset to have in relation to the the two pieces. I thought it was 1mm but I'm sure I read on here that someone is using a 3mm offset between the dowel holes. Any ideas?.

Another advantage of chamfering off the top of the bottom rail is that it doesn't give any toehold for the little bleeders -- sorry, children - too swing on.

Ha ha, nice one. The clients a dog breeder, not nice little dogs either.

Is there a proven joinery reference book for outdoors gates, doors and the like you know of?

I use 'Modern Practical Joinery' by George Ellis, a great book that is very old but as said on this thread nothing changes in carpentry, just the machines to make it easier.

So in conclusion. I need to have a go at Fox tenons and see how I get on, be aware of sitting water, may introduce a haunching or possibly a 'Franking' tenon to ensure a stronger joint.

Thanks guys, there seemed to be a lot of negative posts recently but I have never found this and you guys above have proved that we are all here to help each other out.
 
Glad to help
Regards the haunching, one of its purposes is prevent the member/rail twisting, think of it as a means of location to the full width of the rail, the tenon is only ever going to be part width in terms of the rails width.It is not always used but if you are going to be grooving for the infill then it would be more work to avoid its use.
The wedging method is shown here http://sawdustmaking.com/woodjoints/mortisetenon.htm fig132, fig176, fig174 shows both fox and through wedging, as you can see traditional joinery wedges on through tenons are on the outer faces, not in kerfs apart from foxing, or other applications.
The wedges are always made so as they grab at the root end of the tenon, closest end to the shoulder. And this is only point you should apply glue to the tenons themselves, never the mortise on wide stuff, as the glue gets taken too deep into the mortise itself, and then when the stile trys to shrink slightly with changes of seasons, it gets held. Resulting in either a split stile, or if it has not be wedged right, the shrinkage occurring back across the stile width, ending with a gap on the shoulder. Drive the wedges on the outer faces first, then if you are using twin tenons, the inside ones next. Make sure you leave horns on the stiles and do not over drive the things, they just need to go firm then a good tap.Not beaten to death.

For 3" thick material i would be using twin tenons myself, as in fig168, many years ago on best work this would be used for mid rails on work and refereed to as lock rail tenons, this allowed the fitting of deep inline, lever, latch lock mechanisms, but it is a bit more work and depends if the client wants to pay for it.
Regards books, the one suggested is a great book and much can be learned from it. Some other good books to look for are books of standards for the Mod of old, turn of the century time, a rummage in second hand book stores can give you some great buys. They had standards and what was acceptable practice for just about everything, dare say the paperwork they have these days is no different. When you read such works, you wondered where all these skills have gone. Nowadays we have every tool under the sun, and yet the rubbish i see being sold, both from so called joinery workshops and the massed produced howdens types, is something you have to wonder at. Sometimes it is down to money others greed.

Hope some of that is useful to you.
 
A few points.

You say you tenon is not drawn to scale. Good, because the proportions are not right as it is drawn. The top of the tenon should be in line with the groove for the panel, the bottom should be a little way up, say 20 or 25mm from the bottom.

You have relief holes for the tenon slits. Good. But the slits should be closer to the edges of the tenon, not in 1/3 as you have drawn. the idea of the wedge is that it forces the edges out, but the edges have to be flexible enough to do that. I'd also make the slits much longer, down almost to the shoulder, and flare the mortices to match.

Marky, are you sure about the twin tenon on a lock rail? I think you mean a double tenon, don't you? I agree twin tenons here would be advantageous, but for a lock rail, where you want to leave solid face-grain timber into which you would mount a mortice lock, You would have two narrow tenons spaced far enough apart to house the lock. Using twin tenons you would remove a lot of the glue interface (and hence the joint strength) when you cut out for the mortice lock. Or am I missing something? It wouldn't be the first time. (Having said that, I did actually make my front door with twin tenons, but then it has a modern multipoint lock on it which doesn't require a very large mortice.)

Cheers
Steve
 
Agree 100% on those old books. I have one on workshop practice from an RAF apprentice mechanic uncle in the 1920s, and one of a series of carpentry and joinery volumes from a grandfather.

Both contain so much information, and are so well illustrated and set out. There was a right and wrong way to do everything....
 
Hi steve

Yes quite sure on the double twin tenons on a lock rail. Keep in mind a 10"/9" width of rail and the mortises are as you say inline with grooves, this leaves solid material at centre. If you look in the bible of joinery as some joiners refer to it as, Modern Practictical Joinery, by George Ellis, page 142/143 shows both the layout and description of this joint. I have only ever had the need for its use for a few jobs. But i have come across it in old work a number of times in better class work.It allows far more glue face, then what is left after chopping out a large inline latch/lock. Some of these i have fitted in the past are around 4" in height, and up to 7" deep. Coupled with 18mm/20mm cases.
 
Marky, I think we agree on this but I also think we are using opposite terms.

If I have two tenons side by side (ie their cheeks are facing each other, so one tenon is closer to the front face of the door and the other is closer to the back)), is this a twin tenon or a double tenon? And if I have two tenons in the centre of the thickness, but with a gap between them (ie one is higher up the door than the other, but both are central), is this a double tenon or a twin tenon?

If we are simply using opposite terms (and I hope it's not me who has egg on his face, but it might be) then I have no quibble with your advice. If we are using the same terms I don't quite follow your reasoning. But then I'm not an expert on joinery, either.
EDIT - and I don't have Ellis. I think I probably should.

S
 
Steve Maskery":nnkp5xpl said:
.......
If I have two tenons side by side (ie their cheeks are facing each other, so one tenon is closer to the front face of the door and the other is closer to the back)), is this a twin tenon or a double tenon? Double tenon

And if I have two tenons in the centre of the thickness, but with a gap between them (ie one is higher up the door than the other, but both are central), is this a double tenon or a twin tenon? Pair of single tenons

If we are simply using opposite terms (and I hope it's not me who has egg on his face, but it might be) then I have no quibble with your advice. If we are using the same terms I don't quite follow your reasoning. But then I'm not an expert on joinery, either.
Steve Maskery":nnkp5xpl said:
EDIT - and I don't have Ellis. I think I probably should.

S

Yes, you should :wink:

Ellis's terms in red above
 
Hmm.
Well that explains it. I would have said that the first above is a twin tenon and the second is a double tenon. And now I'm faced with finding the source of my terminology. I haven't made it up but I don't know where I got it from.

If I'm lucky this will be a case of different people using different terminology over a long period of time. If I'm unlucky I have egg on my face for posterity, because I've produced a body of work consistently using these, er, alternative, names!

Package in the post, Roger.
S
 

Latest posts

Back
Top