Folding knife project and first attempt at inlay work

UKworkshop.co.uk

Help Support UKworkshop.co.uk:

This site may earn a commission from merchant affiliate links, including eBay, Amazon, and others.

3billy3

Member
Joined
19 Feb 2013
Messages
9
Reaction score
0
Location
Somerset - UK
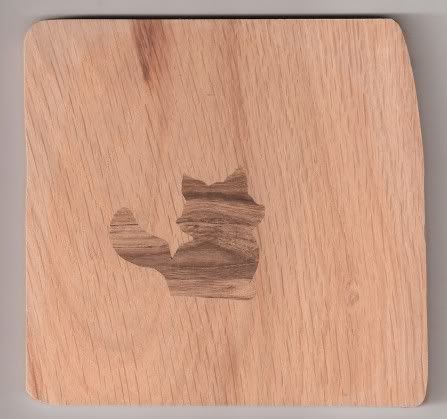
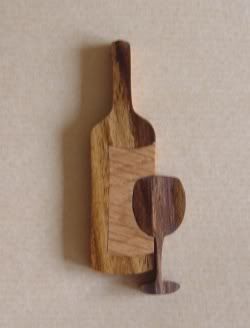
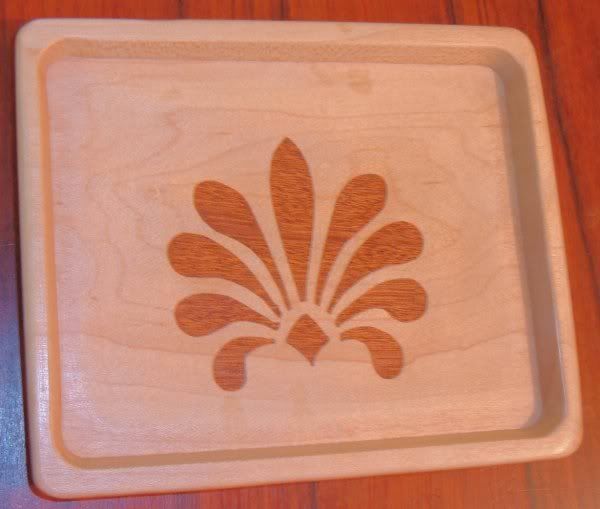
This is a small pen knife made from Ash and inlaid with Purple Heart, and with a simple oil finish, my first attempt at some inlay work.

You can see a small "oversized" blade entry hole on the pic (how do you do that without it showing??) - but well pleased for a first effort - it even opens and closes!

I will keep practicing the inlay, small blade = small entry hole I guess, any other tips on getting a more "invisible" entry hole for inlays??

Thanks for looking
 

Attachments

  • sm008.JPG
    sm008.JPG
    139.5 KB · Views: 1,329
  • sm008b.JPG
    sm008b.JPG
    142.3 KB · Views: 1,329
one of the best ways to hide it is fill the hole with glue/sawdust and then sand it over, looks really good. I did some inlay work some time ago, loved it but never got the chance now days to get back to it, too many orders..
 
Nice project :) .

Are you seated? Is there someone nearby who can call for assistance if required? If so, read on, but I feel I need to warn scrollers of a nervous disposition that the rest of this post might contain material of a disturbing nature...


...remember those maths classes which seemed so irrelevant when you were 14 years old? They weren't. The key to inlay success with a scroll saw is...


...trigonometry!


:shock: :shock: :shock: :shock: :shock: :shock:


You need to work out how to drill a hole which is the same width as the kerf of the blade you are using with the table set at the appropriate angle to raise (or lower) a piece of wood of known precise thickness into the upper (or lower) piece of wood which will be the background for the inlay without requiring subsequent sanding to align the surfaces. The following diagram illustrates the goal:

BoulleLayers3.jpg


The following diagram illustrates the mathematics involved:

BladeAngle3.jpg

The object of the cut is to lift Point 2 so that it is flush with Point 1. If W is the width of the blade and A is the thickness of the top veneer, angle X = Asin (W/A).

Oh, and if there are any Doubting Thomas' out there who think this is all too complicated, the maths works. I used it to cut these:

CatInlay2.jpg
Bottle_Glass.jpg
Dish1a.jpg


You may be able to see signs of entry holes but they're nowhere near as noticeable as they would have been if I hadn't done the maths before I turned to the saw.
 
3Billy3 .that is a lovely bit of work you have done , to feel that you can improve on your knife is the sign that you are a perfectionist and I look forward to seeing more of what you do . Thank you .
 
Gill ,bleddy hell I was just coming to terms with scrolling and you had to introduce maths in the form of trigo-what ever it is and me poor auld head is in bits trying to figure out what I couldn't 65 years ago.

Oh well I have got to this stage of my life without having to dig into Trigonometry so I will leave it to the brainy ones to do all the fancy work I will stick to what I understand ( I think ) :oops: :roll:
 
now where did I put my book of algorithms... Ah! yes it's in my desk at school - wonder if it's still there, my school I mean. (37 years ago when I left) I have a calculator that has sine, cosine, cosecants and the like, but I'm blowed if I can use it. Gill or anyone is there a formulae for this or better still an answer ?

Gary
 
As I said, Gary, "If W is the width of the blade and A is the thickness of the top veneer, angle X = Asin (W/A)."

:twisted:

Your calculator should be able to cope with that!

So if you're using a FD-SR No. 3 blade which is 0.035" (0.889 mm) wide and the thickness of your top layer of wood is 4 mm, the arcsin of the angle at which your table should be tilted is 0.889/4 which is 0.22225. The arcsin of 0.22225 is 12.84º. So the table should be angled a tad under 13º - gadgets such as the Wixey angle finder can be very useful for setting tables to precisions of 0.1º,

:)

All this assumes that the pilot hole you drill for your blade to enter is not of a greater diameter than the width of your blade. Sadly, this is invariably not going to be the case because scroll saw blades are deeper than they are wide, so you will still have signs of the pilot hole (although substantially minimised). The way around this is to use a drill bit which is as near to the width of the blade as possible and drill a series of pilot holes along a straight part of the pattern which can overlap into each other, effectively creating a slot for your saw blade to enter.
 
Thanks for the trigonometry lesson Gill, never thought of hole drilling like that before!

Thanks for the comments folks :lol:
 
Back
Top