Thanks Gill, Steve and Andrew!
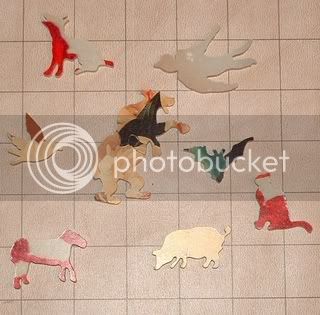
Steve, the book is Old-Fashioned Silhouettes, published by Dover. It has 446 silhouettes and a CD with them all on it as well. I bought it from Amazon UK. ISBN is 0-486-99512-7 but Dover have a whole range of silhouette collections. How on earth do they make money out of this stuff?!
Gill, here's what I did.
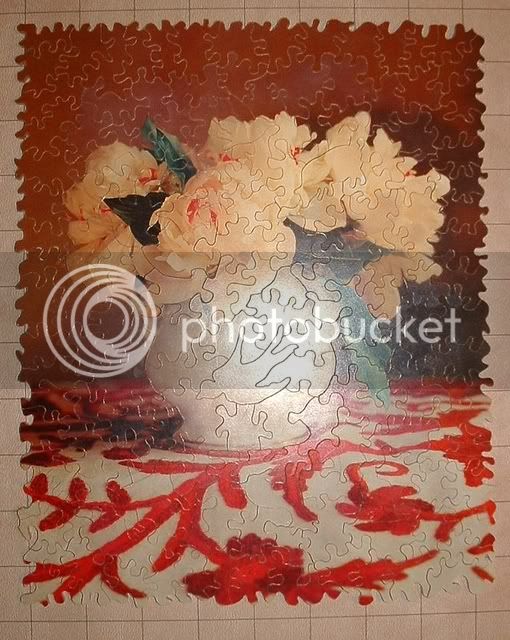
The picture was cut out of a calendar. Now is a great time to buy calendars by the way, you get them dirt cheap. I used 3M Scotch-Weld Photo Mount to stick it down (the one in the red cap). It is not repositionable and you need to wear a mask and get it right first time.
The wood is 4mm 3-ply birch plywood, I can't vouch for its Baltic-ness. I got it from an educational supplier in 18"x12" sheets and haven't had any serious problems with internal knots. For jigsaw puzzles you need knot-free wood which is why most people seem to use Baltic Birch. I sand it lightly and wipe with a tack cloth before sticking the picture down.
I cut it on my Axminster AWFS18 (yay for the Ax!) using Flying Dutchman Superior Puzzle Blades from Mike's Workshop in the USA at
http://www.mikesworkshop.com - I change the blade about every 30 pieces or so, before it breaks. I cut about one piece a minute and have the saw speed at 400-600spm.
Carter's work did inspire me to do a puzzled edge. Another advantage of a puzzled edge is you don't have to cut a neat straight line! Also, there's some colour line cutting, but it's not as central a theme as with Carter's work. My idea at present is to sometimes cut partially along the colour line and then move away from it so as to disguise the shape of the colour line without signalling that there is colour line cutting going on at that point.
I selected some figurals from the Dover book's CD and made up a page of them on my DTP software, then printed that out. I glued these to some adhesive film of the sort used to protect books, which was bought from Rymans. If you stick this film straight onto the picture it will damage the surface, but I stuck the figures onto a piece of scrap wood first and peeled it back, until the adhesive was mostly just tacky. Then I stuck the not-so-sticky-now side onto the picture lightly and cut around the images. Which is nerve-wracking with some of the detail, such as the pig's tail and trotters.
You need to be very gentle and careful peeling the sticky paper away again after it has been cut. Once or twice I lifted a bit of the picture and had to very carefully glue it back down with a tiny lick of white glue applied on the corner of a bit of paper, slid under the lifted area.
Once the puzzle was cut I reassembled it, photographed it for posterity, turned it over and sanded any fuzzies off the back. You need to keep a grip on the puzzle to prevent the pieces rubbing against the work surface while sanding, or you can scuff the picture.
I haven't been using varnish on my puzzles for a while. That means taking care when handling it during cutting and what I do is try to avoid cutting a whole series of pieces from the same part of the puzzle in a row. You need to avoid gripping the board in the same place continuously and rubbing at the edge, damaging or lifting the picture. I've used a paste wax around the edges sometimes to help with this, and it does make a difference without harming the finished puzzle. But I didn't bother with this puzzle, since the edge is so irregular anyway.
Andrew - it's kind of you to praise my skill and patience, but honestly, I have only been doing this a couple of months and it didn't take a long time to cut the puzzle. About 3-4 hours work spread over two days, and that includes preparing the figurals. I think the main skill in cutting puzzles is having a clear idea of what you want to do and then doing it.
Chris