Fitting a bench vice

UKworkshop.co.uk

Help Support UKworkshop.co.uk:

This site may earn a commission from merchant affiliate links, including eBay, Amazon, and others.

paulm

IG paulm_outdoors
Joined
25 Sep 2005
Messages
3,605
Reaction score
209
Location
North Hampshire
Just been beefing up my workbench by fitting a nice thick back and side panels to make it a bit more rigid.

It's much more solid now and no racking which is great :D

Thought I would take the opportunity to take off the two smallish vices I had fitted rather amatuerishly a few years ago and fit a couple of hefty 52 1/2's I have been tripping over in the workshop for a while now.

Not entirely sure how to go about it though and want to try and make a decent job of it this time round.

Anybody know of the best way to go about this ?

Cheers, Paul. :D
 
Paul,

PM sent but I'll also lend you my copy of the Workbench Book which shows various ways of fitting Record vices, depending on whether you want the front of the rear jaw facing flush with the bench front or not (not so easy when retro-fitting to an existing bench but might be possible).

Cheers :wink:

Paul
 
Hi Paul,

Have been looking at the very same book this evening when I eventually remembered I had it on the bookshelf, doh (homer) :oops:

Cheers, Paul :D
 
Paul

This is a job that I would like to do sometime in the future. I have a bench with a small vice and would love to upgrade it to something bigger. If you find that it is possible (even easy) then I would be very interested in the method of doing it. Can I ask you to take some pictures of the work and maybe even do a little write up about it, please.

Bob
 
Paul - I found that when I fitted mine to the bench is was much easier to take off the bench top, turn it upside down and then fit the vice in the right position.....those Record 52's are mite heavy to hold with one hand whilst doing up coach screws with the other :shock: - Rob
 
I can't remember where I read about this tip, but I found it very useful when installing my on my own vice...

find a length of strong wood and hold it in the vice so that the length protruding from the bottom of the vice is the distance from where the bottom of the vice will be on the bench to the floor. Now put the vice into position under the bench and the wood should help hold it there supported by the floor.

When I fitted my 52 1/2 Record I think I only used the one piece of wood but a piece on each end of the jaws would probably make it easier.

Another thing you could try is to hold the vice in place using a length of wood wedged at an angle with one end against the vice and the other against the base of a wall or a block fixed into the floor. I've never tried this on a vice but have used it successfully when I needed a third hand fitting various things in the shed.

Duncan
 
duncanh":ne330zr5 said:
I can't remember where I read about this tip, but I found it very useful when installing my on my own vice...

find a length of strong wood and hold it in the vice so that the length protruding from the bottom of the vice is the distance from where the bottom of the vice will be on the bench to the floor. Now put the vice into position under the bench and the wood should help hold it there supported by the floor.

When I fitted my 52 1/2 Record I think I only used the one piece of wood but a piece on each end of the jaws would probably make it easier.

Another thing you could try is to hold the vice in place using a length of wood wedged at an angle with one end against the vice and the other against the base of a wall or a block fixed into the floor. I've never tried this on a vice but have used it successfully when I needed a third hand fitting various things in the shed.

Duncan

I also used this method when I fitted an Axminster quick release vice to my bench, and I don't remember where I got it from either (probably through this forum). I used a length of 4 x 2 clamped in the jaws as a prop to hold the vice at the correct height, then it was easy to slide the vice into place over the partly installed lag bolts. I morticed the edge of the bench to leave the inner jaw flush with the edge of the bench and then added an oak inner facing that runs the length of the bench (Oak flooring off-cuts are very useful). The outer jaw is made from beech (a re-cycled door frame) and is flush with the bench top. I made mine thick enough that I could drill 3/4" dog holes to line up with the ones in the bench top. I have a couple of the metal ones (Axminster I think) but the plastic B&D workmate ones can also be very useful for holding odd shaped pieces.
 
George_N":1pz6ooiu said:
duncanh":1pz6ooiu said:
I morticed the edge of the bench to leave the inner jaw flush with the edge of the bench and then added an oak inner facing that runs the length of the bench (Oak flooring off-cuts are very useful). The outer jaw is made from beech (a re-cycled door frame) and is flush with the bench top. I made mine thick enough that I could drill 3/4" dog holes to line up with the ones in the bench top. I have a couple of the metal ones (Axminster I think) but the plastic B&D workmate ones can also be very useful for holding odd shaped pieces.
Good ideas, George - my only modification would be not to make the inner facing in one long piece, because inevitably the bit within the vice gets a bit of damage over time. With mine, I used the same general idea, but kept the rear jaw facing separate, so it could be renewed when necessary (though it's actually not been replaced in at least 5 years)
 
Thanks for all the great tips guys, the one about clamping a piece of timber vertically in the vice jaws at the right height is so simple but made a huge difference and made it quite easy in the end.

Got the end vice replaced, just got to go look for some suitable timber for the front jaw facing first thing tomorrow to finish it off.

Still got the second one to do as well but now that I've done the one it shouldn't be too much more trouble.

Lucky enough to have threaded holes in the faces for fastening the cheeks, but haven't found any bolts with threads that match yet, guess they must be imperial or something rather than metric ?

Will post some pics over the weekend if I remember to take some !

Thanks again to all.

Cheers, Paul. :D
 
chisel":1tdwcp0j said:
Lucky enough to have threaded holes in the faces for fastening the cheeks, but haven't found any bolts with threads that match yet, guess they must be imperial or something rather than metric ?
:D
Pretty sure they are 1/4inch Whitworth. Or possibly the more modern 1/4" UNC, which is exactly the same!
 
Thanks Dick, any idea where I could get some from, are they still available anywhere ?

Cheers, Paul :D
 
dickm":160fikhs said:
chisel":160fikhs said:
Lucky enough to have threaded holes in the faces for fastening the cheeks, but haven't found any bolts with threads that match yet, guess they must be imperial or something rather than metric ?
:D
Pretty sure they are 1/4inch Whitworth. Or possibly the more modern 1/4" UNC, which is exactly the same!

UNC is later than whitworth, although not by much. The main difference is that UNC is predominantly a USA standard.

It also differs slightly in some minor technical details. The main (and not very big) difference is the pitch at 1/2" OD, which is 13 tpi for UNC and 12 for Whitworth.

(the pitches are the same for UNC and Whitworth for all other OD's, at least on my chart).

BugBear
 
Well, started to fit the two new vices at the weekend but didn't manage to get them finished as I had to switch to some gardening chores as well, but managed to finish them off today on a day's holiday :D

For any amatuers like me who aren't sure how to go about it the pdf that Jake posted earlier in the thread was very useful as well as the other advice from everyone else.

Here's some pics of fitting the second vice as I forgot to take any of the first :oops:

DSCN3458.jpg


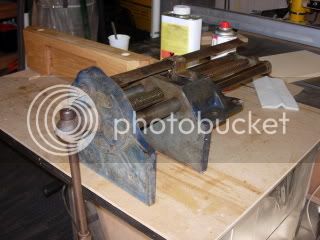
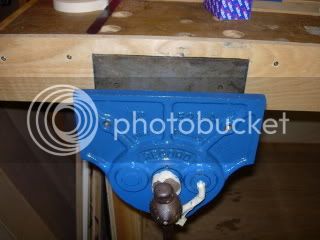
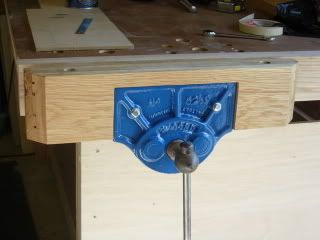
This is the secondhand vice, bit scruffy to start with but nothing a wirebrush and airline couldn't clean up. Took the opportunity to clean the thread as well and sprayed liberally with pfte spray so the action is nice and smooth. This one is a Record 52 1/2 quick release, a big heavy beast !

DSCN3468.jpg


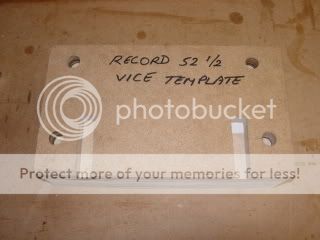
Next thing to do was make up an mdf template for the vice mounting holes and also with cut outs for the reinforcing ribs on the vice.

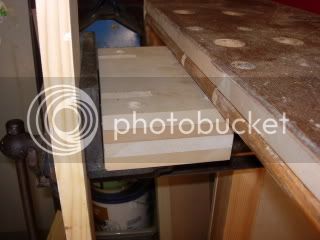
Used the template to cut and drill four more bits of mdf the same and glued them all together as a spacer block for under the bench so that the vice could be mounted with the top of the jaws about 1" below the top of the bench.

I cut the mdf blanks to size, then glued them together and then with the template on top drilled and made the cut outs all in one.

Found that four pieces of 15mm mdf gave me just the right overall thickness of 60mm for the spacer.

DSCN3466.jpg


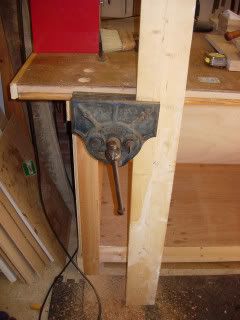
Then using the single most useful tip ever I used a stout piece of timber and held it vertically against the bench and marked the timber where I wanted the top of the vice jaw to be, about 1" below the bench top, then put the piece of timber in the vice with the jaws at the marked point and tightened it up. It's then really easy to position the vice in place against the bench with the piece of timber taking all the weight (which is pretty considerable !).

Having checked that the vice workings were going to clear the bench leg, I then used the template to mark the mounting holes and drilled the bench, using a large spade bit to a depth of around 5mm so that the coach bolt heads would be below the surface of the bench, and then drilled through the bottom of the large holes with a smaller spade bit. I was using 10mm by 130mm bolts so made the holes 12mm to make sure there was a bit of adjustment for lining everything up. Would have used 12mm bolts if I could have found any but had to take what I could get at B&Q as I didn't want to wait for a Screwfix delivery !

DSCN3470.jpg


Then positioned the spacer block on the vice and moved the whole thing into place, still taking all the weight with the piece of timber in the vice, dropped the bolts through and tightened them all up, making sure the back of the vice jaw was tight against the edge of the bench. Could have taken a rebate out of the front edge of the bench so that the front face of the back jaw was flush, but decided to do it this way instead.

DSCN3473.jpg


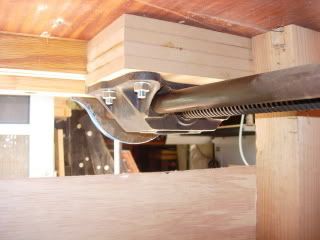
Picture of the vice and spacer block from underneath in case I haven't explained very well.

DSCN3477.jpg


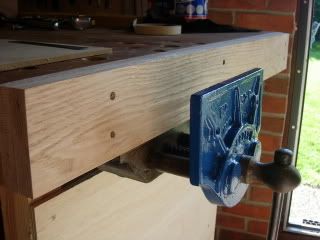
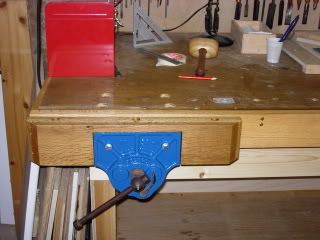
Then used a piece of my reclaimed oak flooring to edge the bench top, cutting out a suitable recess for the rear vice jaw.

Took the time to give the front face of the vice a couple of coats of blue hammerite paint to smarten it up.

DSCN3455.jpg


Then fitted another piece of oak flooring over the front of the first piece and covering the exposed rear vice jaw. Unfortunately the vice jaw protruded a couple of mill in front of the rebated piece of oak so on the second piece I had to skim a shallow recess on the back to compensate and allow it to sit flush.

DSCN3480.jpg


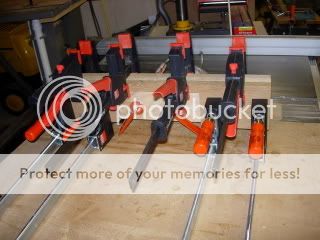
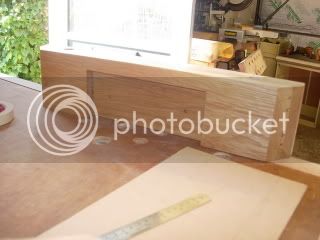
Then I made up a front jaw facing by laminating three pieces of oak flooring, cutting a recess first in the back piece so that it would sit over the front vice jaw. Cut off the corners on the tablesaw and drilled some benchdog holes.

DSCN3461.jpg


DSCN3462.jpg


Mounted the jaw facing on to the front jaw, fastened with a couple of stout coach screws through the front as I couldn't find any bolts to match the threaded holes ( sorry Paul C !).

Planed the bench lipping and top of the vice jaw flush and a couple of coats of Danish to seal the oak.

DSCN3482.jpg


DSCN3483.jpg


DSCN3484.jpg


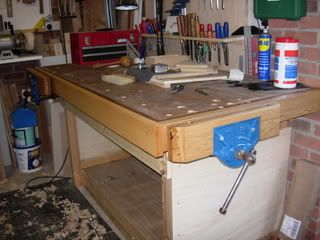
Also fitted a new front apron having removed the original to make fitting the vice easier.

Just need to make up some new drawer units sometime to sit underneath the bench and give it some weight.

Hope this helps someone else understand better how to go about fitting a bench vice.

Whether the new vices willl help me cut better dovetails remains to be seen though :oops: :lol:

Cheers, Paul. :D
 
Paul,

Well done, I have a similar vice set-up, very useful. :D

Note to self,

Best buy some blue hammerite, my vices all look tattier than Paul's and I don't think the yellow I have would look quite right. :? :roll:
 
Nice job, Paul, and a great set of pictures =D> =D> So good, in fact, that I'll let you off about the screws :D

Cheers :wink:

Paul
 
Nice job Paul, and a very good set of pictures. I think your post should go into the "How To" section.
 

Latest posts

Back
Top