February challenge - Post your entries here

UKworkshop.co.uk

Help Support UKworkshop.co.uk:

This site may earn a commission from merchant affiliate links, including eBay, Amazon, and others.
Status
Not open for further replies.

nev

Established Member
Joined
21 Jan 2011
Messages
4,860
Reaction score
16
Location
The green and wetter end of the M4.
Again a little early, but whats life without whimsy? :mrgreen:

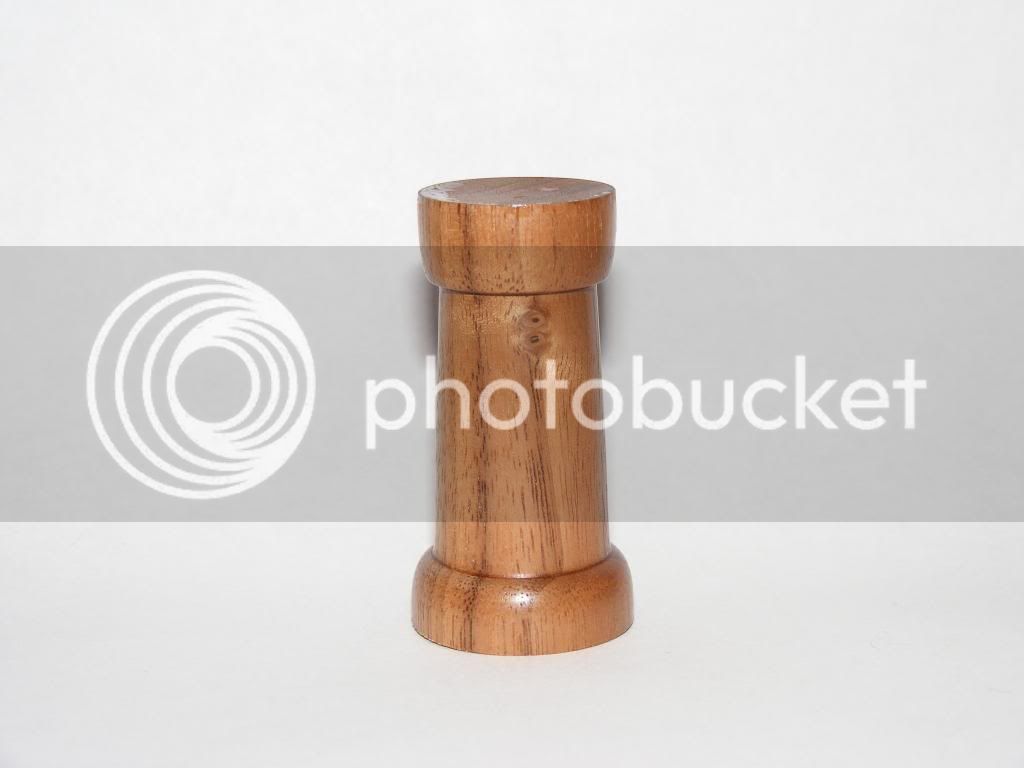
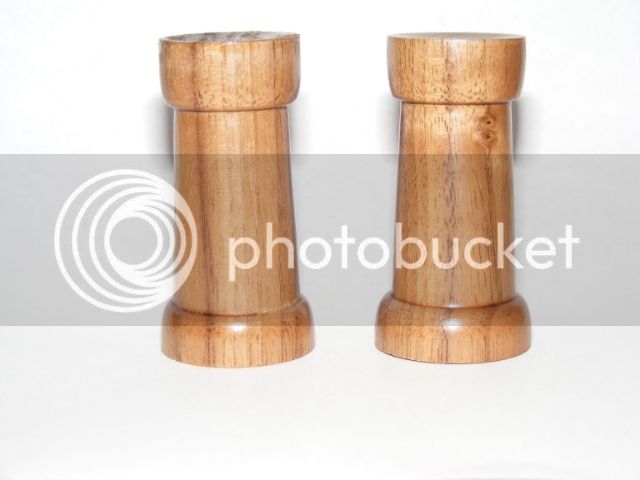
A pair of matching chess pieces.

Any size.

Any Wood. - They Do not need to be black and/or white.

To be made on the lathe using wood turning tools.

Carving / sawing etc acceptable to form the 'Head' (Kings crown, queens coronet, bishops mitre, rook castellations etc)

This months judge will be Richard Findley **

'Post your entries here.' this thread will remain open for 2 days during which time you can upload the required pics of your entry, along with a brief note about how you made it, what tools and finish you used, what wood (if known) and the objects dimensions. (this helps the judge and plagiarists ).

Please post 3 or 4 images of your work / entry as follows...

1 showing front profile
1 showing side profile (if different)
1 showing the pair side by side
1 optional photo showing any other feature you think might be of interest

Image size please use image size 640 x 480 0.3 mp, same previous months

Please upload your pics and description between ..

now on the 24th Feb.
and
10pm on the 26th Feb.

After this time the thread will be locked for Judging
Results will be given on or before the last day of the month

Any entry's that are outside the rules and requirements will not be judged
The Judges decision is final ( Any negative comments re judging must be via PM only and not on the open forum )
NO Critique or comments on any work until February Please, After the Judging and results.

Best of luck .

Roundup
 
I quite enjoyed doing these and may well continue with the whole set over time.

I started with a pair of bishops but messed up one of the collars so deviated to rooks instead.

Made from boxwood, 'normal' sized - base about 30mm across, height 55mm.
Started with a blank of box 50x50x100 marked and and cut a cross centrally in one end with the bandsaw to the width and depth of the blade to form the castellations. mounted between centres and roughed to round with a tenon on the opposite end for chucking. Mounted in chuck and turned with mainly a spindle gouge but using the skew for the sharper detail.
Started at the top and worked my way to the base, using the previous bishop as a template and some callipers and a rule to get the sizing correct. Repeat for second one.
Sanded from 320, 400, red, yellow, micromesh and polished with glosswax 16 on a mop (thanks for the link George)

The 'blacks' are (will be) made from bubinga.

castles1.JPG


rooks1.JPG


rooksbalanced1.JPG


rooksandbishops1.JPG
 

Attachments

  • castles1.JPG
    castles1.JPG
    187.5 KB · Views: 2,193
  • rooks1.JPG
    rooks1.JPG
    183.4 KB · Views: 2,193
  • rooksandbishops1.JPG
    rooksandbishops1.JPG
    207.8 KB · Views: 2,193
  • rooksbalanced1.JPG
    rooksbalanced1.JPG
    192.2 KB · Views: 2,193
Don't say I'm not committed to the challenge!
After sitting in a freezing cold broken down car for a couple of hours, being bought home on the back of a recovery truck, what did I do?........

Went outside in my tiny 6x4 freezing cold shed and turned an entry!!! all be it a token entry but a points a point!!

So no intricate details as planned (I had templates cut for 2 beautiful queens) but hay ho!

Turned using a spindle gauge, a roughing gauge, and a little skew (Not good with the skew, was gonna use this as a bit of a practice session, but that didn't happen)

So embarrassingly.... 2" tall, 28mm at the base, and 22mm at the top, recycled walnut (off cut from work) finished in friction polish.... I just couldn't take the cold any longer!!

DSCF6024_zpse7c96ba5.jpg

DSCF6021_zps7f898818.jpg


PS: I do love that little knot in the wood though!!
 
A pair of crooks,in red oak. Turned between centers off center to turn the top. Sanded and then mounted in the chuck to turn the rest. I used spindle gouge and parting tools. I basically turned in stages to compare the two. Spray lacquer finish. Done quickly in between Mexico and ski trip to B.C. Thanks DK Oops, they are 3 1/16 high by 1 3/8 at the base.
 

Attachments

  • P1020091.JPG
    P1020091.JPG
    188 KB · Views: 2,102
  • P1020092.JPG
    P1020092.JPG
    188.5 KB · Views: 2,102
  • P1020093.JPG
    P1020093.JPG
    184.5 KB · Views: 2,102
  • P1020094.JPG
    P1020094.JPG
    185 KB · Views: 2,102
These pieces were based on a Russian chess set pictured in Gareth Wiliiam’s book “Master Pieces: The Architecture of Chess”. I loved the form, and thought they would have a satisfying tactile quality (and they do!).

These are two kings. The dark piece is in walnut, the lighter one, I have no idea (another off-cut I was given. Could it be beech?).

Height 103mm
Radius of base: 28mm

Turned on Jet 1014 Mini Lathe

Methods. I did the walnut piece first. Used a chuck to hold the square stock. Made up a card pattern of what I wanted. Fixed the key distances along the length and turned to these. The wood seemed to suggest the exact curves for the shape, so I deviated slightly from the pattern as I loved the flow that was emerging (and this was the first piece!).
Sanded and finished with loving care (then started dropping it in workshop, measuring it with callipers, covering it with shavings, kicking it under the workbench etc!!)

Second piece I decided not to use the chuck as it was intimidating and made working at the left end quite tricky. Used a small base-plate on a 2MT taper. When I removed the tail, I discovered this was liable to work loose, which added a few problems re-centering. Roughed down, established same data points along length. Turned roughly down using template, then used callipers to replicate the curves, allowing a small margin for sanding. Slight complication: there was a very small knot right at the top of the piece, which was only apparent at the last minute. It actually adds to the character of the piece, but made final finishing of the shape quite scary as I was sure it would break off.

Finishing: sanding sealer + friction polish.

Loved this challenge. Definitely do at least one full chess set at some time!
 

Attachments

  • chess1.jpg
    chess1.jpg
    31.8 KB · Views: 2,080
  • chess2.jpg
    chess2.jpg
    17.3 KB · Views: 2,080
  • chess3.jpg
    chess3.jpg
    19.8 KB · Views: 2,080
Here is my entry for the February competition – two matching chess pieces.

These are made from lime and stand 78mm tall; the width at the base is 37mm and at the top is 31mm.

Having turned the wood to a cylinder I turned each piece to shape in the chuck jaws using a spindle gouges, a beading tool, a small square ended scraper and a thin parting tool. The crenellations were made with a carbide burr drill in a dremel, and tidied up with a fine point diamond tipped drill, also in the dremel.

The turned pieces were sanded from 120 to 320, cellulose sanding sealer applied and then sanded at 400. The finishing coat is microcrystalline wax.
 

Attachments

  • Detail View.JPG
    Detail View.JPG
    84.5 KB · Views: 2,058
  • General View.JPG
    General View.JPG
    77.1 KB · Views: 2,058
  • Profile view.JPG
    Profile view.JPG
    101.3 KB · Views: 2,058
My effort for the February Challenge.

A great challenge for more intricate work on a small piece.

Made from a piece of beech tree felled 2 years ago, these were rough shaped with a 3/4 gouge and 1" skew till cylindrical then tennon made to chuck them with tailstock support.

Shaping was achieved with a 1/4 gouge and 3/8 skew with beading done with a 1/8 parting tool. Sanded to 600 then nymesh and polished with renaisance wax. They are 40mm across the base and 100mm high.
 

Attachments

  • left.JPG
    left.JPG
    81.6 KB · Views: 2,022
  • right.JPG
    right.JPG
    89.2 KB · Views: 2,022
  • paired.JPG
    paired.JPG
    35.6 KB · Views: 2,022
My two pawns, done with a couple of pieces of Beech with a little spalting, turned to a cylinder with a tenon on one end, mounted into a chuck and turned with two spindle gouges , one sharpened to quite a small point to get into the fine grooves, finished with sanding sealer (blow dried) and Woodwax 22.
65mm high, 35mm dia at the base. The one on the left finished a tad larger but like Melinda's shed, the garage was too cold, runny nose and all that.

Pair 1.jpg


Pair 2.jpg


Andy
 

Attachments

  • Pair 1.jpg
    Pair 1.jpg
    39.1 KB · Views: 1,958
  • Pair 2.jpg
    Pair 2.jpg
    31.5 KB · Views: 1,958
trying to do matching pieces was a first for so had a few attempts at it before realising that I would need a use the skew chisel that I had stopped using about 5 mins after I got it.

As a first attempt I did a pawn in elm that was approx 10 cm in height to get me used to using the oval skew before mounting one block of oak in order to turn the matching pieces. Apart from rounding a bit of the top of the pawns everything was done using the skew. The pieces were sanded to 320 grit, then sealed before sanding at 400 - finally they were finished with friction polish. The two pawns measure 7cm in height.
 

Attachments

  • 3.JPG
    3.JPG
    111.6 KB · Views: 1,941
  • 2.JPG
    2.JPG
    253 KB · Views: 1,941
  • 1pawn.JPG
    1pawn.JPG
    82.4 KB · Views: 1,941
Here is my entry for the February challenge.

Ok Nev, you were right. I should have started at least 2 weeks ago....

My entry, as Melindas was going to, consists of 2 queens. It seemed a good idea at the time, but I may have bitten off more than I can chew. Browsing, I was also attracted by the Russian ones, but in the end I went for a more modern design. The wood is from the firewood pile and it's almez, which is a tree which occupies the ash niche here in the South of Europe, the wood is used for tool handles etc. and it's excellent firewood, even better you can burn it the same day you cut it down, though of course it's better dry. Un fortunately I seem to be allergic to it, my eyes are itchy and watering and my skin is itching and very dry.
I didn't really want to varnish these, I liked them in the white, but in the end I finished them with sanding sealer and wax to comply;)

I made a template, and then a prototype, on seeing the prototype I decided that it needed a wider base, so I had to make 2 more, which threw out all my time calculations and that is why I'm fighting with photos again at the last minute as usual. They took ages for me to make, almost exclusively with the spindle gouge which I have more or less figured out how to sharpen, (but I think I need 2 different kinds of sharpening which I'm not sure how to do.) and the parting tool.

Forgot to say, they're 16cm long and 6.5cm in diameter at the base and everyone thinks they're pepper mills.:(

2 Queens 001.jpg


2 Queens 002.jpg


2 Queens 003.jpg


2 Queens 004.jpg
 

Attachments

  • 2 Queens 001.jpg
    2 Queens 001.jpg
    21.6 KB · Views: 1,922
  • 2 Queens 002.jpg
    2 Queens 002.jpg
    14.6 KB · Views: 1,922
  • 2 Queens 003.jpg
    2 Queens 003.jpg
    15.9 KB · Views: 1,922
  • 2 Queens 004.jpg
    2 Queens 004.jpg
    18.1 KB · Views: 1,922
Hi.

Not quite so last minute as January, but close.

Decide to opt for Bishops for my entry, based on a metal set that I found a picture of.

Wood is sycamore with a little bit of spalting (hoping the rest of the log is going to yield some nice bowls).
4" tall and 1 3/4" across the base.

Turned to a cylinder then used a small spindle gouge ground to a tighter point to get the basic shape, then was very brave and used a small skew to do the final cuts. Finished with wax as last month,need to do some shopping for alternative finishing products.

Single-Bishop.jpg

Pair-of-Bishops.jpg

Tired-Bishop.jpg
 

Attachments

  • Single-Bishop.jpg
    Single-Bishop.jpg
    25.5 KB · Views: 1,914
  • Pair-of-Bishops.jpg
    Pair-of-Bishops.jpg
    30.3 KB · Views: 1,913
  • Tired-Bishop.jpg
    Tired-Bishop.jpg
    24.4 KB · Views: 1,913
Status
Not open for further replies.
Back
Top