End grain boxes,continuous grain between box and lid?

UKworkshop.co.uk

Help Support UKworkshop.co.uk:

This site may earn a commission from merchant affiliate links, including eBay, Amazon, and others.

McAldo

Established Member
Joined
12 Jul 2013
Messages
92
Reaction score
11
Location
London
I was trying to figure out how to make a box so not to interrupt the grain between box itself and lid.
The best I could think of was parting the lid with a very thin tool and turn a tube like insert separately, to fit the box or the lid. I will give it a go as soon as my wood is dry enough not to move too much.

Is there any other way?
I thought of using magnets, but it's not too elegant I think.


Thanks!
Aldo
 
Aldo,
I've never made a box, but I am pretty sure I've seen on here the first method you describe - I THINK I'm right in saying the person made a 'sleeve' from some similar wood, (poss parted off the spare end wood?), to slide inside the box, over which the lid fits.
I would imagine it would work end or side-grain.
I cannot remember who posted it - someone else may come along who remembers.
Let us see how you get on.
Greg
 
Aldo sir,
Absolutely loads of utube demos of this process go checkout Carl Jacobsen for one, far more elegant than me chuntering away trying to explain.
Let me know how you get on and best of luck.

Rend.
 
Hi Aldo,
I think it very much depends how close you want the grain match to be, but the timber will almost always move and so a small gap between the two halves, or a pair of beads at the joint, is actually desirable to disguise this movement and this also helps hide most grain mismatches. Here are a few examples of boxes from Richard Raffan...
Raffan%20boxes.JPG


I make quite a lot of boxes and for most straight'ish grained timber the grain match will be pretty good anyway, even if you take out a narrow parting tool cut and a 1/4" spigot too.

HTH
Jon
 
nev":1hox3rff said:
How you describe it is the way I do it but as chipmunk does, if you cant hide it - make a feature of it! (also works for lots of other things in life)

Absolutely.

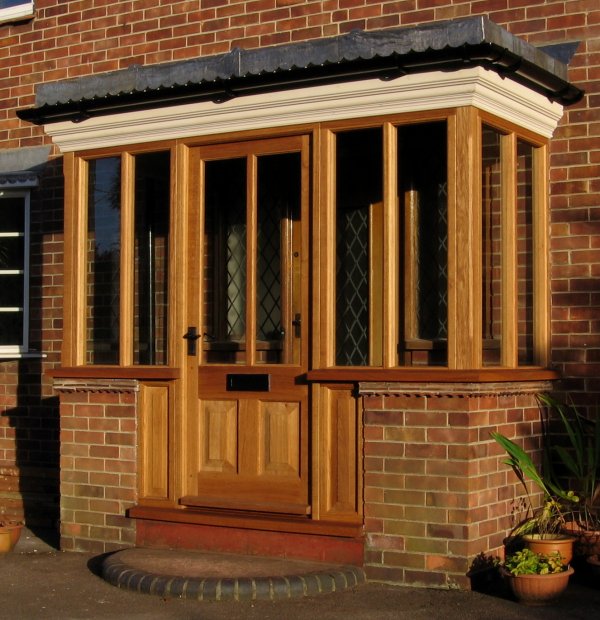
I had no choice about the upper plane of my new porch (since the old beams and fixing points were in situ). So I had to make the roof absurdly thick.

I added a lot of "stuff" to make it look as if I'd meant it that way...

porch.JPG


Look at the actual distance from the upper rail to top of the roof!

BugBear
 
if you cant hide it - make a feature of it!

Thats what my wife says :wink: but i refuse to wear that xmas jumper with the :deer on it :ho2

Bugbear that porch looks good and i bet if you took 100 people of the street and asked them to point out anything strange or different only one or two might have any inkling as to what you mean =D> =D> =D>
 
I recently did a couple of bubinga boxes, cut from the stock at 90' to each other. The grain crossed the lid/body joint at an angle. On the first box the angle was quite steep so just parting the lid off and turning a reduced diameter on the body still matched fairly well. On the other box the grain angle across the joint was shallow, meaning if I had turned away six or eight mm the grain positions would have been very noticably different. In this case I did exactly what you suggest, parted with a thin tool, then fitted an insert from the same stock into the body to form an inner mating collar.
 
NikNak":3e0uzmv7 said:
Aldo....

Not quite sure what you mean about an 'insert of wood', providing you dont go mad with your parting tool you should be able to get the grain to line up fairly well. Have a look here....

a-couple-of-boxes-i-finished-today-t44148.html

latest-box-turning-t36423.html

or... for an alternative method of lid/base attachment....
this-weekends-twizzelings-t61364.html


HTH.....


Nick

Thanks Nick!
Lovely boxes, I love the finish on the Goncalo Alves one. Is it shellac/boil linseed oil/alcohol mix you used? I am asking because I saw a similar finish in a video just today, and that's what they used.
What I meant by insert is pretty much a wooden fitting like the metal ones you use with so much success :)
 
chipmunk":2t3hno5m said:
Hi Aldo,
I think it very much depends how close you want the grain match to be, but the timber will almost always move and so a small gap between the two halves, or a pair of beads at the joint, is actually desirable to disguise this movement and this also helps hide most grain mismatches. Here are a few examples of boxes from Richard Raffan...
Raffan%20boxes.JPG


I make quite a lot of boxes and for most straight'ish grained timber the grain match will be pretty good anyway, even if you take out a narrow parting tool cut and a 1/4" spigot too.

HTH
Jon

Thanks Jon, I'll give it a go with a very thin parting tool then. Actually, I have a box which I rough turned and parted already, I can try with that as soon as it dries up.
I love Raffan work, if I could use the skew like he does I would be a very happy turner.
And, while I am very intrigued with coming up with a seemingly continuous curve between box and lid, I see your point that a bead or two at the joint can save lots of trouble.
My last, uhhh, "piece" has now dried enough for the lid to make a good fit instead of knocking about (ok, turning it green and loose then hoping for the best is not the most intelligent way of fitting your lid). But the junction between the box and lid is pretty embarrassing :D
Now the lid is clearly larger than the box, seriously tempted to take my chances and remount it on the lathe to correct it.

Aldo
 
bugbear":3nkzlysb said:
nev":3nkzlysb said:
How you describe it is the way I do it but as chipmunk does, if you cant hide it - make a feature of it! (also works for lots of other things in life)

Absolutely.

I had no choice about the upper plane of my new porch (since the old beams and fixing points were in situ). So I had to make the roof absurdly thick.

I added a lot of "stuff" to make it look as if I'd meant it that way...

porch.JPG


Look at the actual distance from the upper rail to top of the roof!

BugBear

For sure it all worked out fine in the end, lovely job :)
 
Not trying to high-jack this post, this is my first attempt
 

Attachments

  • 100_1615 - Copy.JPG
    100_1615 - Copy.JPG
    53.5 KB · Views: 1,419
  • 100_1610 - Copy.JPG
    100_1610 - Copy.JPG
    44.2 KB · Views: 1,419
I wouldn't try to turn the insert as a tube. Just turn a recess into the end of the blank and then turn a tenon to fit on another piece. Glue the two together, part off the excess and then proceed just as though you were turning the spigot from the original blank. The insert becomes a tube when you hollow the box. Here is a link to a playlist where I used that technique: http://www.youtube.com/watch?v=7gHRNV25 ... 0BQeVrMM6S

As others have said, it is not necessary on reasonably straight grained pieces because the grain lines up pretty well anyway.

Good Luck!
Bob
 
bobham":c83a8tkq said:
I wouldn't try to turn the insert as a tube. Just turn a recess into the end of the blank and then turn a tenon to fit on another piece. Glue the two together, part off the excess and then proceed just as though you were turning the spigot from the original blank. The insert becomes a tube when you hollow the box. Here is a link to a playlist where I used that technique: http://www.youtube.com/watch?v=7gHRNV25 ... 0BQeVrMM6S

As others have said, it is not necessary on reasonably straight grained pieces because the grain lines up pretty well anyway.

Good Luck!
Bob

Hi Bob,

Thanks so much for your advice, it makes quite a lot of sense.
I'll give it a go the way you describe.
At the moment I am very fond of figured wood and irregular grain, so the closer the better.
I apologize for the awful quality of the, uhh, "pieces" :) They are my first two and they were turned from green wood, so they shrunk quite a lot. I have to remount them and correct quite a few things, but, that's the kind of figures on the wood I like at the moment and I would like to retain.
Now that I have a chuck it should be a bit easier, before I was turning the interior of the lid first, parting, hollowing the box and using it as a jam chuck for finishing the reversed lid, so matching the figures was really not possible.

Aldo


PC060510_Boxes2.jpg
 

Attachments

  • PC060510_Boxes2.jpg
    PC060510_Boxes2.jpg
    220.7 KB · Views: 469
Hi McAldo

I cant remember exactly the finish i used. I checked back on the photo and see it was dated Aug 2010, so that would have been around 18 months after i started having a go at twizzeling, and there's no way i would have been into any 'fancy' finishes at that time. I'm sure all it was was a friction polish finish and possibly a wax stick on top for durability.

Hope this helps....


Nick
 
Part off and cut recess in lid and finish, if you put the lid up to the base you will notice the grain match has been lost, this is due to the thickness of your thin parting tool.

Cut a recess in the base (wider than the tenon of the lid will be)

Cut a spigot on a piece of contrasting timber to fit snugly into the recess in the base (it would be good if you can do this on a second chuck because remounting the base accurately will be difficult)

Hollow the centre of the spigot and part off the ensuing ring long enough to fit into the recess and allow a tenon for the lid to fit over, do not hollow too widely as you will need some thickness for the tenon.

Fit or glue the ring into the base.

Cut tenon for the lid to fit onto and adjust the length of the visible piece until the grain is once again a perfect match, the length on show will be equivalent to what has been removed by your parting tool and any sanding etc.

Finish inside and outside of base so that ring and base are flush.

Hope you can follow that, it is taken from the Chris Stott DVD.

Andy
 
Back
Top