December Challenge - Post your entries here

UKworkshop.co.uk

Help Support UKworkshop.co.uk:

This site may earn a commission from merchant affiliate links, including eBay, Amazon, and others.
Status
Not open for further replies.

nev

Established Member
Joined
21 Jan 2011
Messages
4,860
Reaction score
16
Location
The green and wetter end of the M4.
Blisters original suggestion. A Christmas Cracker!

I have no idea if this will work as I've never tried it, but here goes..

The challenge is to make a Christmas cracker that can be 'pulled' - so two 'halves' that slide or twist apart to reveal a novelty inside a la traditional cracker.

The novelty can be anything you like from a simple ring to a scale model of HMS Victory as long as its turned or made from turned parts.

****JUDGING WILL BE OF THE CRACKER ALONE REGARDLESS OF THE CONTAINED NOVELTY. ****

This will make Richards life a little easier and the judging fairer. (one may be the best cracker but not have the best novelty item) so...

A BONUS 3 POINTS WILL BE AWARDED FOR WHAT THE JUDGE DETERMINES TO BE THE BEST NOVELTY ITEM. So as with all crackers there may be a little something extra inside worth getting 8)


Both the cracker and the novelty are...

All parts to be turned on the (wood) lathe using wood turning tools. (it is a turning challenge after all :))

Can be made from any materials as long as they are turned using wood turning tools.

No minimum or maximum size.

Colouring / texturing / burning allowed

Glue can be used to assemble cracker/ novelty.

The novelty can be disassembled to fit in the cracker as long as no tools or glue etc are required to assemble it (after all it will be on the xmas dinner table!) (hammer)

Any entry's that are outside the rules and requirements will not be judged
The Judges decision is final ( Any negative comments re judging must be via PM only and not on the open forum )
NO Critique or comments on any work until December Please, After the Judging and results.

Please state wood type if known, dimensions and a little about how you made it and what tools and finish you used ( this helps the judge )

Please post 3 images of your work / entry

1 showing the cracker
1 showing the novelty
1 showing the fit of the join of the halves

Image size please use image size 640 x 480 0.3 mp, same previous months

Entry’s to be uploaded from 10pm on 27th Dec up until 10pm on the 29th Dec. after this time the thread will be locked for Judging

Results will be given on or before 31 Dec


Roundup
 
I wanted to do as much as possible on the lathe and have minimal decoration (cos im not good at that stuff), so here goes...

The Cracker.
made from sapele approx 10 inches long x 2 and bit wide. mainly using skew and spindle gouges.
Roughed a cylinder about 12" long, parted into 3 and put a tenon on all ends.
mounted centre piece, drilled with forstner 35mm bit as deep as it would go, reverse and repeat = 1 cylinder with tenons. plane with skew and cut deco lines.
Mount first of the 'handles' in chuck, and turn top hat to fit in cylinder, shape rest of snowman. repeat with the other 'handle.
make a collet chuck from some pine to hold the top hat without marking it and then hollow bell end. (quiet at the back!) repeat.
remount centre section and fit in one snowman and then turned taper and bead to match.
Paint Jo Sonja ir gold between burn lines, and paint hats (chestnut ebonising spray and lacquer) and then sand inside tube with 400 to get good fit without taking the paint off.
all finished with friction polish.
Also makes a great popping noise when pulled :D

cracker2.JPG


cracker5.JPG


The Novelty - Nevmobile mkIII
Body- started with a pen blank drilled holes for seat (12mm) and axles (5mm), cut slots to axle, then turned to shape. sloped front and back done on sanding disc.(on the lathe)
wheels and axles turned as one piece, (from another unknown hardwood pen blank) tested for fit in slot, sanded painted, and then sanded and painted again so that they fitted.
Pilot turned from remainder of blank, bum first so i could check fit into body.
all assembled and given a couple of coats of lacquer. disassemble and check for fit etc.
The axles click into place and it also rolls nicely - bonus :)
very simple yet most enjoyable.

cracker3.JPG


Disassemble car and insert in cracker.
Tie on pretty ribbons and present.
 

Attachments

  • cracker2.JPG
    cracker2.JPG
    164.1 KB
  • cracker3.JPG
    cracker3.JPG
    163.3 KB
  • cracker5.JPG
    cracker5.JPG
    170.7 KB
I really enjoyed this month’s challenge as I’ve wanted to have a go at one for a while now so it was the perfect excuse. The cracker measures approximately 11” x 2 ¼” and was made from a piece of lightly spalted beech. It’s made up of four sections with the middle sections being drilled to accept the gift which in this case is a Walnut Roller Ball Pen. The cracker is hollow throughout with the centre section left at just under ¼” thick to keep the weight down but still provide some rigidity, the ends have been drilled using a 10mm bit (which worked quite well as the pen end sits nicely in one end and stops it rattling around). Once the centre pieces had been made the pieces were reversed and using a small set of jaws in expansion mode the original spigots were resized to provide a gluing point for the two ends which were turned , hollowed and then glued in place. The cracker was then remounted as a whole and a few light passes with a skew ensured the whole piece was the same size. It was then sanded to 600 grit and a couple of coats of Mylands Red Dye applied. The piece was then sealed with a couple of coats of acrylic sealer and finished with four coats of gloss spray. Finally once dry it was buffed using the Chestnut system to bring out the shine. Tools used were a roughing gouge, 3/8” spindle gouge, 1” skew and all of the boring was done with various saw tooth bits. I thought long and hard about how to decorate it and decided that simple was the way to go so the Green Christmas Trees came courtesy of some old tree decorations I had laying about and are secured with very fine elastic to keep them in place. The whole thing was given as a gift on Christmas day and went down very well so whatever the result I already feel like a winner.

Steve

It looks like I may have misread the instructions for the photo's, unfortunately I don't have the cracker anymore so cant show you how they join, all I can say is that its a typical box join with a 20mm overlap and makes a nice sound when it's pulled.
 

Attachments

  • DSCN2704.JPG
    DSCN2704.JPG
    192.2 KB
  • DSCN2708.JPG
    DSCN2708.JPG
    213.2 KB
  • DSCN2702.JPG
    DSCN2702.JPG
    200 KB
So here's my entry.
The cracker was particularly fiddly as there were several parts to be drilled and fitted over the top of each other...

Steps:
Cut the main body in 2 leaving enough at the centre to make 2 bands for adding at the end - this means that the grain in the centre matches.
Cut the parallel part of the centre sections to length so that it can be drilled and not require hollowing to get a flat base.
Cut the ends and drill/hollow.
The wood I had for the body wasn't particularly fine grained and dense so I didn't want to risk a thin join. Therefore I added the small extra band with which to make the usual tenon.
Mount the parallel bodies between centres and take down the section where the contrasting bands and centre pieces would fit.
Roughly turn the bands round but leave plenty of thickness to allow for drilling without cracking.
Drill the bands, put on the body and hold in place with tape to allow them to be turned to approx final thickness. (approx 1mm).
Remove the bands and pierce with a dremel (mind you don't go into your finger when supporting work from underneath - it hurts like hell!). Once pierced use a bristle brush in the dremel to remove the inevitable torn edges.
glue bands and matching centre bands in place so that the grain matches.
Almost forgot to mention - there's a hole right through the middle and the ends for placing a cracker banger
Finish with spray lacquer
Main body is some unknown brown wood. Band and tenon are hornbeam.
Final cracker is 26.5cm long and 4.5cm diameter.

The novelty is something that I've been meaning to turn for a while now after learning how to make a basic whistle from a carrot earlier this year. I didn't do anything scientific in the way of calculating hole length/diameter etc - I just made several to find a sound which I liked that would fit inside the cracker. If I'd planned ahead a little better I'd have done a wider cracker as I had a better sounding whistle that didn't fit:-(
This one is made from hawthorn for the main body and slider end, ash for the slider length and tip, plastic milk bottle for the slider plug. I tried several turnable materials for the slider but milk bottles gave the best slide/fit combination.
Steps:
Turn to a rough cylinder leaving plenty of thickness to allow for drilling without splitting.
Hold in chuck and drill. This needs to be a neat, uniform hole. (I used 11mm I think).
Cut the slot for the whistle. This could be done by hand but I got a better finish on my table saw with the blade angled as much as possible. The wood was held against the fence with a clamp and the guard was removed - my hands were nowhere near it. The blade should come approx half way down the centre hole but this isn't critical.
Turn the slider with a tenon on one end for fitting the plastic and the plug and a tenon for the handle.
Mount squares of plastic on the tenon. I did this by melting a hole in the plastic using a hot drill bit - drilling them caused very uneven holes.
Glue the plug in place tightly, forcing the plastic together - I couldn't find anything to glue the plastic whilst still keeping the slides of it slippery.
Mount the slider in chuck pin jaws between a cut length of plastic - this keeps it central but doesn't mark the surface.
Turn the plug slightly smaller than the diameter of the hole.
Turn the plastic slightly larger than the hole and then adjust with abrasive. This seemed to be better than just turning it to size, perhaps it makes a better seal.
Turn a plug to fill the hole. It needs to be long enough to go past the first edge - make it over long and trim later.
Mount a piece of abrasive in a chuck and hold the plug against it to uniformly remove about 1.5mm from one edge. This needs to be parallel.
Push the plug into the hole, put your finger over the end and blow. If you get no noise push it further and repeat. The ideal spot seems to be about 1.5-2mm past the top surface of the cut. If you go past the sweet spot just push it back out with a rod. Once you have it in place glue it and trim the end.
Length 15cm
Coat with a food safe finish - I used beeswax/carnauba.

R0013452-3.jpg

R0013454-2.jpg


R0013463-2.jpg
 

Attachments

  • R0013452-3.jpg
    R0013452-3.jpg
    45.4 KB
  • R0013454-2.jpg
    R0013454-2.jpg
    53.8 KB
  • R0013463-2.jpg
    R0013463-2.jpg
    32.7 KB
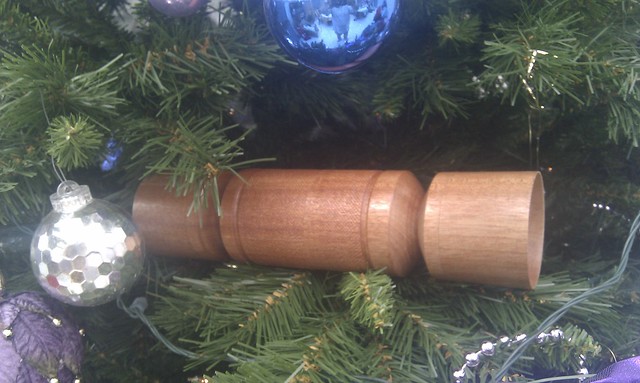
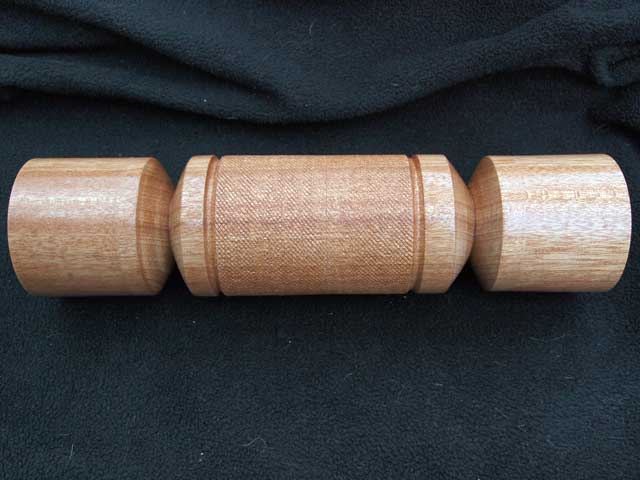
A god bit of fun

Mahogany (it was to have been a coffee table leg but needs must (hammer) )

28 x 7 cm

1" skew and some forstner bits, texturing with a Decorating Elf. Finished with sanding sealer and acrylic spray.

As presented

8305785287_290d83c1be_z.jpg


8318509440_507710c456_z.jpg


8317418329_724393f096_z.jpg


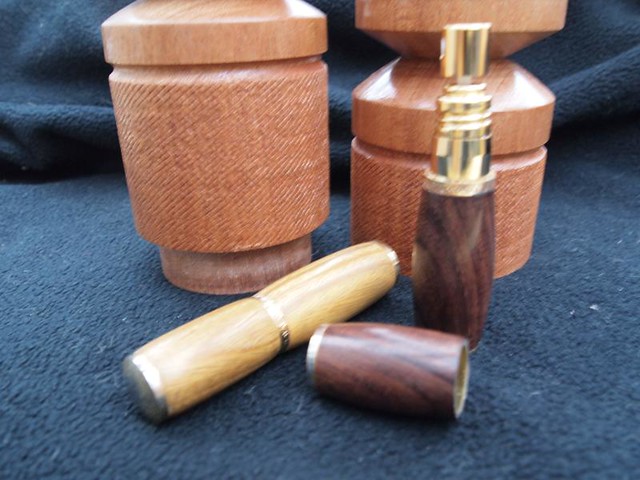
trinkets shown for illustration purposes only as they are non-conforming
they were appreciated when the cracker was pulled!
 
Here is my December entry – a Christmas cracker and novelty

The cracker is made from London Plane and the novelty from Acacia (?) and Holly.

The cracker, which is 280mm long, 56mm outside diameter with a 40mm diameter cavity inside, was made largely as described in the following webpage: http://www.woodworkersinstitute.com/page.asp?p=1569

After turning the cracker I mounted the whole cracker onto the lathe using a jam chuck in the headstock and a purpose made sleeve to fit over the tailstock live centre. With the lathe rotating at about 50rpm I then airbrushed red spirit stain over the whole of the outside (2 coats). When dried I then applied Mylands metallic gold spirit stain by sponge to achieve a mottled effect. The insides of the end of the cracker were treated with red and gold spirit stains in the same way, but this time off the lathe.

The completed cracker was given 3 coats of acrylic gloss lacquer finish and decorated with a paper bow and ribbons.
The novelty is a small box with a push fit lid and 5 gold rings (unfortunately there was no room in the cracker for four calling birds, three French hens, two turtle doves or a partridge in a pear tree!!). As you can see from the photos, not all of the rings can be placed inside the box at one time, but there is plenty of room inside the cracker for the box and all five rings. In the second photo you can just see the lid of the box inside the left hand half of the cracker.

The box is 37mm outside diameter, 30mm inside diameter and approx 50mm tall including the lid. I believe that the wood used is acacia, but I am not sure as the blank was not labelled. The box was turned in the traditional manner, finished with hard wax oil (4 coats) and lined with green velour to the bottom of box, the inside (sides and bottom) and the inside of the lid.

The rings, made of spalted holly, are all different; they are 25-28mm outside diameter and 20mm inside diameter with widths of 4 to 10mm. I used a 20mm forstner bit to make the rings, and sanded from 120 to 400. The rings were finished with acrylic sanding sealer, 600 grit paper and 3 coats of various gold acrylic paints (autumn gold, rich gold and pale gold) and rolled in gold sparkles after applying an initial coat of acrylic gloss lacquer. A final spray of acrylic gloss lacquer was applied to all the rings.

Tools used for all pieces were 3/8“ and ¼” spindle gouges, pointy tool, round nosed and flat scrapers and a thin parting tool, plus forstner bits in a Jacobs chuck.

A thoroughly enjoyable, if time consuming, challenge!

Happy Christmas and a prosperous New Year to all entrants, the organiser and the judge!! :ho2 :ho2
 

Attachments

  • Lidded box and 5 gold rings.JPG
    Lidded box and 5 gold rings.JPG
    94.4 KB
  • Detail showing joint and lid of box.JPG
    Detail showing joint and lid of box.JPG
    98.9 KB
  • Cracker.JPG
    Cracker.JPG
    103.5 KB
Cracker in maple and ash. Turned the ash between centers to about 2 3/4" with tenons on each end and parted off about 60/40. Grabbed the tenons and with a forstner drilled out the inside and turned the male part of the joint on the bigger piece and with a skew skewed? out the recess on the smaller piece. Swapped ends and drilled 5/8" holes into the tenons. Took a piece of maple and chucked it and turned it to about 2 5/8" and forstnered a hole in it and then turned a 5/8" tenon on the chucked end. Did this twice and stained them dark brown and then put the hole shebang in the lathe for a glue up overnight. I used Oneway safe driver on drive end and a live center on the other and they left rings but i thought it would be decorative. Turned the coves and used a skew to turned the ash down to 2 5/8" or so and the maple ends to about 2 3/8" or so and it was done . Sanded and sprayed with lacquer. Its about 10 5/8" long. I used roughing gouge, spindle gouge, parting tools and skew.
I wanted to do the cracker on the old Wadkin and the novelty on the new Titan, but after I had the new black beast in place we could not get it to work. So with the Wadkin 50' away in the other part of the shop, I just whipped up a little top in beech and tried some coloring on it.
Thanks to everyone involved in the challenge, and hope it goes next year. Happy New Year to all, and hey its only -5 C out there now. Positively balmy!
 

Attachments

  • P1020076.JPG
    P1020076.JPG
    174.5 KB
  • P1020077.JPG
    P1020077.JPG
    182.4 KB
  • P1020079.JPG
    P1020079.JPG
    185.6 KB
Okay, here is my humble entry turned from ash and walnut..

I first made the glue up with two pieces of walnut strategically placed in the ash. I wasn’t sure how the glue would hold up on the end grain of the ash but it was just fine (I used PU glue).

After turning between centres to a cylinder I marked out the transition points so I knew where to cut. I made the tapered sections next to the walnut and put a chucking point on each end.

I then separated the piece into the two halves making sure I left enough for the tenon that would be used to joint the two halves together. Each piece was then reversed and re-mounted onto a chuck.

The shorter piece was done first. After mounting in a chuck, I used a forstner bit mounted in a chuck in the tailstock to hollow out the middle and create the mortise. This piece was then set aside while I worked on the other half.

The longer of the two pieces was next and the tenon made testing as I went to ensure a good fit in the mortise of the other half. When this was a nice fit, I then hollowed out the middle of this piece in the same way as the other one but obviously using a smaller forstner bit.

The two halves were then put together and remounted on the lathe so that I could finish to final diameter. There was a tiny lip where the two halves met and this had to be smoothed out.

I then took a small ash blank and made a jam chuck to reverse mount the pieces so that I could finish the ends. I did the smaller of the two pieces first as this had the largest hole. First the chucking point was removed and then the end hollowed out. After finishing the end of this piece, the jam chuck was turned down to fit the other piece which was handled in exactly the same way.

The end of each piece was hollowed out and tapered at the end to give a more pleasing look.

I finished it with sanding sealer followed by wax and buffed to a shine.

I then turned the spinning top using part of the jam chuck that was still mounted on the lathe. This also has a wax finish.

Tools used were roughing gouge, spindle gouge, parting tool and a couple of small scrapers. Forstner bits were used for hollowing out.

Overall length is about 12 inches and outside diameter is fractionally under two inches.

_MG_0671.jpg


_MG_0672.jpg


_MG_0674.jpg


It makes a very satisfying 'pop' when pulled :D

regards

Brian
 
Status
Not open for further replies.
Back
Top