Late to the party, I know but dug out of a text file for Stottman's template jig..
I have the original 'struxions somewhere and will try and find 'em.
edit - they're pdf and the forum won't allow them. If anyone needs them I'll try and find a file sharing solution.
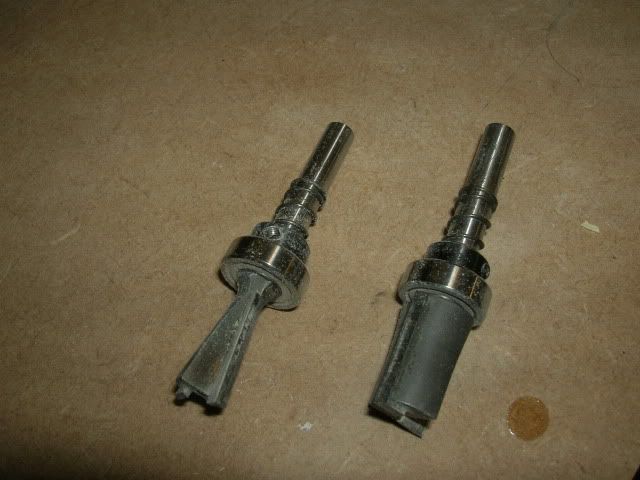
the Stott = 8 degree 1/2 inch diameter router bit with 5/8 inch diameter bearing and stop collar.
and a 1/2 inch diameter pattern bit
I've no experience of the Leigh but in my experience, apart from the Festool - which is idiotproof and turns out great results - and the Incra LS - which is different from everything else and extremely fussy about wood quality but amazing once it's sorted - this home-made template gizmo is the best jig I've ever come across
---------------------- from an on-line review. Apologies to OP---------------
Stots Dovetail Template Master
Manufactures product description: Your jigs will produce a dozen different dovetail joints with bull eye accuracy. And you will create them again and again, never having to buy another dovetail jig! Includes a user’s manual, which shows in detail how to make all the jigs.
Details & Review
As this is a unique product among machine cut dovetails, I will divide this review into the following three primary sections:
Building the Jig
Using the Jigs
Overall Cost
Conclusions (skip to here if you want the fast and dirty analysis)
Building the Jig
Packaging & Instructions Rating: 5/5
Everything arrived to my home in a single 12.5" x 9" USPS Priority mail cardboard envelope. Nothing was damaged, even with the envelope containing some obvious rough handling by the USPS. Included in the package were the Stots Dovetail Template Master, Users Manual v 1.01, instructions for the newer S-3 and S-4 jigs, the instructional CD-ROM, one 8º dovetail bit with bearing and stop collar, one 1/2" diameter pattern bit, and a Stots Saw Aid. Being anal retentive by nature I am a RTFD kind of guy, so I promptly read through both sets of instructions.
Making the required boards: Rating 5/5
One thing to know right away is that there are two basic designs for templates you can construct. The original design looks something like a Keller jig while the newer S-2 and S-4 design is more like a Katie Jig or Porter Cable Dovetail machine. I opted to make the S-3 and S-4 jigs since those are designed to use on the router table. Regardless of which jig you build, they both use the same set of router bits. The S-3 and S-4 directions had actual photographs compared to the user Manual which featured mostly CAD drawings. A great point in the User's Manual is thoughtful inclusion of "before and after" drawings. This lets you know what your templates should look like before and after you perform a cutting or assembly step in the building of your jig. A great point for first time users. I then watched the QuickTime video included on the CD-ROM which walks you through most of the steps constructing the S-3 and S-4 jigs, hosted by Richard Stottman. I considered the video essential regarding the ease I had constructing the two jigs. It provided a wonderful frame of reference that let me know if I was on the right track during construction. I would like to recommend that Mr. Stottman improve the audio quality on the videos, as words were sometimes difficult to understand due to audio distortion. Although I have to say that after watching the QuickTime video, you quickly get the feeling that this is one well thought out product.
I then went to my local home depot to purchase all of the required hardware and 3/4" thick boards necessary to construct both jigs. The hardware and a 3/4"x12x48" MDF board cost $6.97 before tax. Even though I had some of the hardware on hand, I purchased all new materials so I could get a fair idea on the complete cost of building a jig. once I returned home I reviewed the QuickTime video (again) and then went to the shop. I had to use my 10" SCMS and router table edge jointer to cut all 10 pieces of board required to make both jigs. They were all easy to cut since my saw's cross cutting capacity is greater than the max width of the MDF board, no ripping on the bench saw was needed.
Assembly: Rating 4.5/5
1. Next came the first of five steps needed to assemble both jigs. This went without a problem.
2. During step two I had to assemble the backer board to the brace assembly. It would have been nice to have some measurements to know where I should screw the two together.
3. Step three and four went without any problems. The provided Whiteside router bit cut the MDF effortlessly while making the actual tail and pin templates.
4. During step five I had some trouble, but it was because of me not the instructions. When it came time to attach the templates to the backer board assembly, I neglected to use the 1.25" screws and used the 3/4" screws instead. Needless to say, I had trouble with the template staying securely attached to the backer board assembly. At this point I wrote an email top Mr. Stottman and he promptly returned my email, pointing out my mistake. Once I was back on track I quickly finished up the final step. In the end, I had one working tail template and one working pin template ready to go.
HINTS:
I replaced the wing nuts with brass knurled knobs I purchased from Lee valley. They are much easier on the fingers.
When you have to mark a line 1/4" from the bottom of the backer board, use a piece of 1/4" thick material to accurately draw a straight line if you don't have a marking gauge
Using the Jig
For my test cut I used two pieces of 5"x7.75"x3/4" sassafras . I intended to make a single through dovetail joint cutting both parts on the router table.
Using the S-3 Tail Jig: Rating 2.5/5
Problem: Here's where I ran into my only significant problem with the jig. In the course of setting up the dovetail bit to cut the pin slots the bit fell short of the necessary height, even with the router set to maximum plunge depth. In the pic you can see this gap highlighted by the red circle. You can see that it's still a good 1/4" short of the backer board and 3/4" short of the necessary height to cut the pin slot to full length. To combat this problem I needed to plane the test stock down to 7/16" thick and raise the dovetail bit in the collet a smidge, but to where I still felt safe. Once that was accomplished the jig set up without a hitch and everything went exactly as described in the instructions. The included dovetail bit cut the sassafras effortlessly and followed the template fingers perfectly. This is a pic taken just after cutting the pin slots.
At the end of this day I contacted Mr. Stottman about the depth issue I encountered when setting up the Tail Jig for the first time. He responded promptly and suggested there may have been a problem with the jig construction, as he has made countless dovetail joints using 3/4" stock without trouble. After a bit of discussion, it was concluded that the jig was assembled correctly and the trouble was:
My router (DeWalt DW6212HP plunge router) has a clear plastic shield between the top of the base and the collet. this plastic shield aids in the built in dust collection of the router but also prevents the router from reaching it's maximum plunge depth. the combined with the added thickness of the router table mounting plate all conspired to prevent the dovetail bit from reaching the necessary cutting height for 3/4" stock.
In my opinion, in order to properly use the jig for 3/4" stock I will need to cut a new template that uses 1/4"-1/2" thick material for the board that has the guide fingers. Another possible solution is to purchase new router bits that have longer cutting lengths, although this has not been confirmed by Mr. Stottman. I've had similar issues with the max plunge depth on my DW621 before and it usually makes me upset because there is no easy answer. But in this case I do have to say that the solutions are fairly easy, but if I were a novice I would have been quite upset and frustrated beyond and acceptable level. Fortunately, I'm no longer a novice and my woodworking patience and solutions are more advanced. Additionally, if you do not own a DW621 router you should have no trouble similar to mine. In the spirit of fairness I have to say that, if this problem did not occur I would have given a jig a rating of 5/5 as opposed to the 2.5/5. Simply because once fixed it did a wonderful job at cutting the pin slots.
Using the S-4 Pin jig: Rating 5/5
With the stock already planed to a smaller thickness the jig set up without a single hitch. Here's one place where this system really shines compared to others. Getting the pin board correctly aligned with the fingers on the S-4 jig was a snap due to the K.I.S.S. (Keep It Simple Stupid) method of operation. The pattern cutting bit worked as well on the sassafras as did the dovetail bit and I had all of the fingers cut in under two minuets.
Assembling the Joint: Rating 5/5
When I went to assemble the two pieces the fit was a wee bit tight, enough that glue would have made it impossible to fit together correctly. So I then made the only necessary adjustment, I made the adjustment to the S-4 template that produced slightly thinner fingers. I then made this cut on the opposite end of the test board and the two pieces then fit together perfectly without any trouble. Then I went ahead and glued up the joint. After the glue dried I noticed the test boards were offset about 1/64" but that was easily fixed on the router table edge jointer. After that all that was needed was to sand the joint smooth. I ended up with a strong, attractive through dovetail. .
Overall Cost 3.5/5
The Dovetail Template Master markets itself as the most inexpensive dovetail jig on the market. And this claim is true, however, it isn't exactly a "small" monetary investment. Here's how I calculate the actual cost of the system with all the necessary components:
Template Master
$39.99
Required Hardware and boards (for assembly of one S-3 jig and one S-4 jig)
$7.00
8.5° Dovetail Bit + bearing kit
$27.90
1/2" Pattern Bit
$19.95
Total
$94.84
Even with the cumulative total approaching $100.00, this jig system is still superior to it's similarly priced competitors. I've owned the porter cable 12" dovetail machine and the Stots jig is a much better choice. Simply for the fact that you can make both traditional Keller style and (the newer) Katie style jigs. If you already posses the necessary router bits and bearings then the overall cost rating should move up to 5/5 .
Conclusions 4.3/5
Overall, I thought the instructions were good, although it's a little confusing if you don't know that there are two basic versions for the jig. However, if you take the time to watch video on the included CD-ROM, it clearly makes the distinction between the two. The jigs are easy to manufacture and use if you have skills beyond novice and accurate tools. I also like that when you have a problem, you contact Richard Stottman, the man responsible for designing and refining this jig. It is well thought out and does what it is designed to do. I recommend this product, simply be prepared to spend closer to $100 as opposed to the $40.00 selling price for the template alone. Take care if you only own one router and it is a DeWalt DW621, you'll run into the serious issue I encounter above (go read the Using the S-3 Tail Jig section above).
Manufacturers Post Review Statement:...remember that when you purchase most other jigs (except for the Keller) you must still purchase the router bits, and also a guide bushing. So if you compare only jigs the cost difference is $39.95 vs $????. With router bits for both jigs (Stots vs other company) the cost difference should be exactly the same.
-Richard Stottman
Disclosure statement: The Stots Corporation provided these products to promote this review.
Purchase this item at