Built in cupboards, need some ideas

UKworkshop.co.uk

Help Support UKworkshop.co.uk:

This site may earn a commission from merchant affiliate links, including eBay, Amazon, and others.

johnelliott

Established Member
Joined
16 Apr 2003
Messages
1,105
Reaction score
0
Location
Near Swindon, Wiltshire
I've been asked to quote for creating a wall of cupboards on a wall that is about 2.5metres tall and about 2.8metres long. Seems to me to divide reasonably into 3 rows of cupboards high average about 750mm high and 5 cupboards wide around 560mm wide. Cupboards can only be about 300mm deep.
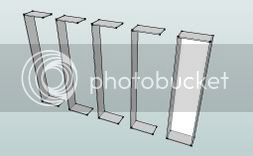
My normal way of doing built-ins is to make a box a bit smaller than the space, then fit it with scribing strips on three sides and a plinth at the base. This gives me a square box (always easier to fit a door to a square box) a back, and sides that can be drilled for shelves and also take kitchen style hinges.
Doing this job this way would mean a price based on 15 such boxes, and will work out a good deal more than I think this customer is looking to spend.
I don't actually need this job at all, but it is, never-the-less, an interesting problem.
Perhaps a less expensive way would be to shelve the wall and then create a framework in front of it that could take the doors?
What does the panel suggest?

John
 
john, not sure that this will help, but i think making backed boxes is always the way to go because that way you cannot lose things down the back.

questions, why does it have to be 3 cupboards high??
have you been given a size spec to work to, what are the cupboards for??

i find these days i want to make things that i can move on my own, so
the sizes are important, given that they are only 300 back to front,
then i wonder whether 1220 high might not be too bad, two on top of each other would give you 2.4, plus your plinth and you get to the height.
but alos a 1220 x600 approx wide cupboard would be still relatively
easy to lift and move.

logic suggests using sheet goods, and you should get at least one out of each sheet, with plenty of shelves to spare, so the material cost would not be too high, and frankly the time involved in initial manufacture is about
30 minutes per basic unit, so i am not sure that the basic cost is too high,
the problem is the on-site fiddles, and the kind of doors the client wants.

not sure if this helps
but am doing something similar for myself soon, so will be interested to see how you make out.

paul :wink:
 
I would make it as three boxes, two cupboards wide by three high each side then a single width stack in the middle, I've done wardrobes this way with no problem.

Make them "flat pack" and assemble on site. I use biscuits and carcase screws, most can be driven in from the outside of the boxes so won't show. Only thing to watch is that the diagonal distance is less than the ceiling height as you won't be able to stand them up.

Jason
 
Hi John

I'd also consider making in 5 "boxes", however only one of my boxes would be complete, as the others would be just the top, bottom and one side, like this:

Built-incupboard.jpg


That reduces the quantity of materials to cut and machine. The fasteners to use for this are something like the Hafele Minifix (cam and dowel) or Rafix in conjunction with a through dowel:

262.27.109P1.JPEG


262.27.109D1.gif


To ease the assembly I'd pop a couple of carcass screws through just to hold the ends while you assemble.

The fastest way to get the backs in is top use something like the Keku push-in fittings.

262.50.313P1.JPEG


These allow you to insert the back from the front of the carcass, and if you opt for something like 8mm double-sided MFC or MF-MDF you'll have enough material rigidity to take them.

Shelves would just be standard kitchen-style shelves and hinges likewise.

Scrit
 
I am approaching completion of almost exactly the same task in my dining room. A storage unit with doors; 2.2m high, 3m wide, 400mm deep. The extra 100mm means that I can fit my hifi equipment inside.

I made three carcass units each 1m wide, 2.2m tall, top and bottom panels joined to the sides with pocket screws and biscuits, all 18mm MDF. By pocketing on the upper and lower faces the holes are hidden. One fixed centre shelf to hold the sides together, again pocket screws and biscuits. I routed channels and fitted bookcase strips from Screwfix to give adjustable shelving for all other positions. Back panel made from hardboard pinned on to the sides, top, bottom and centre fixed shelf. Once assembled the units were very rigid.

Two points which I would highlight. Firstly with a span of 1m the 18mm shelves were only just OK for light loads. I have since changed to 25mm MDF and this is fine even filled with books or crockery. Secondly I spent some time making a dead flat and level plinth to support the units, the floor is concrete. This meant that the carcases stood plumb and made their installation very quick and easy. I also attached the units to the wall with two brackets each along the top back edge. Cabinet inside surfaces were given two coats of satin poly varnish.

Doors were again 18mm MDF with a 3mm radius routed along all of the edges. Door layout is six per cabinet, 3 per side. One door from the fixed shelf to the floor, upper section height is split 700mm and 400mm, these proportions look fine. The doors were painted with a roller using eggshell paint, chosen one shade away from the wall colour. This way the unit looks part of the room. I bought some small round satin chrome Ikea handles which had a wooden centre insert. This insert I also painted the same colour which makes the handles look specially made.

Drilling for the 42 off Blum cabinet hinges was fun, my advice is to make a jig and make the hinges inset the same distance from top and bottom door edge. That way the doors will not be handed, I learnt that one the hard way.

I have saved the best bit to last, I gave the dimensions for all of the parts to the MDF supplier and it all came cut to dead to size and dead square, with no dust. OK it cost a few pounds more but with no mess and accurate cuts it was well worth it.

Just got to fit the side and top infill panels and job done.

Regards,

John.
 
JE, what structure did you opt for in the end?

Scrit
 
Scrit":1m7sh3fz said:
JE, what structure did you opt for in the end?

Scrit

I decided I would be happiest doing it my normal way, ie premade boxes to nearly fill the space, with scribing strips and an inset plinth to finish. This would make it easy to make units of different heights and with different fittings etc, and so I quoted accordingly...... and I haven't heard back yet. I'm not really expecting to either.

I think this was one of those situations that crops up from time to time where the customer's ideas about a reasonable price are completely out of whack with the actual cost of providing their wants. Only thing you can do is quote what you need and maybe hear back but probably not

John
 
Back
Top