Built in cupboard under floating shelves

UKworkshop.co.uk

Help Support UKworkshop.co.uk:

This site may earn a commission from merchant affiliate links, including eBay, Amazon, and others.

jools182

Member
Joined
28 Jul 2014
Messages
16
Reaction score
0
Location
Derbyshire
I'm thinking of putting up some floating shelves in the alcoves next to my fireplace

Underneath on one side I was going to build a built in cupboard

I've not done anything like that before

I'll have access to a router, but will mostly be using hand tools and a workmate

Should I just use 2x2 or 3x2 to build the frame of the unit screwed to the wall?

Any construction tips for the main body and doors?

Also what timber would be best for the top of the unit?

It will either be all painted, or front painted and top left bare and varnished or oiled

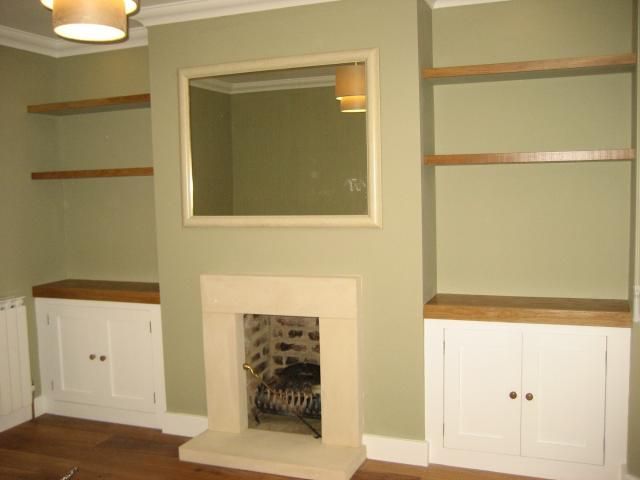
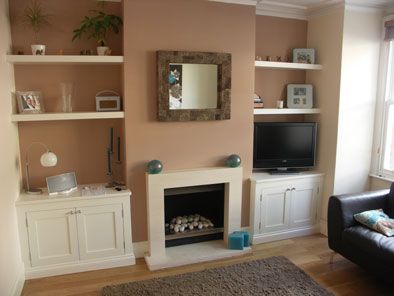
something like these:


I think it is easiest to build a cupboard like this as a carcase in 18mm material. Although expensive, birch ply looks nice for a cupboard interior and it can be screwed together. If you want shelves inside, constructing in studwork makes it more complicated since it still has to be lined with some form of boarding.

Because plasterwork is never dead square or flat, it tends to look best to either sit back or proud of an alcove.

I suppose making carcases is generally suited to machine sawing, however for a one off you could cut with a hand saw and trim the edges with a router (using a bearing guided straight bit, the replaceable tip ones form Wealdon are very good).

Shaker doors can be made with a flat board and planting on some strips of ply or mdf (maybe not the correct method but can look effective if done well).
 
There's a million ways to skin this particular cat, but mine goes something like this...

I make the carcass from 18mm MR MDF with dominos (or biscuit/dowels) for alignment and carcass screws where they won't show, and a 6mm back, stapled on. Make the carcass approx 50mm narrower than the alcove to allow for wonky walls.

Make a base/plinth the same width as the carcass but ~50mm shallower (front to back) from MDF scraps/3x2/4x2/whatever.

In the alcove, remove the rear and chimney breast-side skirting boards. Put the base in position and level it up with wedges, then secure to the floor with brackets and/or feet from MDF scrap.

Put the carcass in position and check that the front plane is broadly in line with the chimney breast. Screw this in place through the carcass base into the plinth - I like to use tongue-tite screws as they have a very small head that can be easily countersunk and filled. Scribe infills either side of the carcass to the wall and chimney-breast or use an infill on the wall side, and an end panel on the chimney breast side, scribed to the chimney breast.

The top is scribed to the alcove in the usual way; if there's no bookcase attached, I usually have the top over-hanging the doors by ~20mm or so, and extending over the chimney breast side of the cabinet enough to return back to the chimney breast.

The base cabinet usually has a full-width adjustable shelf (rows of holes) from the same martial as the carcass, and a softwood lip if likely to bear any significant weight e.g. bottles.

As before, there are many ways to make/fake panel doors; I make mine from from 22mm MR MDF with a 6mm panel and loose tenons, or 18mm MR MDF if they're flush doors. All doors are fitted with Blum soft-close concealed hinges. As mentioned above, an e.g.12mm backer with 6mm strips planted on can be effective way of 'faking' a panel door...

Lastly, I run a piece of ~6mm MDF around the base/plinth scribed to the floor, and pinned/glued in place, painted to match the unit/skirting.

There's no reason you couldn't make this with hand tools, but a tracks aw / circular saw and guide will greatly speed things up, IMHO.

HTH Pete
 
Back
Top