Looks fantastic. What are you intending to build with it? I just finished my very much lower key MFTC and am finding it a bit of a revelation when it comes to building cabinets.
You are using an out of date browser. It may not display this or other websites correctly.
You should upgrade or use an alternative browser.
You should upgrade or use an alternative browser.
Building a MFT
- Thread starter Derek Cohen (Perth Oz)
- Start date


Help Support UKworkshop.co.uk:
This site may earn a commission from merchant affiliate
links, including eBay, Amazon, and others.
Derek Cohen (Perth Oz)
Established Member
Thanks Paul.
As I mentioned earlier, this is a bit of an experiment: will a MFT add to my furniture builds? I suspect that, at the least, it will be a great assembly table, but there is so much more to try out. Tomorrow I will begin using it!
See below: the MFT gets to be finished.
Regards from Perth
Derek
As I mentioned earlier, this is a bit of an experiment: will a MFT add to my furniture builds? I suspect that, at the least, it will be a great assembly table, but there is so much more to try out. Tomorrow I will begin using it!
See below: the MFT gets to be finished.
Regards from Perth
Derek
Derek Cohen (Perth Oz)
Established Member
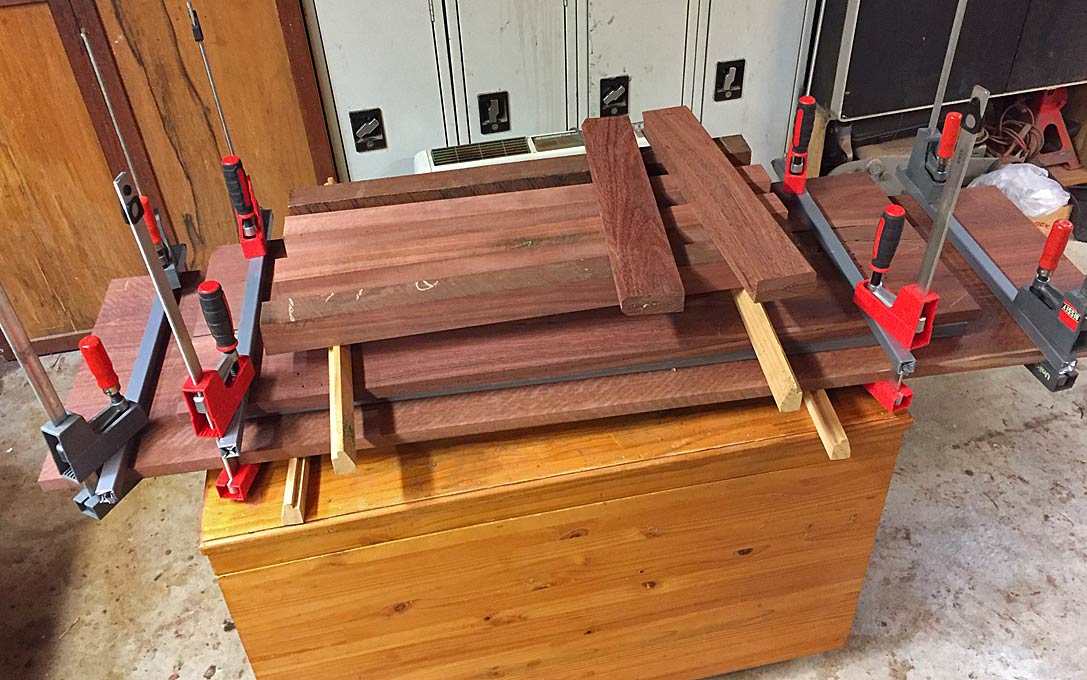
Building a MFT: Part five - the extension table
A small item, perhaps, but the MFT fence was used today as a stop to biscuit two panels together ...
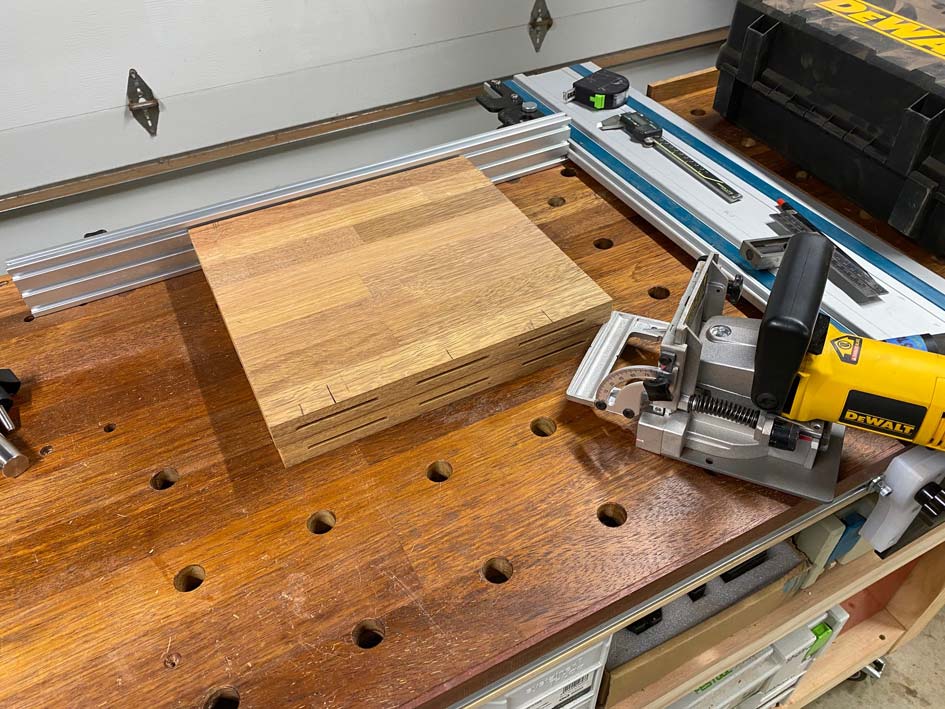
A while back I purchased a 1/4" thick rubber mat, 1200 x 600mm, to use as an underlay when glueing up parts (it would fit the bench top here perfectly if the fence was not in the way).
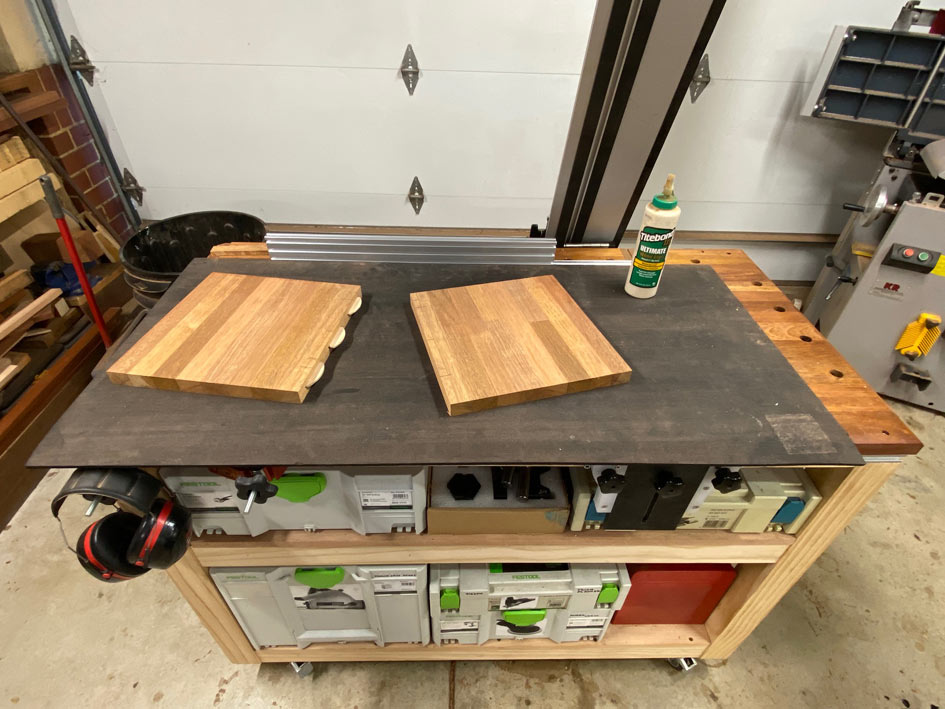
No more concerns about getting glue on work surfaces ..
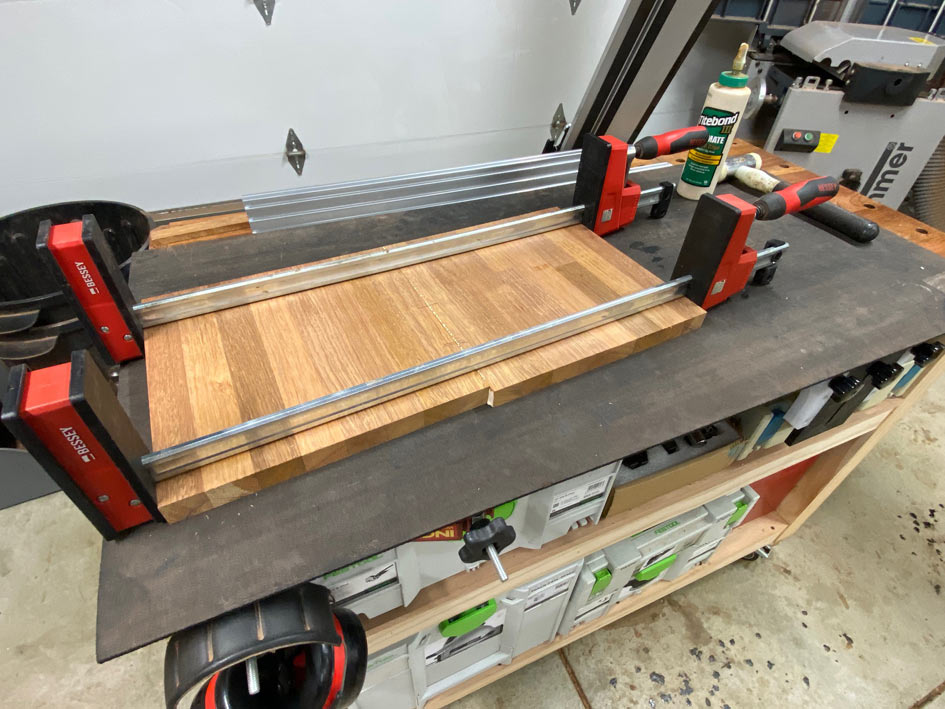
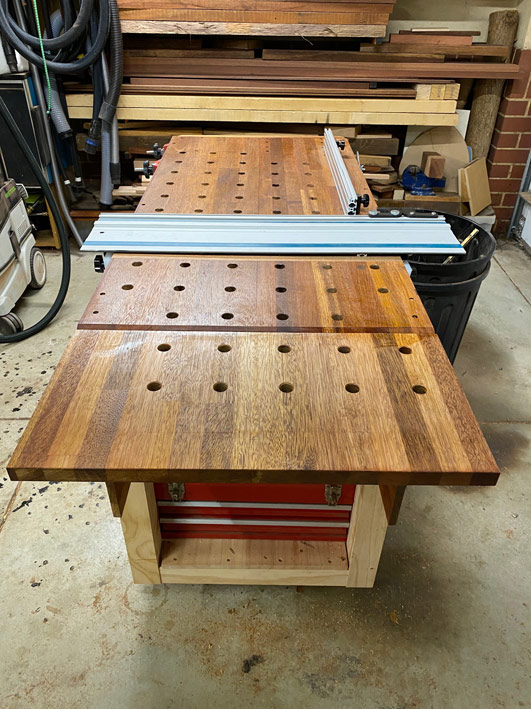
This panel, 300 x 600mm, became a fold-away extension for the bench. Folded down ...
Folded up ...
Folded down ...
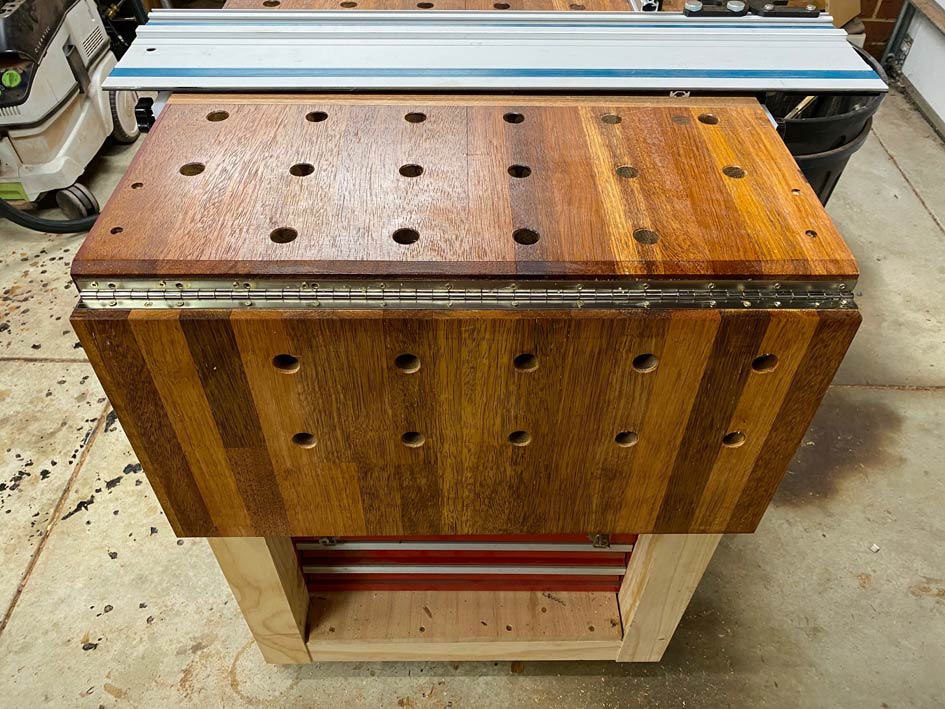
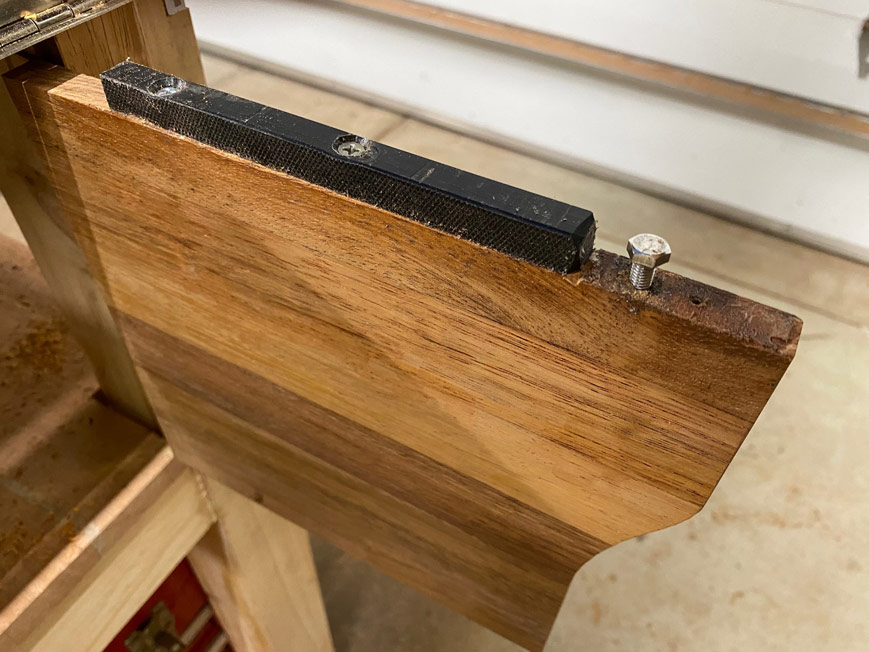
The extension is attached with piano hinges, and secured in the up position with gate legs. I added a bolt for any fine tuning, if needed.
It is all perfectly coplanar ....
Regards from Perth
Derek
A small item, perhaps, but the MFT fence was used today as a stop to biscuit two panels together ...
A while back I purchased a 1/4" thick rubber mat, 1200 x 600mm, to use as an underlay when glueing up parts (it would fit the bench top here perfectly if the fence was not in the way).
No more concerns about getting glue on work surfaces ..
This panel, 300 x 600mm, became a fold-away extension for the bench. Folded down ...
Folded up ...
Folded down ...
The extension is attached with piano hinges, and secured in the up position with gate legs. I added a bolt for any fine tuning, if needed.
It is all perfectly coplanar ....
Regards from Perth
Derek
Derek Cohen (Perth Oz)
Established Member
It's all about work holding
I was asked why did I build the MFT.
There is not a lot to mention that is original. Festool developed the MFT about 20 (or more) years ago. It was not something I paid a lot of attention to as, in my understanding, it was essentially a transportable bench for tradesmen, and principally a substitute for a tablesaw (using the tracksaw).
My focus in woodworking has been largely traditional joinery, and interest in- and use of mechanical joints, such as Dominos, has been pretty low. Similarly, I have not owned a tracksaw as I do not work with sheet goods, such as ply or MDF. I have machines, but they are the traditional ones: tablesaw, jointer-thicknesser/planer, and bandsaw. With occasional exceptions, power tools rarely get used outside of a drill or router. The point being that these power tool-based systems did not enter into my thoughts.�
Some months back I decided that it would be a good idea to re-build the small work surface (I hesitate to refer to it as a bench) I had in the workshop. It was this ...
... just a laminated top on a steel stand. It was used for storing some tools, but not many as the steel legs got in the way. At the time I was storing many of my power tools in a chest (rather than hand tools in a chest!), and it was a pain to access as the top of the chest often was used to store something ...
In addition to the storage aspect, I started to look at MFT tables and all their dog holes. The tables were like Swiss cheese with dog holes. No way I would do that to my Roubo bench! However, these dog holes offered great opportunities for work holding, and I was also becoming aware of the various accessories to accomplish this.
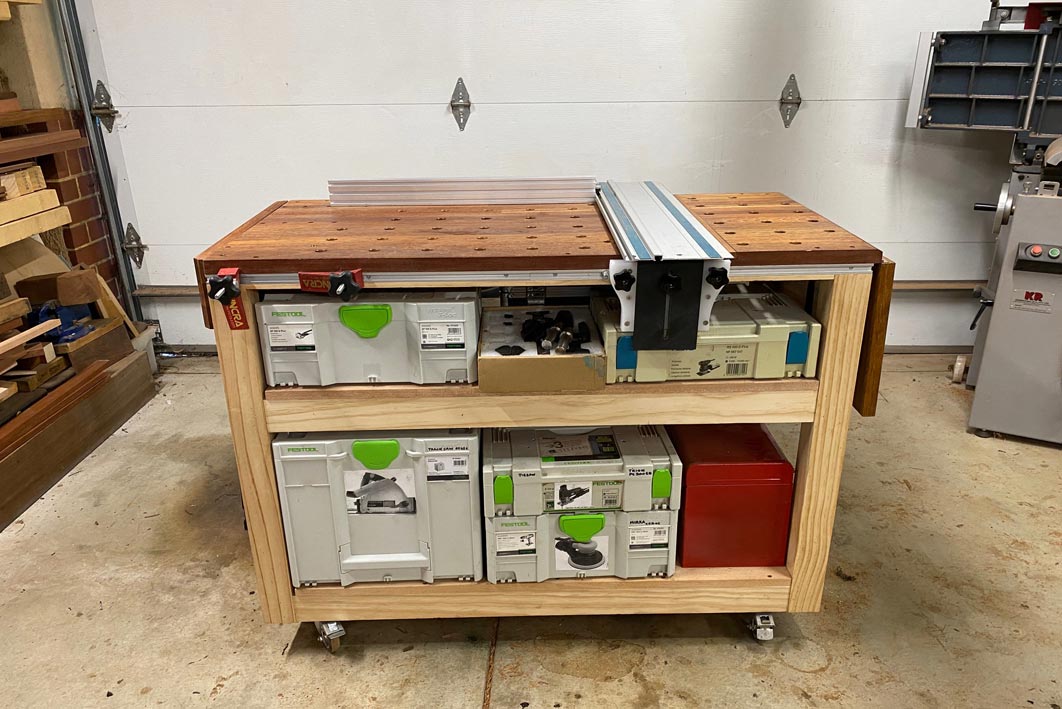
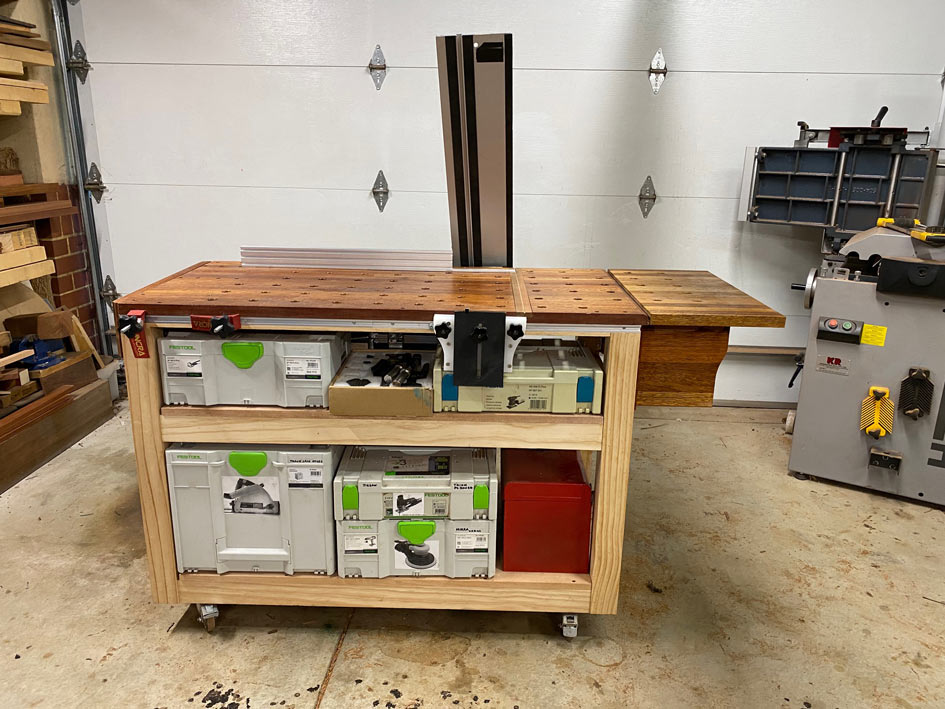
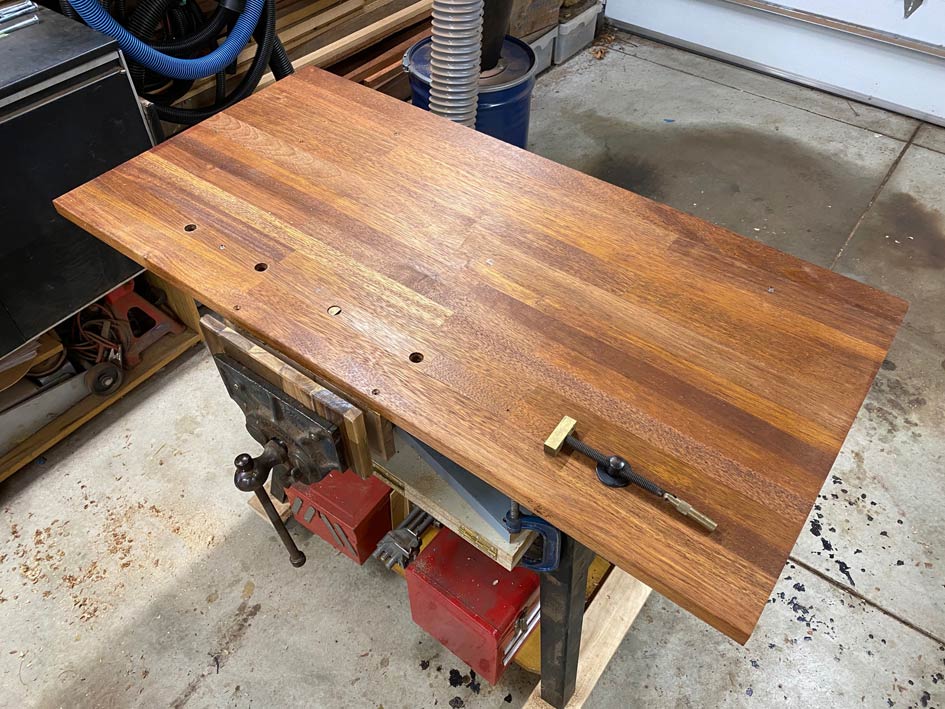
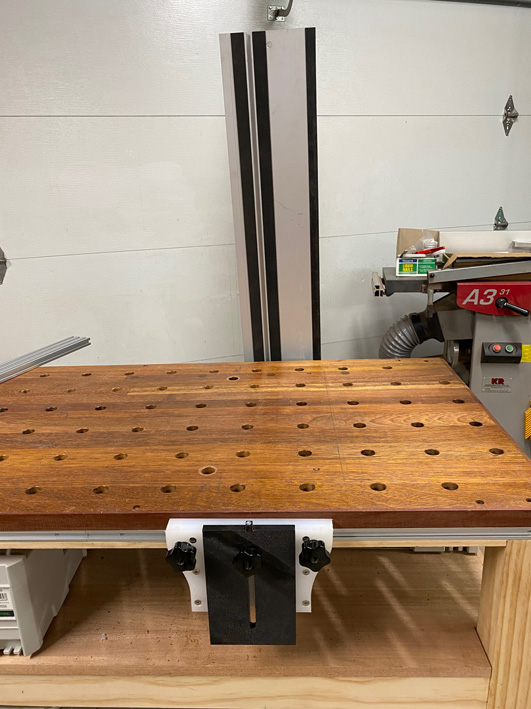
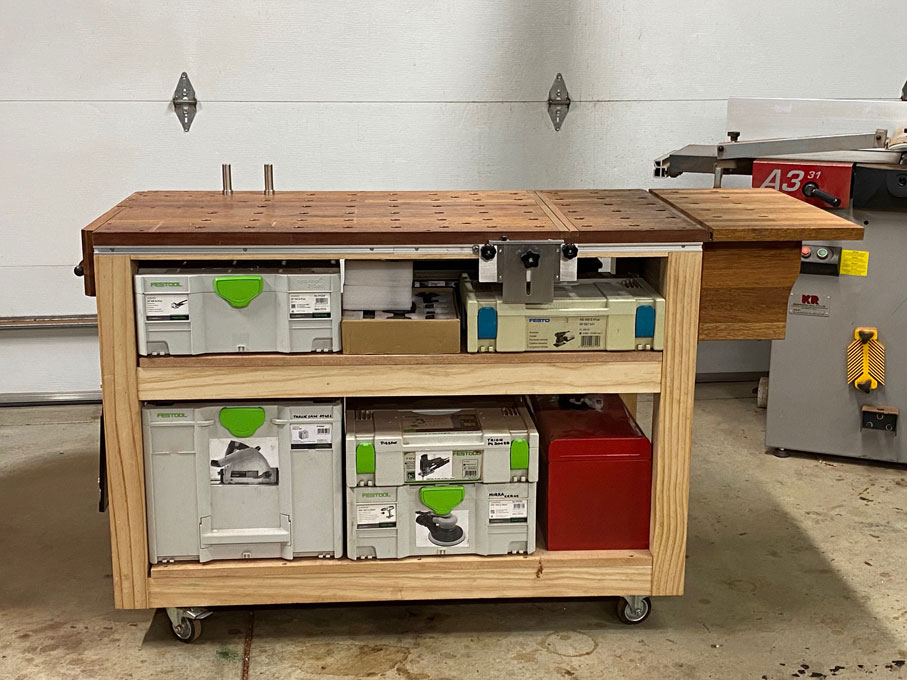
What you see here is storage plus a work top ...

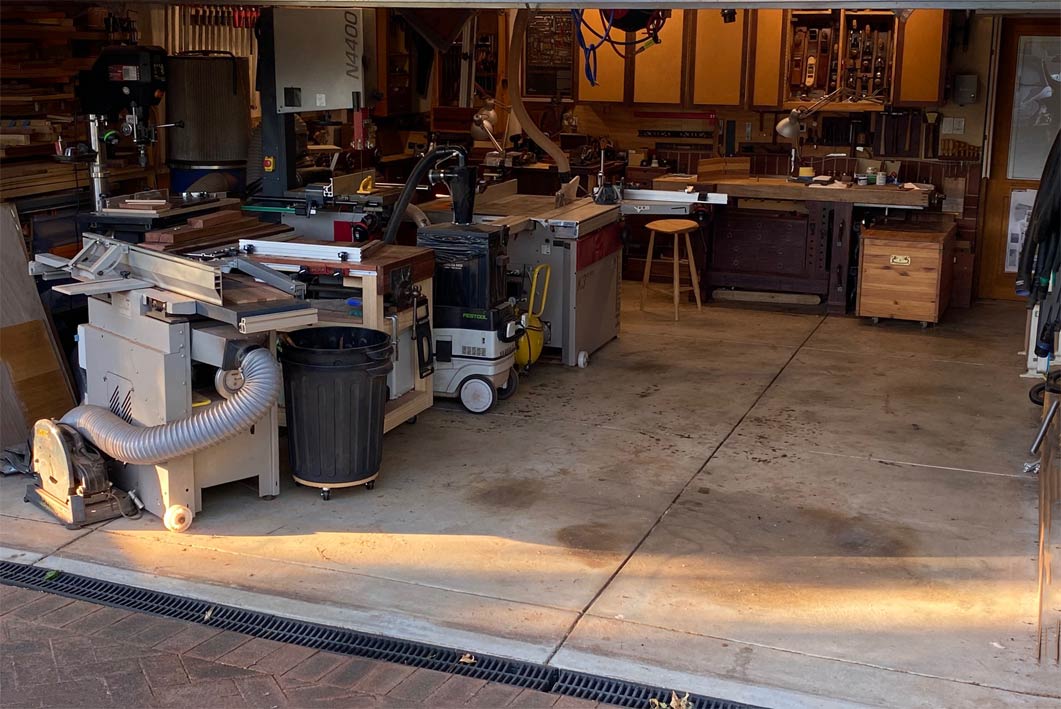
Another principal need is an assembly table. I wanted something separate from my main bench, which is for building on and is usually covered with tools. My work space is small - everything fits into half a double garage. The idea for the bench top extension comes from the need to create as much work surface as possible, and which can be folded up and stored away.�
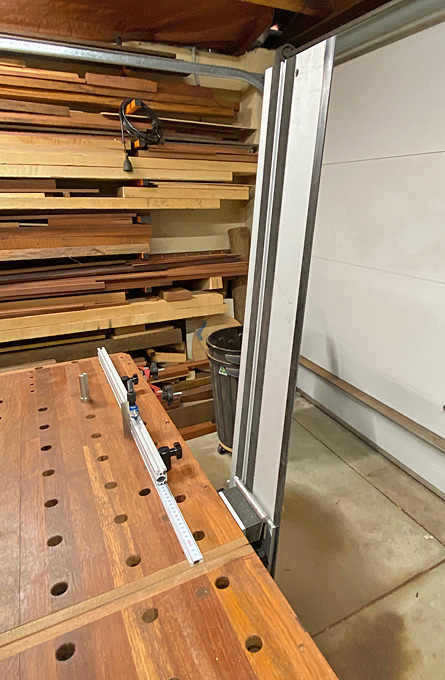
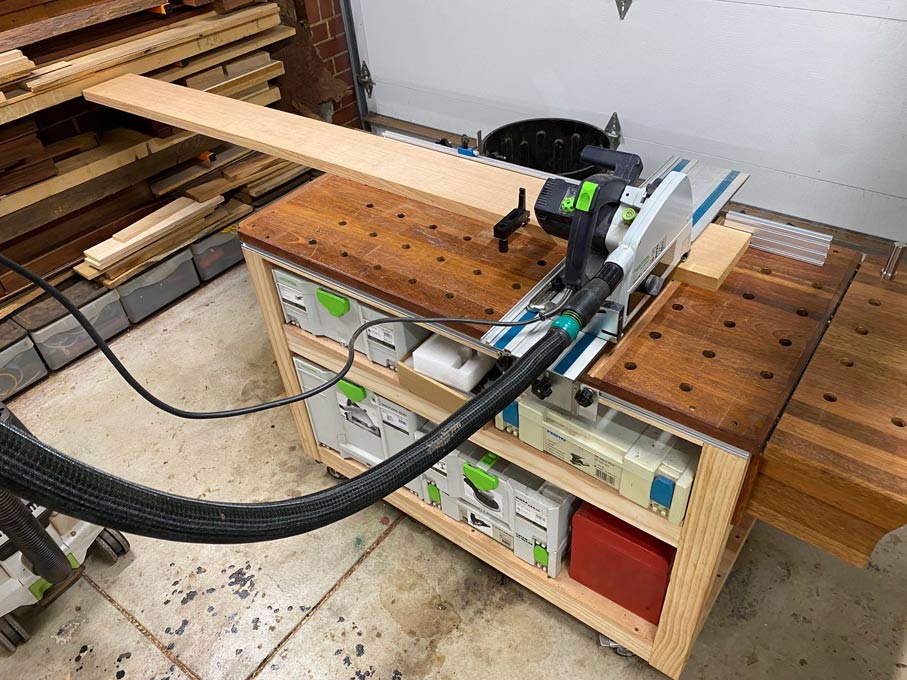
All packed up for the day. The new bench is alongside the bandsaw ...
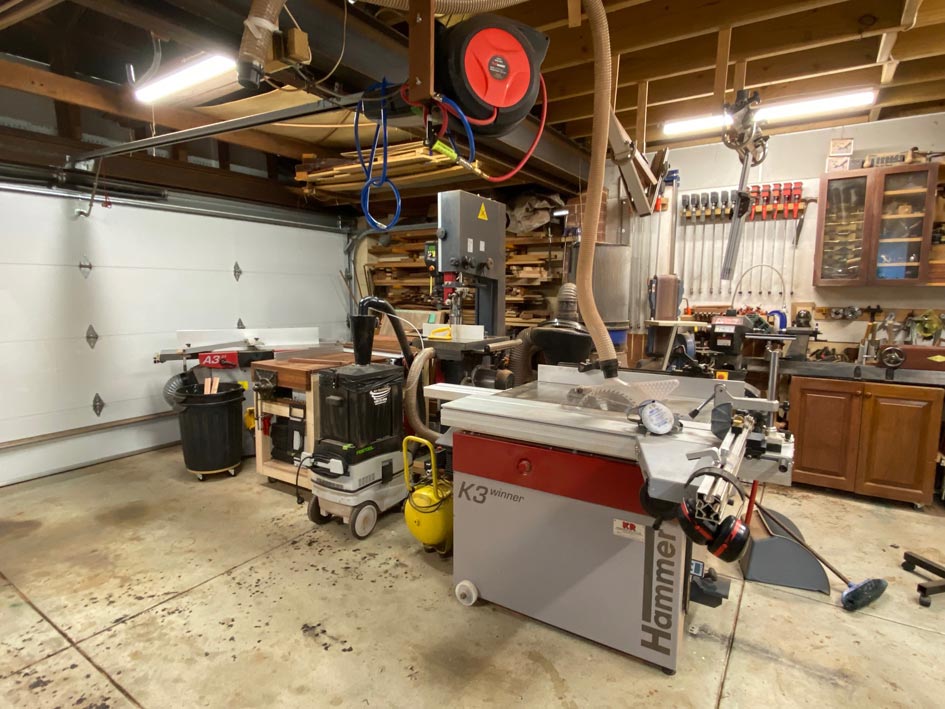
Room for my car (my wife's lives outside!) ..
The idea of adding a tracksaw was only a recent one. I acquired a "new" 20-year old Festool saw (AT65E, for those who want details). I mean it had been used once or twice only. The blade is brand new. And it was too cheap to pass up. The Makita track is as good as a Festool track - identical in design - and cost 1/3 as much. I had it anyway, having thoughts once upon a time of using it with a router.�
My intention was to build this MFT/storage/assembly table as cheaply as possible. The whole thing was partly fun, since I just like building stuff, but I did not even know if it would be viable or useful, and so did not want to lay out much. So we have a Pine frame, all mortice-and-tenon joinery (I guess I could have used the Domino!) with the same laminated Merbau top from earlier on. The base was sized to fit the top, and the height was chosen to be the same as the machines, so as to act as an outfeed. Attention was given to the height of the shelves, which needed to allow for the Systainers I have. All the mechanical parts, such as the fence and the track hinge, I designed and built. There is an aluminium track at the top of the base to allow for clamping.�
Some of the work holding features:
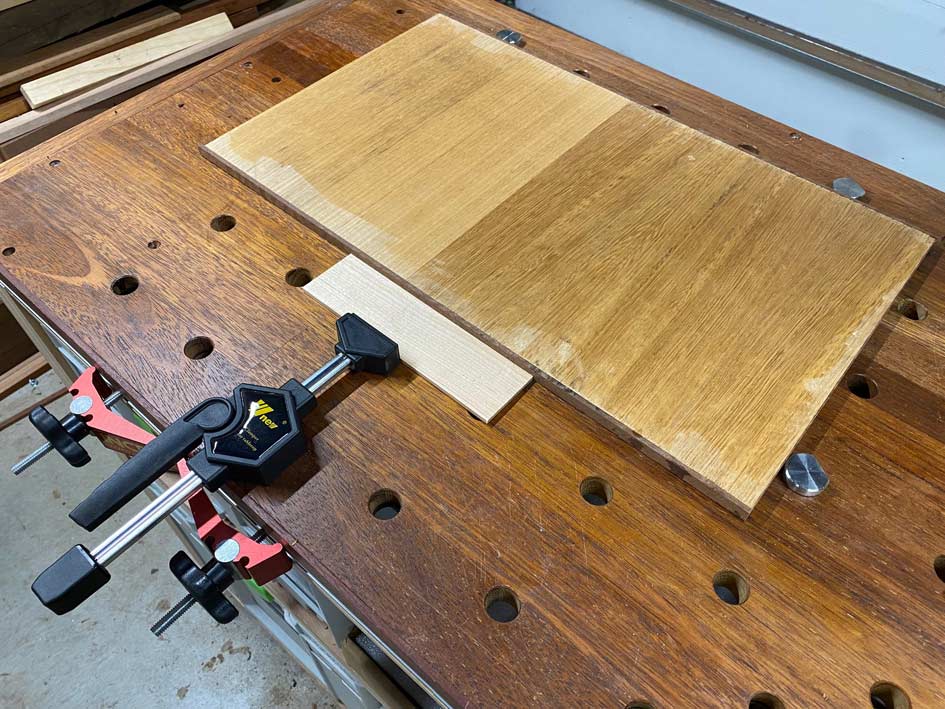
It is possible to clamp boards or doors to the side of the bench ..
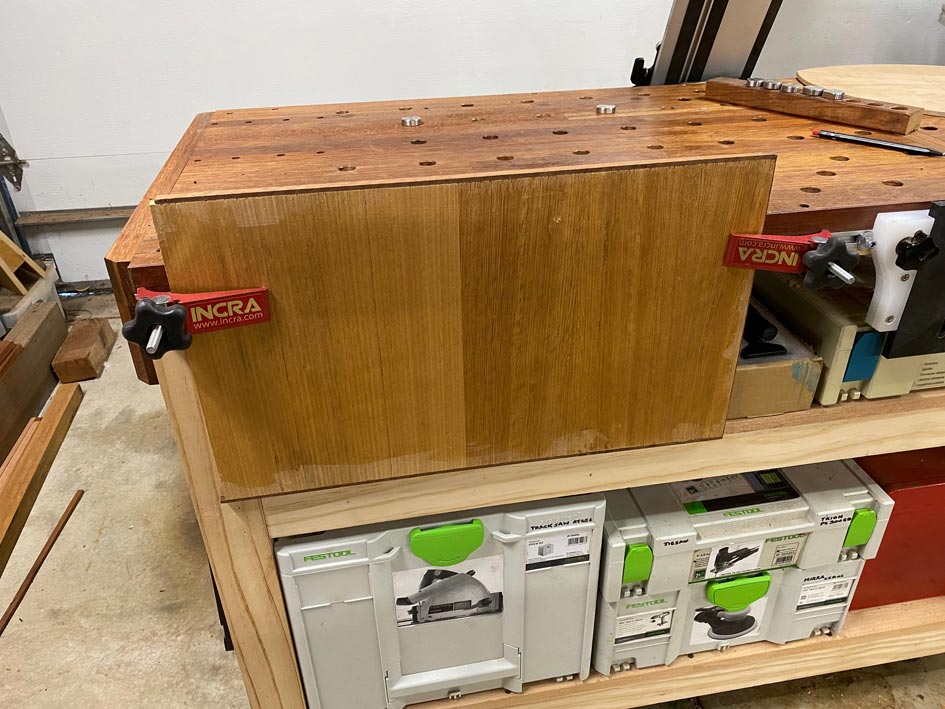
In addition to the Record tail vise, there is storage for a metal vise ...
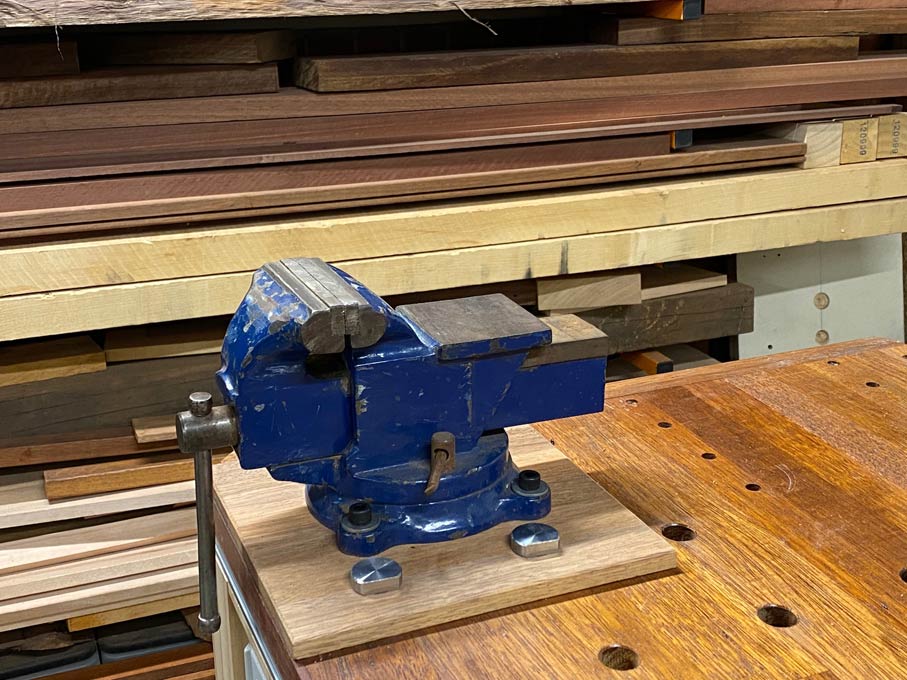
This is attached to the top using the dog holes ..
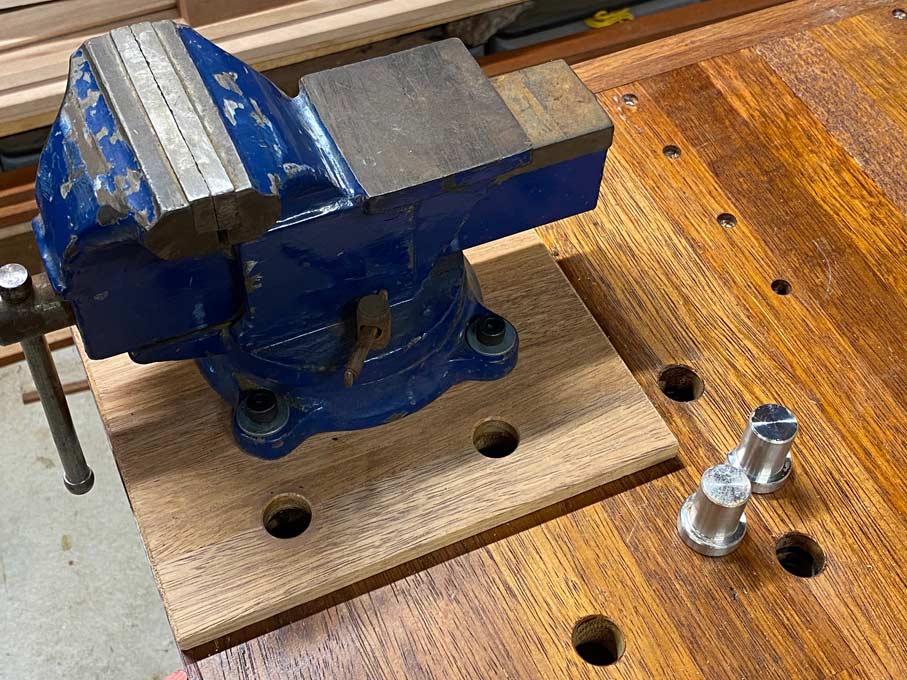
These small steel dogs are very cheap as dogs go, under $10 each.�
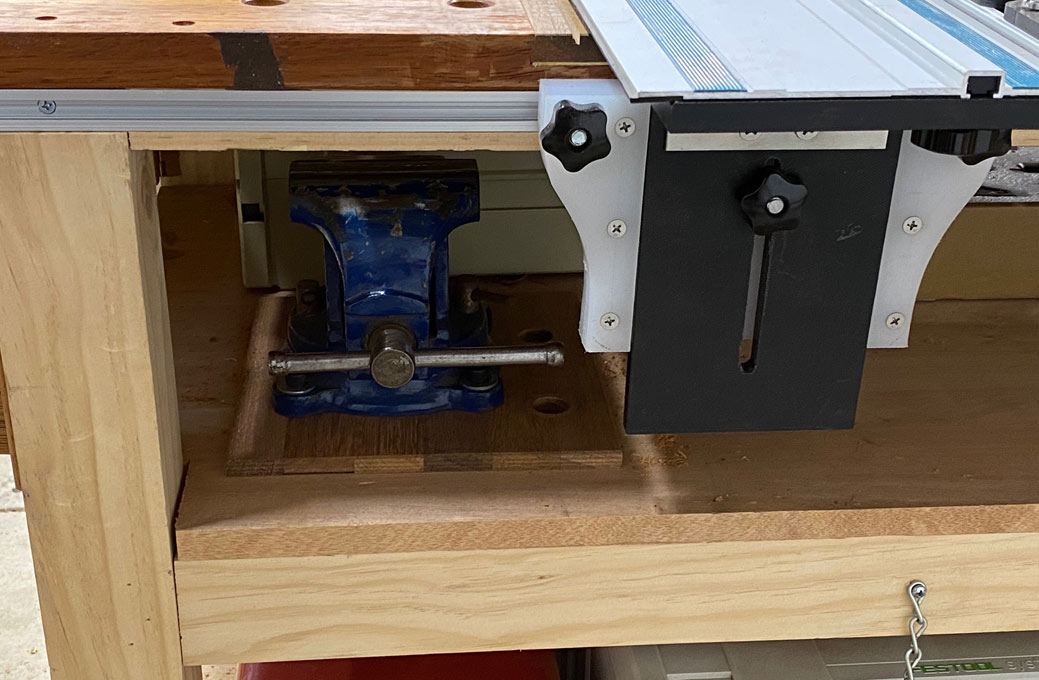
When done, it is stored away ..
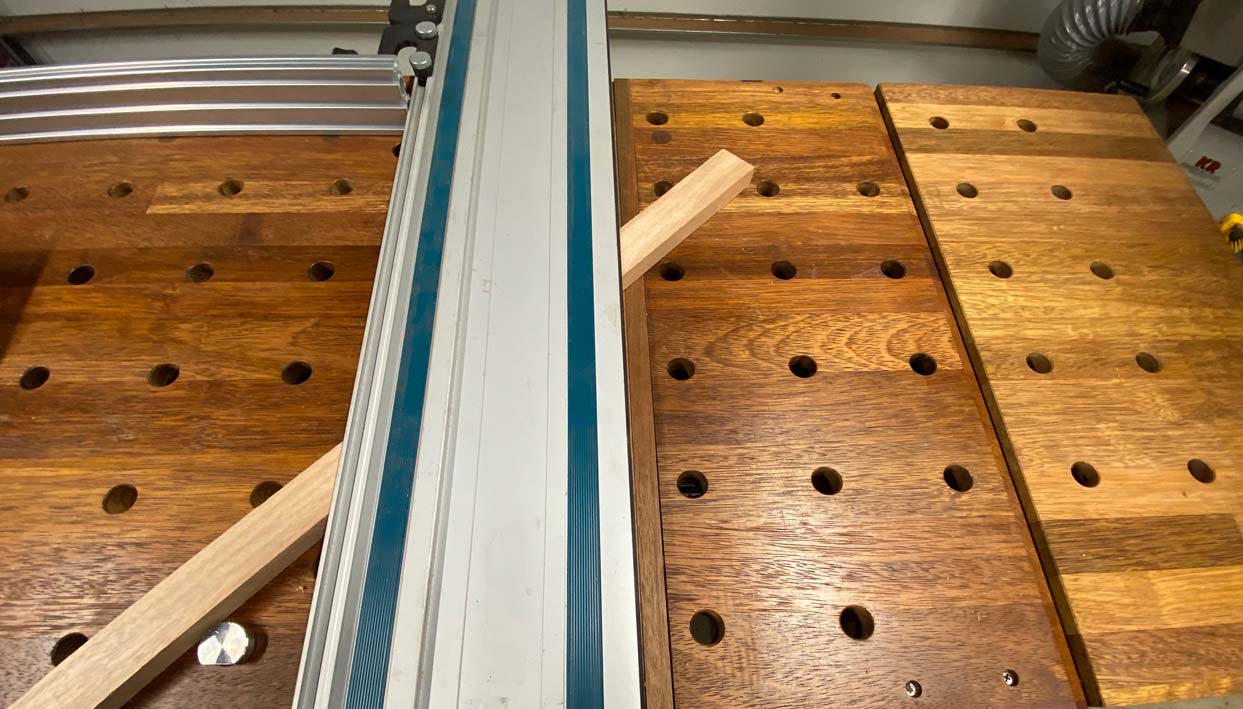
The dog holes were routed using a template made by a friend's CNC machine. The result is extremely accurate. The grid creates perfect square and diagonals. Using the dogs, all manner of shapes can be held ...
Seats for carving ..

Panels for sanding or routing ...
Perfect diagonals ...
... mean perfect mitres ...
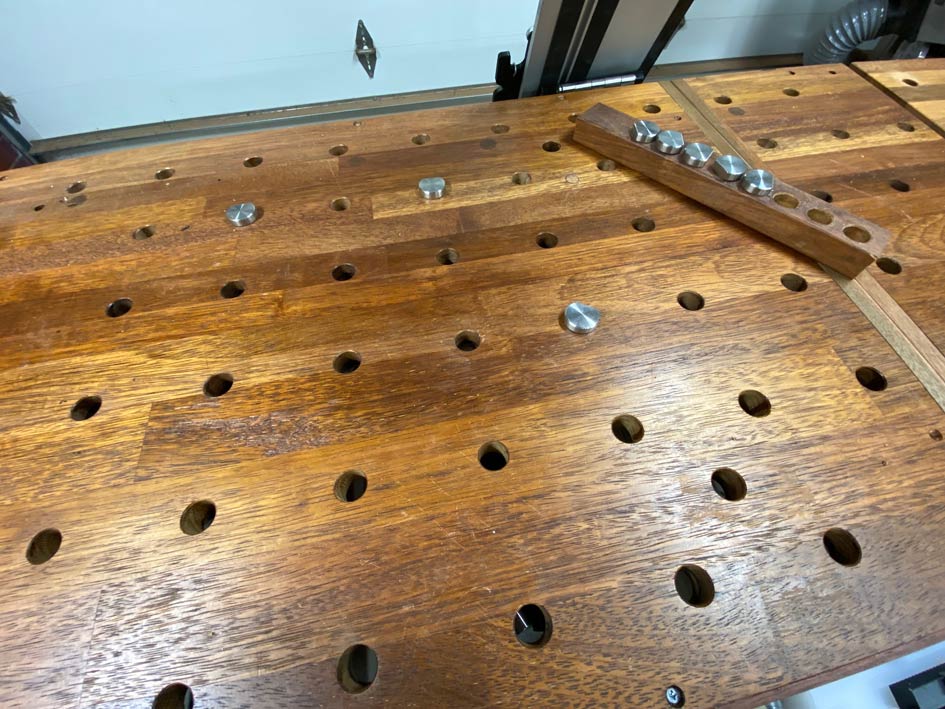
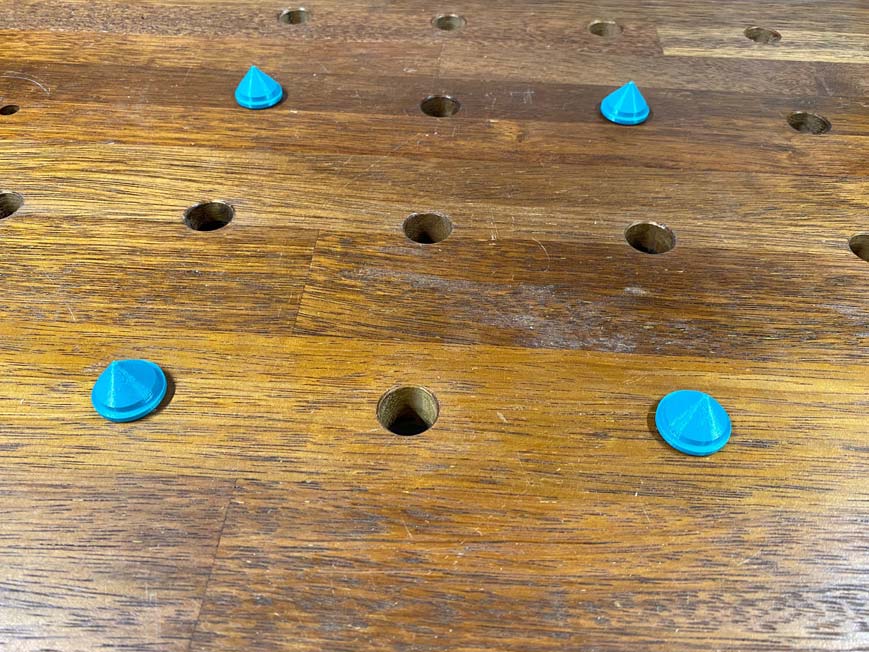
There are also these "buttons", which are reversible.�

Pointy side up, they will hold parts while glue or finish dries ...
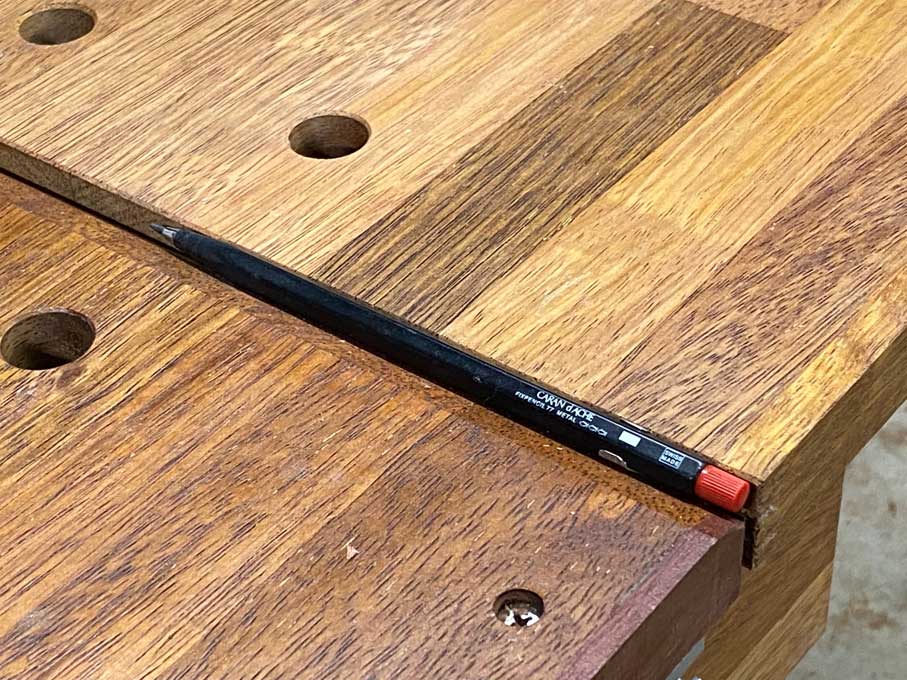
Lastly, and most importantly, there is a place to keep a pencil!
")
Regards from Perth
Derek
I was asked why did I build the MFT.
There is not a lot to mention that is original. Festool developed the MFT about 20 (or more) years ago. It was not something I paid a lot of attention to as, in my understanding, it was essentially a transportable bench for tradesmen, and principally a substitute for a tablesaw (using the tracksaw).
My focus in woodworking has been largely traditional joinery, and interest in- and use of mechanical joints, such as Dominos, has been pretty low. Similarly, I have not owned a tracksaw as I do not work with sheet goods, such as ply or MDF. I have machines, but they are the traditional ones: tablesaw, jointer-thicknesser/planer, and bandsaw. With occasional exceptions, power tools rarely get used outside of a drill or router. The point being that these power tool-based systems did not enter into my thoughts.�
Some months back I decided that it would be a good idea to re-build the small work surface (I hesitate to refer to it as a bench) I had in the workshop. It was this ...
... just a laminated top on a steel stand. It was used for storing some tools, but not many as the steel legs got in the way. At the time I was storing many of my power tools in a chest (rather than hand tools in a chest!), and it was a pain to access as the top of the chest often was used to store something ...
In addition to the storage aspect, I started to look at MFT tables and all their dog holes. The tables were like Swiss cheese with dog holes. No way I would do that to my Roubo bench! However, these dog holes offered great opportunities for work holding, and I was also becoming aware of the various accessories to accomplish this.
What you see here is storage plus a work top ...
Another principal need is an assembly table. I wanted something separate from my main bench, which is for building on and is usually covered with tools. My work space is small - everything fits into half a double garage. The idea for the bench top extension comes from the need to create as much work surface as possible, and which can be folded up and stored away.�
All packed up for the day. The new bench is alongside the bandsaw ...
Room for my car (my wife's lives outside!) ..
The idea of adding a tracksaw was only a recent one. I acquired a "new" 20-year old Festool saw (AT65E, for those who want details). I mean it had been used once or twice only. The blade is brand new. And it was too cheap to pass up. The Makita track is as good as a Festool track - identical in design - and cost 1/3 as much. I had it anyway, having thoughts once upon a time of using it with a router.�
My intention was to build this MFT/storage/assembly table as cheaply as possible. The whole thing was partly fun, since I just like building stuff, but I did not even know if it would be viable or useful, and so did not want to lay out much. So we have a Pine frame, all mortice-and-tenon joinery (I guess I could have used the Domino!) with the same laminated Merbau top from earlier on. The base was sized to fit the top, and the height was chosen to be the same as the machines, so as to act as an outfeed. Attention was given to the height of the shelves, which needed to allow for the Systainers I have. All the mechanical parts, such as the fence and the track hinge, I designed and built. There is an aluminium track at the top of the base to allow for clamping.�
Some of the work holding features:
It is possible to clamp boards or doors to the side of the bench ..
In addition to the Record tail vise, there is storage for a metal vise ...
This is attached to the top using the dog holes ..
These small steel dogs are very cheap as dogs go, under $10 each.�
When done, it is stored away ..
The dog holes were routed using a template made by a friend's CNC machine. The result is extremely accurate. The grid creates perfect square and diagonals. Using the dogs, all manner of shapes can be held ...
Seats for carving ..
Panels for sanding or routing ...
Perfect diagonals ...
... mean perfect mitres ...
There are also these "buttons", which are reversible.�
Pointy side up, they will hold parts while glue or finish dries ...
Lastly, and most importantly, there is a place to keep a pencil!
Regards from Perth
Derek
frankendoodle65
Established Member
That's a really nice workbench you've built there, I'm working on something similar and I'll be tackling a DIY rail hinge soon so no doubt I'll steal/borrow some ideas from yours - imitation is the sincerest form of flattery after all!
I like the removable metal working vice idea too, I've been wondering what to do with mine so that's definitely a possibility - do you find its held securely enough just with dogs?
I like the removable metal working vice idea too, I've been wondering what to do with mine so that's definitely a possibility - do you find its held securely enough just with dogs?
Derek Cohen (Perth Oz)
Established Member
I like the removable metal working vice idea too, I've been wondering what to do with mine so that's definitely a possibility - do you find its held securely enough just with dogs?
So far so good. Forces tend to be lateral, other than downward pounding, and the dogs do a good job. It helps that the wood surface and the base for the vise are both very hard and sturdy Merbau. The dogs fit without any slop, so it feels rigid.
Regards from Perth
Derek
danst96
Established Member
Lovely build! I'm looking forward to the point I can get back to working on shop furniture
Derek Cohen (Perth Oz)
Established Member
I added the following to my website in March this year. It seems appropriate to complete the thread ....
MFT rail hinge and fence (Mk 2)
Part 1
A while back I decided to dip my toes in the MFT water, and built a table and rail hinge. The hinge was made from cutting boards, which likely sounds suspect, but worked very well ...
However, my OCD got the better of me, and I decided to build one in aluminium, inspired by both Benchdogs and Dashboard. I have dimensions for anyone who wants to copy it.
I had also built a fence from 8020, along with shopmade clamps ..
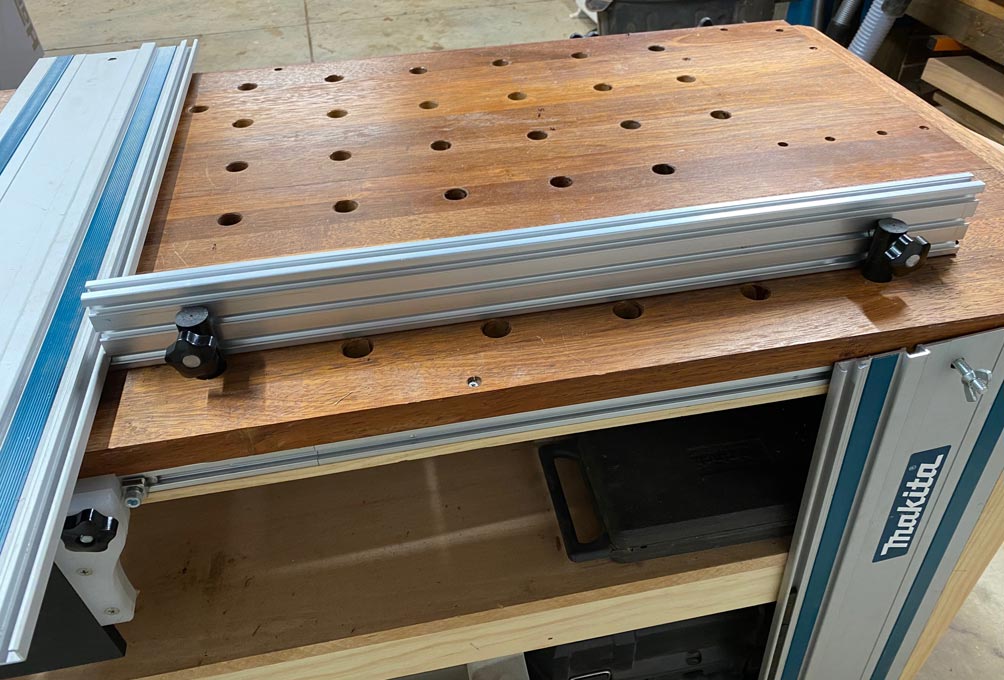
This turned out to be too high for the saw's motor to ride over. Back to the drawing board on this one.
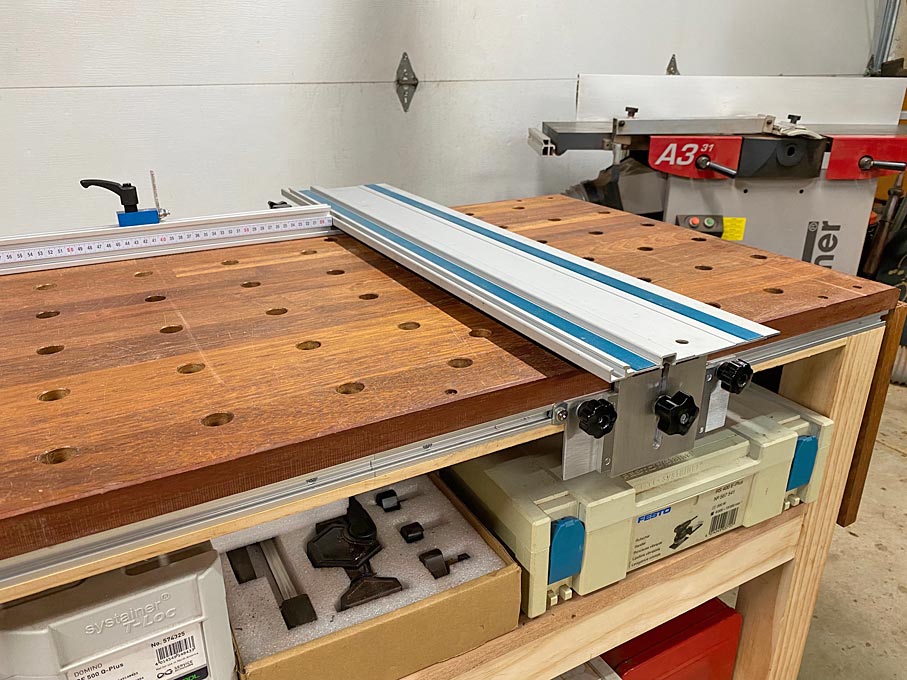
The hinge rail first. It needs to be mentioned that everything was built over 2 weekends. The aluminium was purchased on eBay as 2 x 100 x 300mm (by 6mm thick) sheets, and 2 x 100 x 300mm (by 3mm thick) sheets. These were cut to side with a bandsaw (bimetal blade) - woodworking tools are fine with aluminium. Slotting was done with a router and straight bit. Holes were drilled on a drill press, and threaded tapped by hand. Just work carefully, and you will be rewarded with a great system.
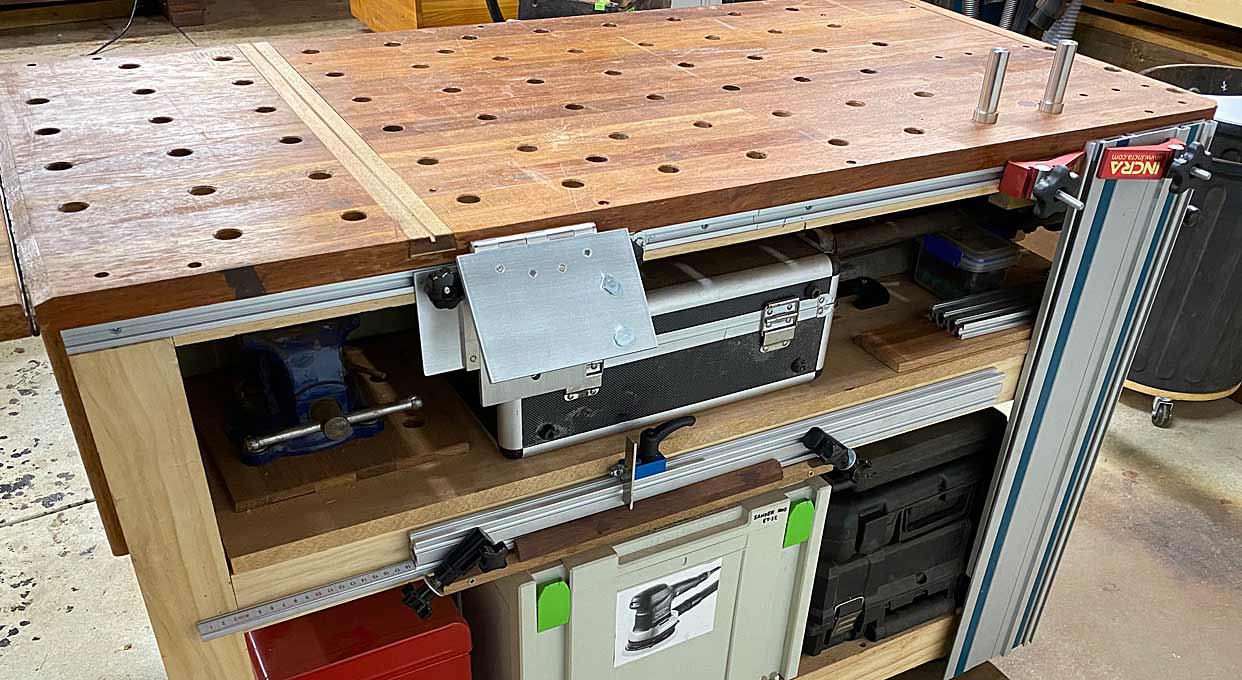
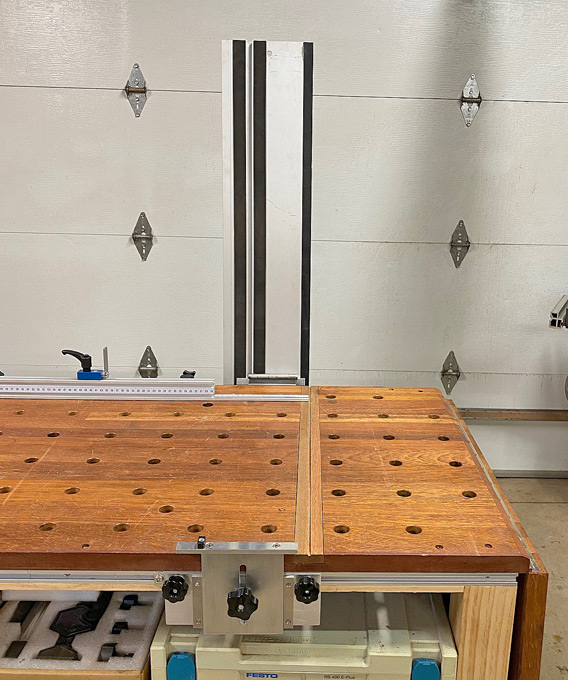
Here is the bench ...
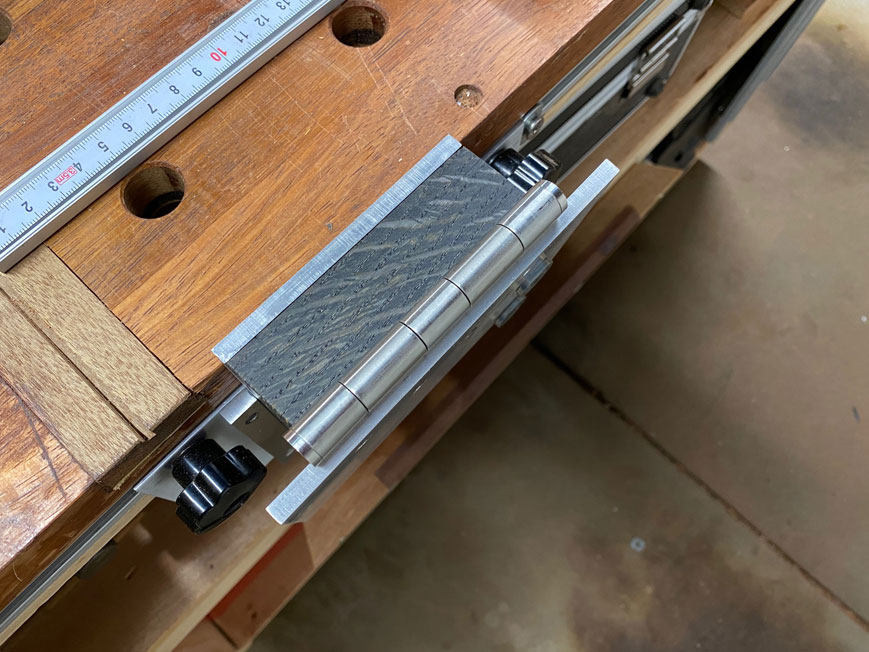
The rest for the rail (I am not sure if there is another name) ...
The rail has a height cutting capacity of a little over 50mm. The saw used is a Festool AT65E. The pin is UHMW, and slightly tapered, which allows the rail groove to fit without slop ...
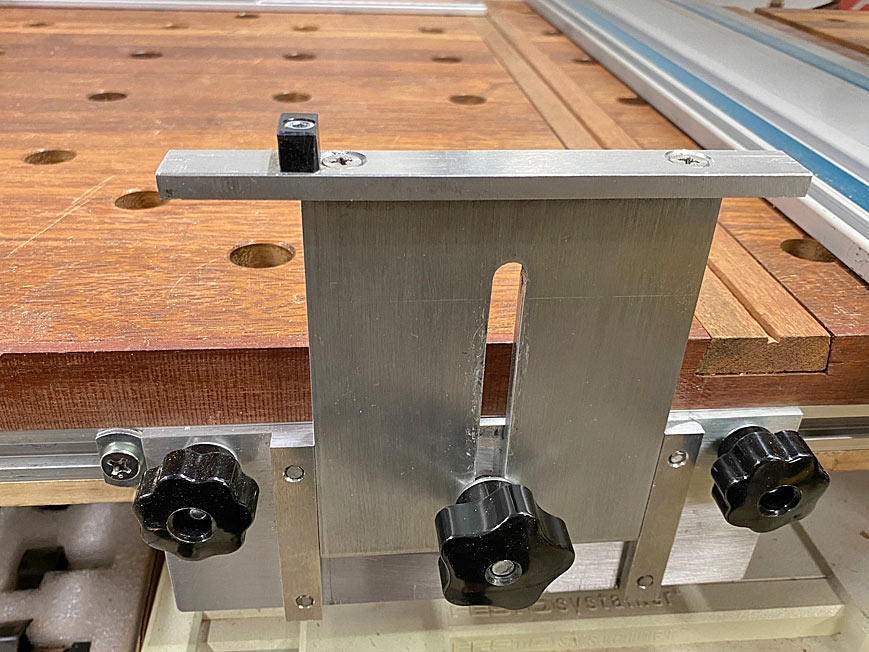
The dimensions here: 115mm high x 100mm wide. The rest at the top is 145mm wide. All built from 6mm thick plate. The 90mm long slot is sized for an 8mm bolt.
The base is made from 3mm plate and is 195mm wide and 75mm high. The two guides are 10mm wide and 35mm in from each side ...
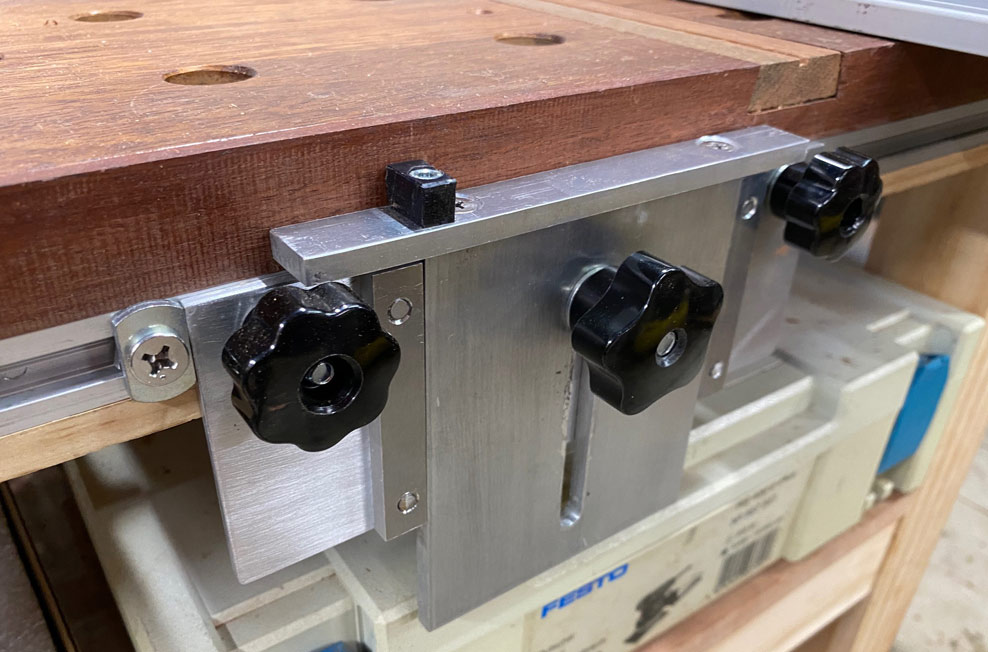
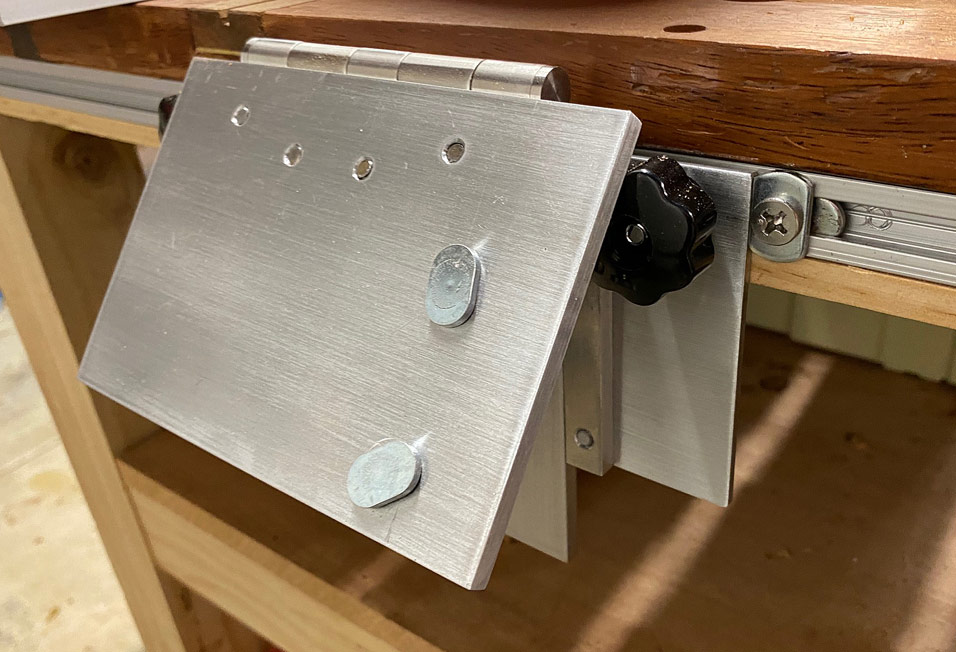
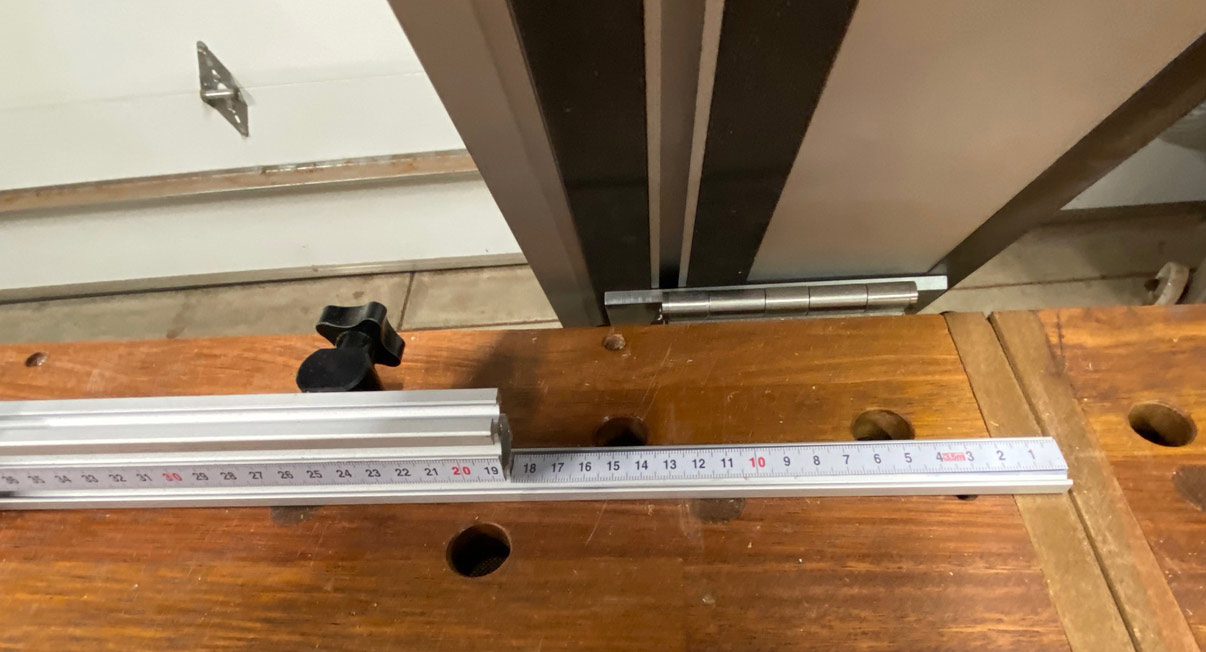
The hinge
Close up ...
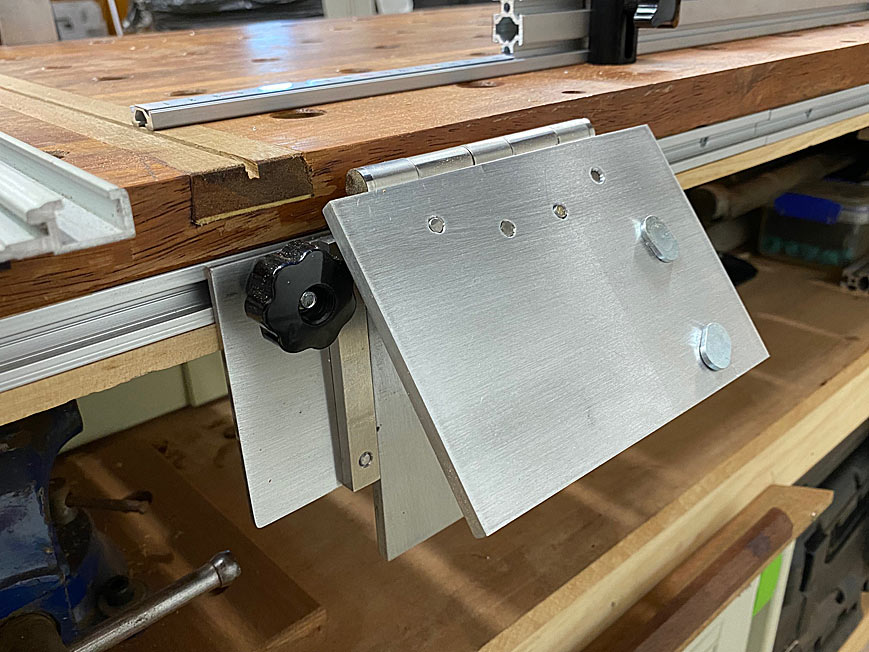
From this angle you can see the stop against which the mechanism can be returned, if moved ...
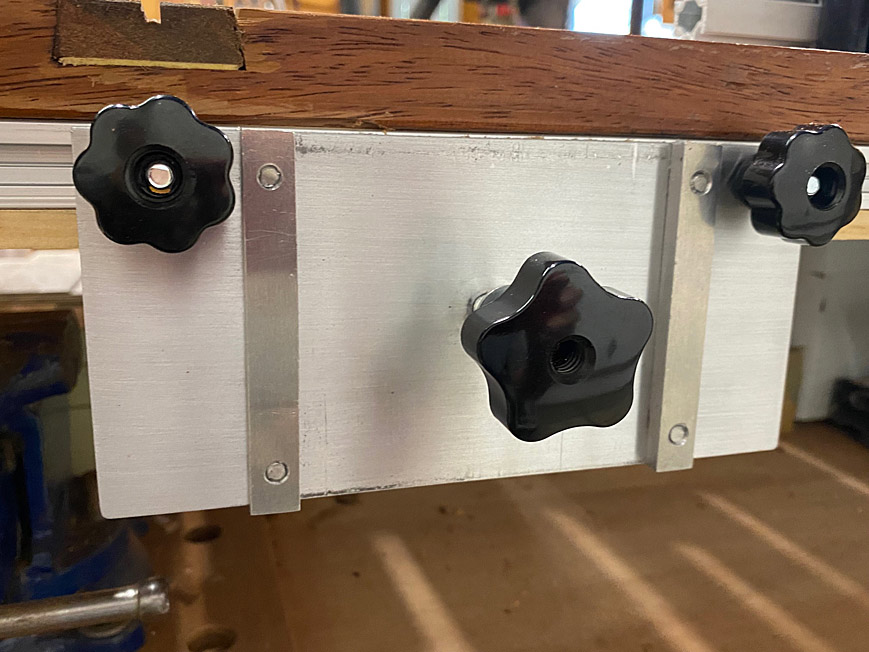
Rather than a bar to clamp the rail from this end, I used the Benchdogs system. This is secured with stainless steel wheels on the underside. Why not use a bar? I found it more accurate to drill two holes, rather than two holes AND then drill the bar accurately ...
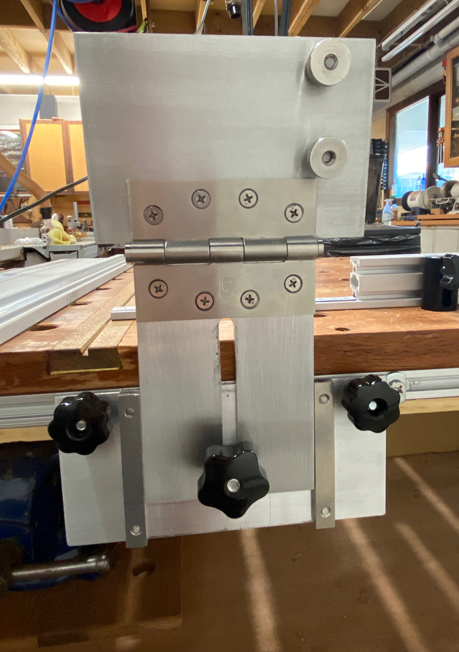
Here is a detailed picture ...
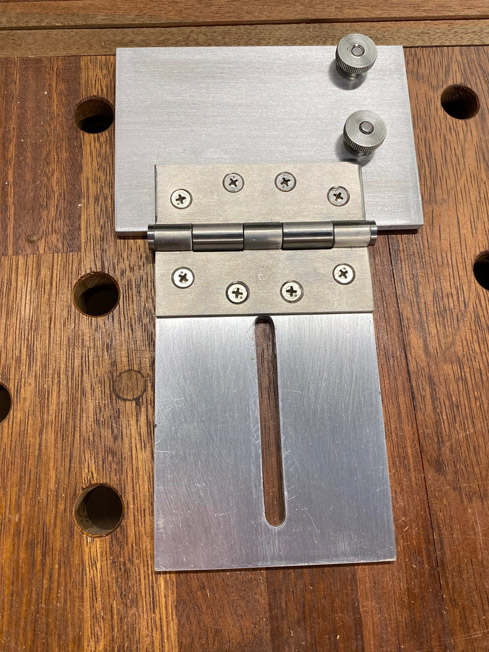
The top plate is 150mm wide x 100mm deep. The 100 x 75mm hinge is stainless steel and has nil movement. The riser is 100mm wide x 140mm high. The slot is 90mm long. All is built from 6mm plate and parts are joined with tapped holes and 5mm machine screws.
All the parts were sanded with a block with 180 grit to create a brushed appearance, and then finished with clear lacquer spray.
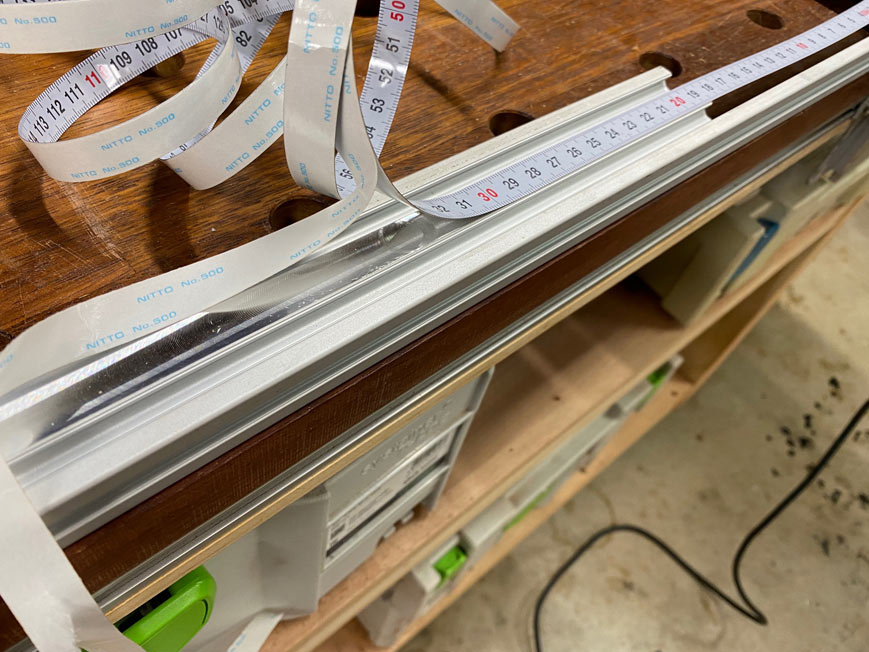
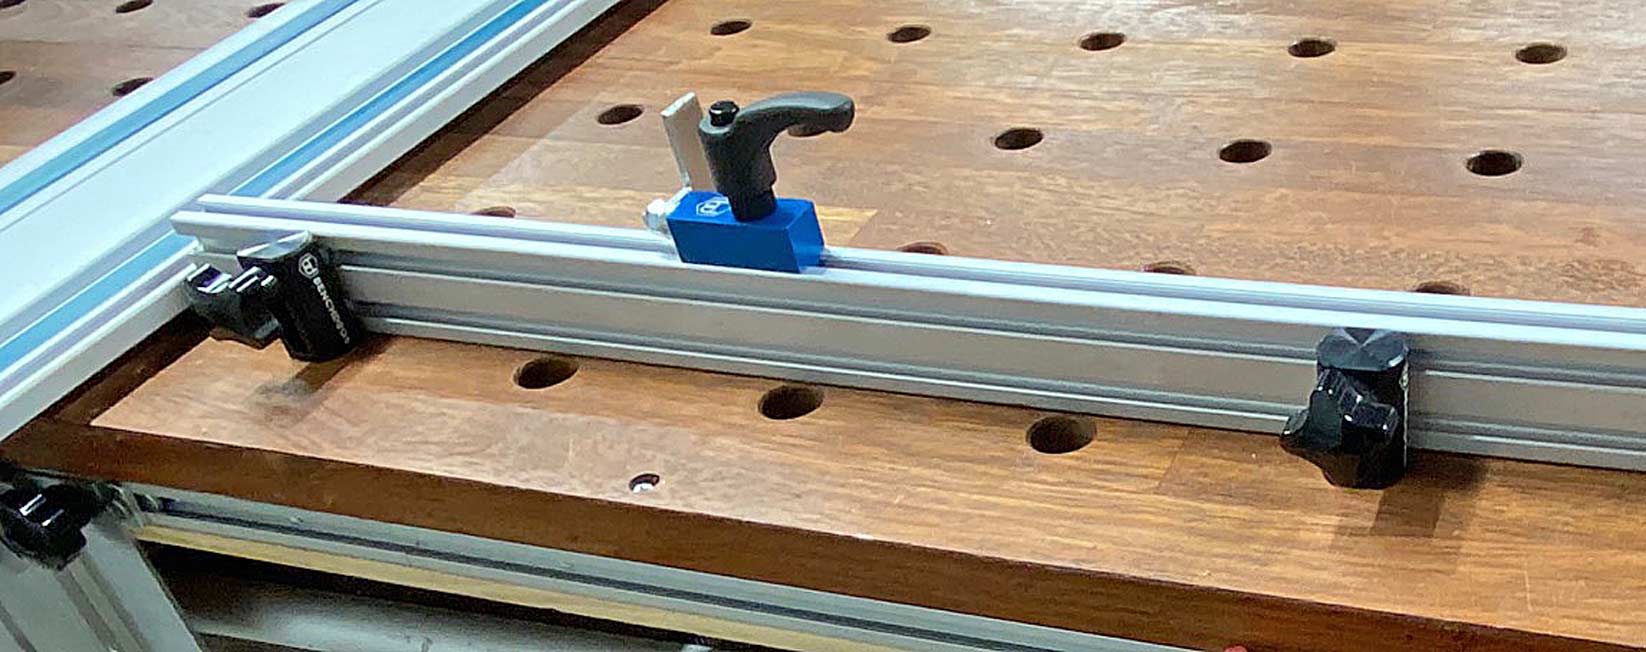
The Fence
The fence is made from 6020 extrusion, in the same design as the Benchdogs fence. The cut out was completed on the bandsaw ...
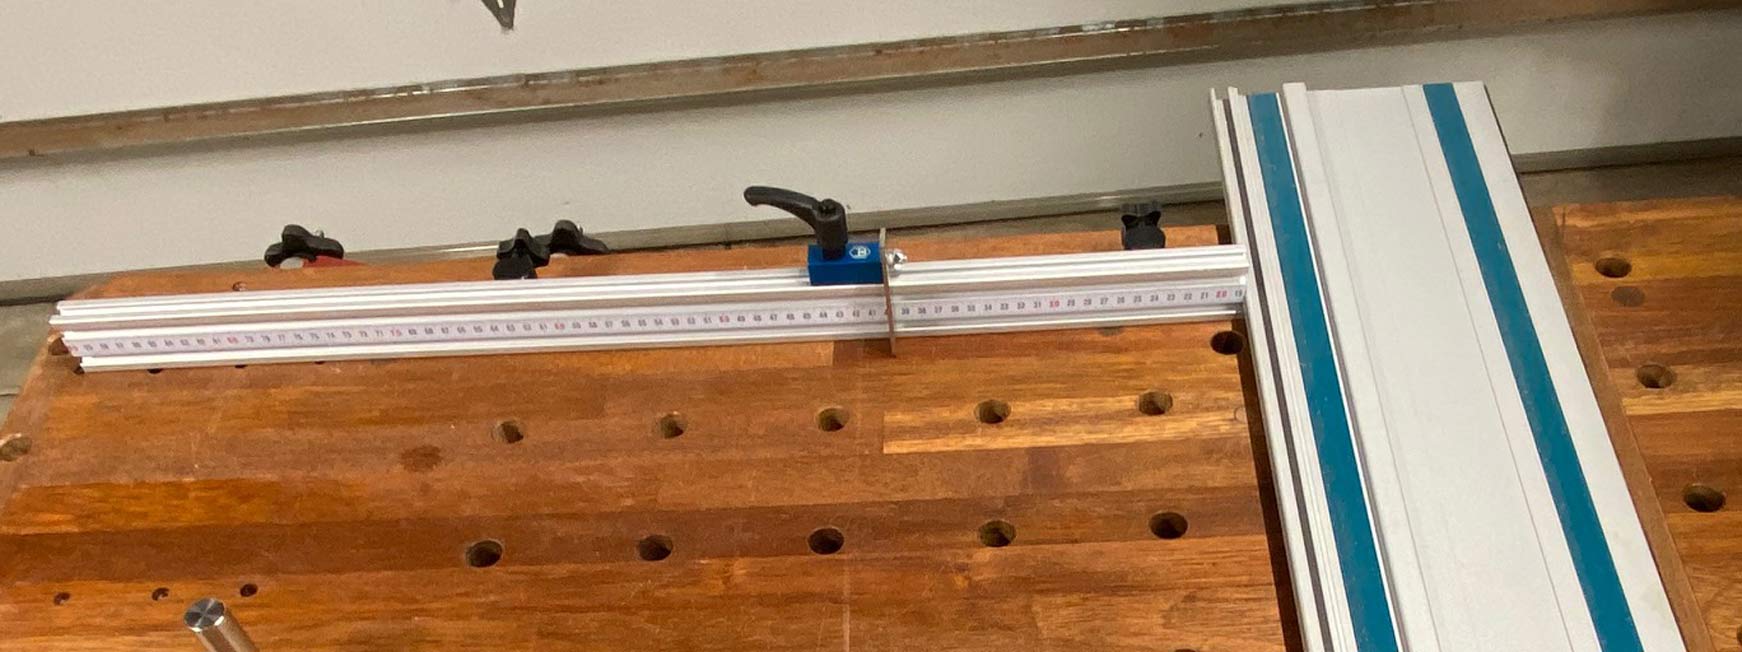
I ordered the Benchdogs Flagstop (flip stop), which can be seen here ...
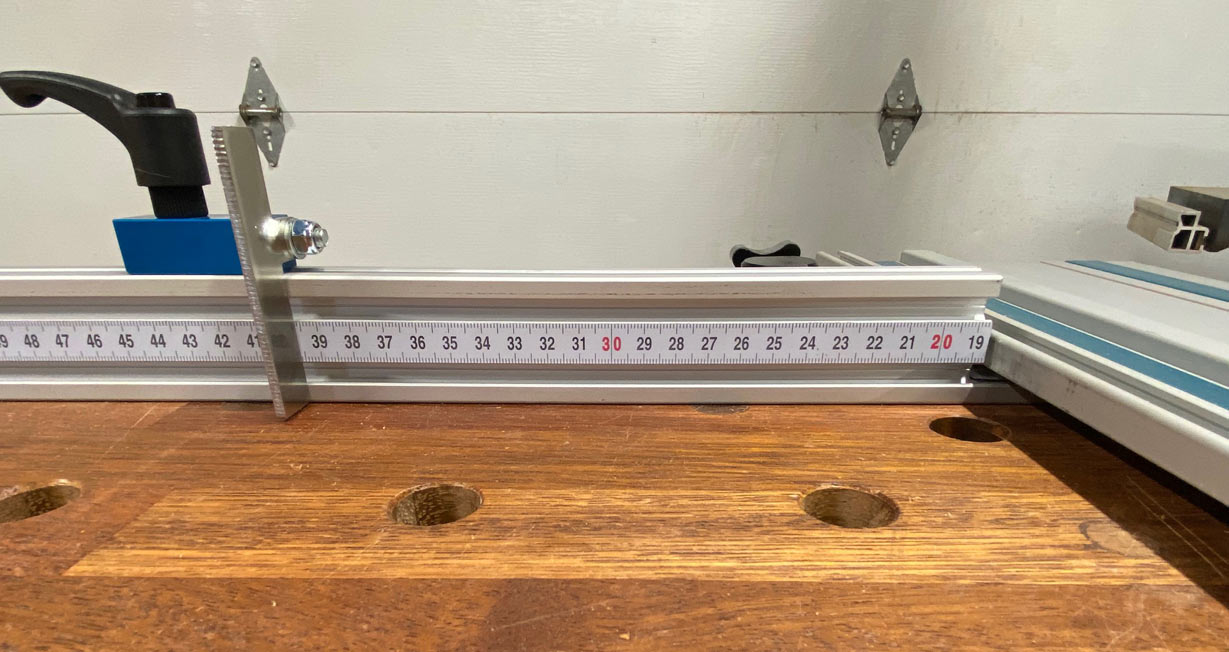
The fence has a scale along its 900mm length ...
To add this to the aluminium extrusion, the centre section was routed to a depth of 1mm with a width of 1/2", and a Kreg tape attached ...
The rear of the fence reveal the Benchdogs "Fence Dogs", which replaced the shopmade versions previously used ...
Part 2
Added information for completion of fixture ...
The MFT hinge I have built runs smoothly and is very solid. However, there was one element that bugged me, and it took me a while to recognise how to sort this out. This was that the rail would not lean back, as seen in the professionally made versions. My hinge/rail would lift, but then fall back on the table side.
It finally dawned on me that the rail needed to be held up by gravity. That is, the weight of the rail. And to do this, the rail needed to tip over the vertical point. Dumb of me not to see this earlier on!
So .. I made a spacer block out of a scrap of Oak. The was drilled to fit the existing hinge, and a bevel was cut at 15 degrees at the rear ....
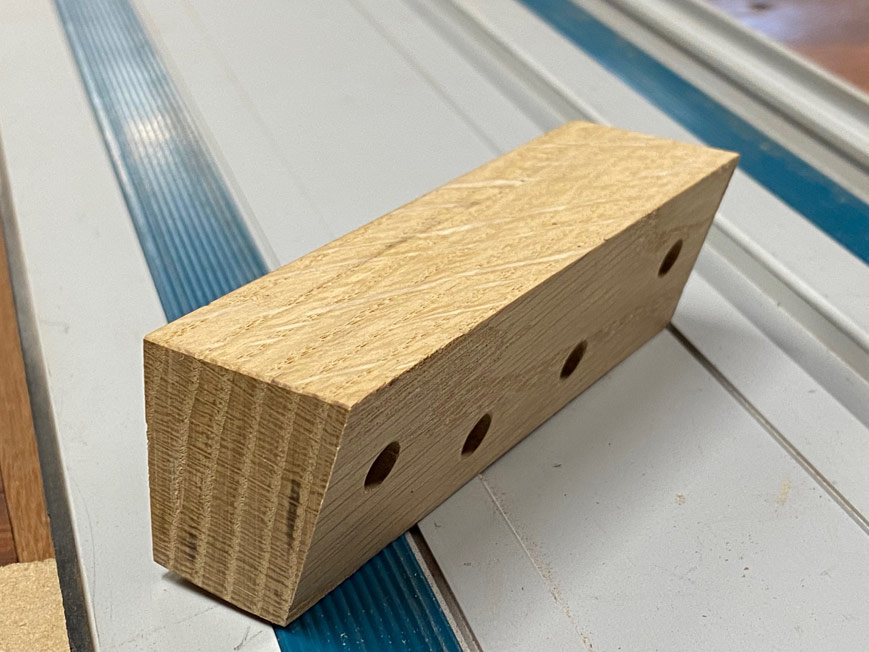
This was then stained black, oiled and fitted ...
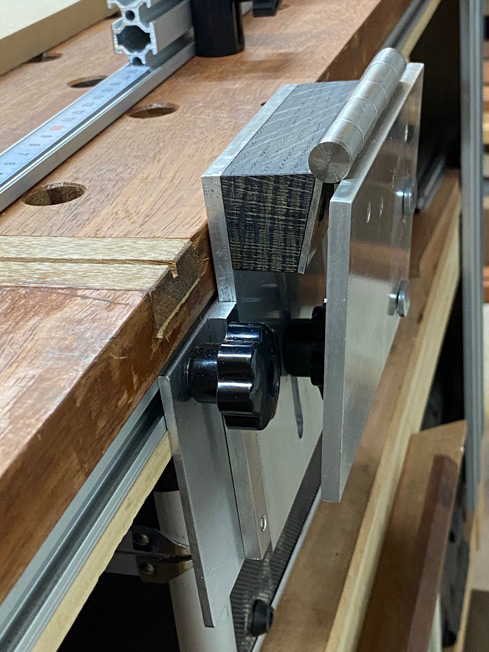
Working perfectly!
Incidentally, this is just an 800mm long (Makita) rail, and it fits just fine.
Regards from Perth
Derek
MFT rail hinge and fence (Mk 2)
Part 1
A while back I decided to dip my toes in the MFT water, and built a table and rail hinge. The hinge was made from cutting boards, which likely sounds suspect, but worked very well ...
However, my OCD got the better of me, and I decided to build one in aluminium, inspired by both Benchdogs and Dashboard. I have dimensions for anyone who wants to copy it.
I had also built a fence from 8020, along with shopmade clamps ..
This turned out to be too high for the saw's motor to ride over. Back to the drawing board on this one.
The hinge rail first. It needs to be mentioned that everything was built over 2 weekends. The aluminium was purchased on eBay as 2 x 100 x 300mm (by 6mm thick) sheets, and 2 x 100 x 300mm (by 3mm thick) sheets. These were cut to side with a bandsaw (bimetal blade) - woodworking tools are fine with aluminium. Slotting was done with a router and straight bit. Holes were drilled on a drill press, and threaded tapped by hand. Just work carefully, and you will be rewarded with a great system.
Here is the bench ...
The rest for the rail (I am not sure if there is another name) ...
The rail has a height cutting capacity of a little over 50mm. The saw used is a Festool AT65E. The pin is UHMW, and slightly tapered, which allows the rail groove to fit without slop ...
The dimensions here: 115mm high x 100mm wide. The rest at the top is 145mm wide. All built from 6mm thick plate. The 90mm long slot is sized for an 8mm bolt.
The base is made from 3mm plate and is 195mm wide and 75mm high. The two guides are 10mm wide and 35mm in from each side ...
The hinge
Close up ...
From this angle you can see the stop against which the mechanism can be returned, if moved ...
Rather than a bar to clamp the rail from this end, I used the Benchdogs system. This is secured with stainless steel wheels on the underside. Why not use a bar? I found it more accurate to drill two holes, rather than two holes AND then drill the bar accurately ...
Here is a detailed picture ...
The top plate is 150mm wide x 100mm deep. The 100 x 75mm hinge is stainless steel and has nil movement. The riser is 100mm wide x 140mm high. The slot is 90mm long. All is built from 6mm plate and parts are joined with tapped holes and 5mm machine screws.
All the parts were sanded with a block with 180 grit to create a brushed appearance, and then finished with clear lacquer spray.
The Fence
The fence is made from 6020 extrusion, in the same design as the Benchdogs fence. The cut out was completed on the bandsaw ...
I ordered the Benchdogs Flagstop (flip stop), which can be seen here ...
The fence has a scale along its 900mm length ...
To add this to the aluminium extrusion, the centre section was routed to a depth of 1mm with a width of 1/2", and a Kreg tape attached ...
The rear of the fence reveal the Benchdogs "Fence Dogs", which replaced the shopmade versions previously used ...
Part 2
Added information for completion of fixture ...
The MFT hinge I have built runs smoothly and is very solid. However, there was one element that bugged me, and it took me a while to recognise how to sort this out. This was that the rail would not lean back, as seen in the professionally made versions. My hinge/rail would lift, but then fall back on the table side.
It finally dawned on me that the rail needed to be held up by gravity. That is, the weight of the rail. And to do this, the rail needed to tip over the vertical point. Dumb of me not to see this earlier on!
So .. I made a spacer block out of a scrap of Oak. The was drilled to fit the existing hinge, and a bevel was cut at 15 degrees at the rear ....
This was then stained black, oiled and fitted ...
Working perfectly!
Incidentally, this is just an 800mm long (Makita) rail, and it fits just fine.
Regards from Perth
Derek
Hey Derek thanks for taking the time to document and share your build. Looks superb!
I’m looking into the idea of incorporating an MFT style grid into a solid timber workbench also. It’s inspiring to see yours has turned out so well! Your design looks very similar to some preliminary sketches that I’ve done for my own bench, mainly the cross cutting feature.
A question that I keep coming back to though, and which makes me slightly apprehensive about MFT and solid timber:
How crucial is the 96mm spacing? I would guess the expansion and contraction of the timber across that span would throw out the 96mm by at least a couple of mm at the extremes? For cross cutting that wouldn’t be an issue, but for 45° cuts they would be off, right?
Let me know if massively I’m over thinking this! It would be great to know your thoughts after using your hardwood MFT for a while")
Cheers,
Calum
I’m looking into the idea of incorporating an MFT style grid into a solid timber workbench also. It’s inspiring to see yours has turned out so well! Your design looks very similar to some preliminary sketches that I’ve done for my own bench, mainly the cross cutting feature.
A question that I keep coming back to though, and which makes me slightly apprehensive about MFT and solid timber:
How crucial is the 96mm spacing? I would guess the expansion and contraction of the timber across that span would throw out the 96mm by at least a couple of mm at the extremes? For cross cutting that wouldn’t be an issue, but for 45° cuts they would be off, right?
Let me know if massively I’m over thinking this! It would be great to know your thoughts after using your hardwood MFT for a while
Cheers,
Calum
Derek Cohen (Perth Oz)
Established Member
How crucial is the 96mm spacing? I would guess the expansion and contraction of the timber across that span would throw out the 96mm by at least a couple of mm at the extremes? For cross cutting that wouldn’t be an issue, but for 45° cuts they would be off, right?
I cannot see a specific reason to have 96mm spacing. I am sure that 100mm would work just as well. The 96mm was devised by Festool for a reason, but I do not know what it was.
I would argue that the 96mm is commonly used as this is a perpetuation of the jigs and guides for making a MFT. This was the case for mine.
Regards from Perth
Derek
The majority of European cabinet work is using a 32mm spacing. So everything is a multiple of 32. Hence the 96mm spacing. As you say though any consistent spacing is going to work just fine for generating right angles and straight lines.I cannot see a specific reason to have 96mm spacing. I am sure that 100mm would work just as well. The 96mm was devised by Festool for a reason, but I do not know what it was.
I would argue that the 96mm is commonly used as this is a perpetuation of the jigs and guides for making a MFT. This was the case for mine.
Regards from Perth
Derek
Jacob
New Luddism. Wake up and resist.
Is it? Why?The majority of European cabinet work is using a 32mm spacing.
96/94mm means to me the finished size of sawn 4" timber for a lot of purposes. Hence 2x4" comes out as 44x94mm ish if you are lucky.So everything is a multiple of 32. Hence the 96mm spacing. As you say though any consistent spacing is going to work just fine for generating right angles and straight lines.
As for these holes - why not just drill them as and when you need them? That's what I do and my old bench had about 6 randomly distributed holes and one 32mm square planing stop. My new one just has the planing stop and no holes yet
That 32mm system came about with the age of flat pack and MFI , it allowed automated production of self assemble frameless cabinets and those cam lock fittings. It also I believe it started the wall to wall fitted kitchen concept because each cabinet relied on it's neighbour for support and strength.
So that parts from different manufacturers work together. Is standardisation…Is it? Why?
https://en.m.wikipedia.org/wiki/32_mm_cabinetmaking_system
Jacob
New Luddism. Wake up and resist.
Right. Thanks for that. Seems to be several systems mentioned there, all competing for attention.So that parts from different manufacturers work together. Is standardisation…
https://en.m.wikipedia.org/wiki/32_mm_cabinetmaking_system
Are they relevant to the typical one-man-band woodworkers we see on this forum?
"Standardisation" is old, useful and well established British Standards - Wikipedia but that's a different thing.
There are idealistic design notions such as Corbusier's "modulor" Modulor - Wikipedia, or the ancient golden ratio, megalithic yard, metric, imperial, etc etc
Seem to be more alternative "rationalised" systems than you could shake a stick at!
Last edited:
I’m a hobbyist but have made a fair few kitchen and bathroom cabinets using the system. It makes life very easy. For a professional for sure it’s going to save a lot of time.Right. Thanks for that. Seems to be several systems mentioned there, all competing for attention.
Are they relevant to the typical one-man-band woodworkers we see on this forum?
"Standardisation" is old, useful and well established British Standards - Wikipedia but that's a different thing.
There are idealistic design notions such as Corbusier's "modulor" Modulor - Wikipedia, or the ancient golden ratio, megalithic yard, metric, imperial, etc etc
Seem to be as more alternative "rationalised" systems than you could shake a stick at!
Of course it depends on what you are doing and how you are doing it. If you need it then it’s fantastic. If you don’t then it’s modern mumbo jumbo designed to sell tools and jigs.
Derek Cohen (Perth Oz)
Established Member
...
As for these holes - why not just drill them as and when you need them? That's what I do and my old bench had about 6 randomly distributed holes and one 32mm square planing stop. My new one just has the planing stop and no holes yet
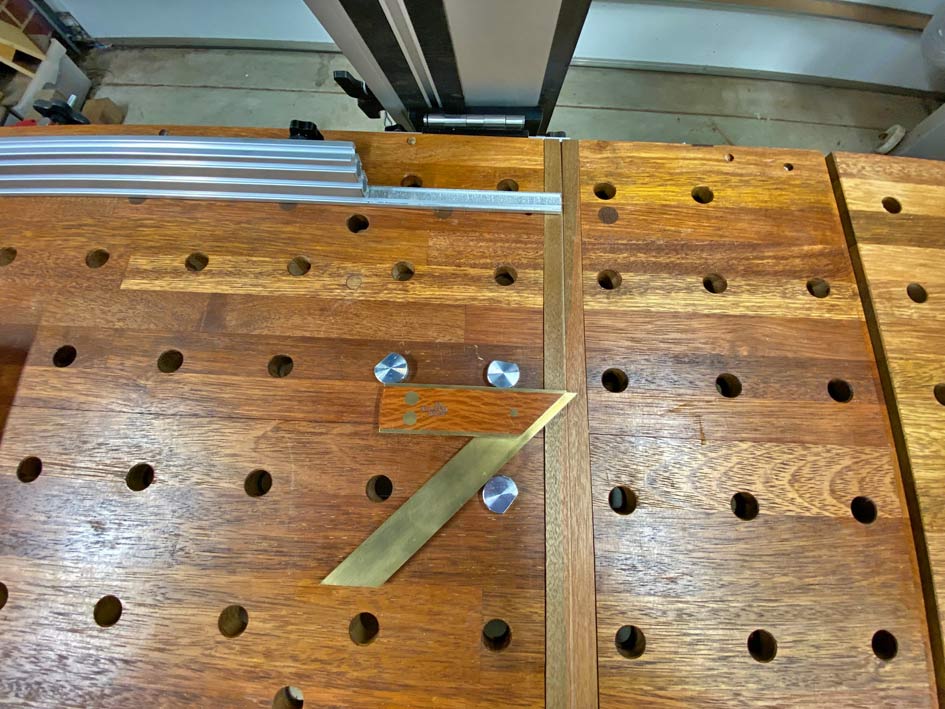
Jacob, I assume that you have not used a MFT table. I do as you do with my work bench - I would add a dog hole where it appears to be needed. The actual position of the dog hole is what suits holding the work piece.
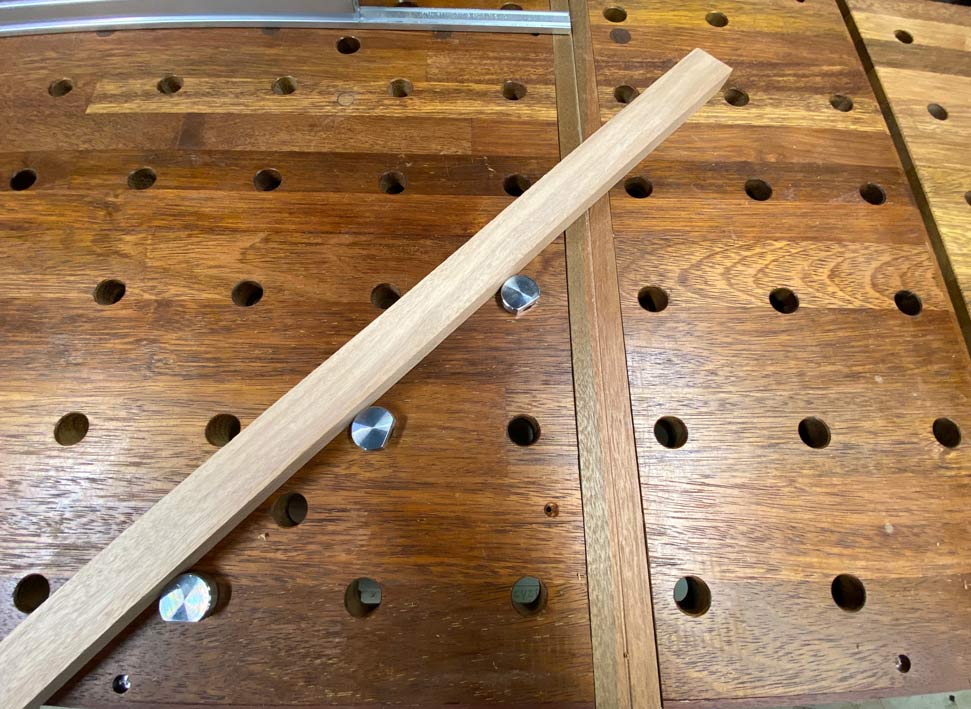
However, a MFT has dog holes positioned to angle work pieces, or position the track (for saw or router) ... accurately. 90- and 45 degrees are simplified and assured with this system of dog holes.
Square cut ...
Regards from Perth
Derek
I have been watching this with interest as I will soon be embarking on my first workbench build. A single car garage workshop necessitates efficiency and so I would like to combine an MFT workbench with a hand tool workbench to allow me to primarily use tracksaw over tablesaw whilst still having the convenience of work holding.
 .
.
This question caught my eye, and therefore I think that an MFT that is to be used for accurate tracksaw cuts needs to be sheet goods based, but I would very much like something more traditional looking. I would like to be persuaded that solid timber is ok for an MFTI would guess the expansion and contraction of the timber across that span would throw out the 96mm by at least a couple of mm at the extremes? For cross cutting that wouldn’t be an issue, but for 45° cuts they would be off, right?
.Jacob
New Luddism. Wake up and resist.
Sorry to be boring but it's always been perfectly possible to make a straight cut with a tracksaw, without any sort of special table. If short of space I definitely wouldn't bother - just lay a sheet of MDF over your normal bench.I have been watching this with interest as I will soon be embarking on my first workbench build. A single car garage workshop necessitates efficiency and so I would like to combine an MFT workbench with a hand tool workbench to allow me to primarily use tracksaw over tablesaw whilst still having the convenience of work holding.
This question caught my eye, and therefore I think that an MFT that is to be used for accurate tracksaw cuts needs to be sheet goods based, but I would very much like something more traditional looking. I would like to be persuaded that solid timber is ok for an MFT
Nobody has said any different. It’s an aid to square, not straight. And yes it’s possible to cut square without a MFT but the MFT removes any ambiguity and adds repeatability.Sorry to be boring but it's always been perfectly possible to make a straight cut with a tracksaw, without any sort of special table. If short of space I definitely wouldn't bother - just lay a sheet of MDF over your normal bench.
Similar threads
- Replies
- 52
- Views
- 5K
- Replies
- 1
- Views
- 150
- Replies
- 12
- Views
- 2K