Beginner - Finishing Joints

UKworkshop.co.uk

Help Support UKworkshop.co.uk:

This site may earn a commission from merchant affiliate links, including eBay, Amazon, and others.

sm7

Established Member
Joined
29 Sep 2013
Messages
21
Reaction score
0
Location
Co. Durham
So I've spent the last couple of days practicing my finger and dovetail joints. They fit snugly, not quite to the point where they require tapping in with a mallet, but well enough to hold in place. Although there is a long way to go before my work becomes even close to being worthy of building anything, I am improving; my cuts have become more true, my measuring has become more accurate and my understanding of the way the wood will react to what I do has increased. However, despite this, my dovetail and finger joints are still horribly messy and do not sit flush, the distal ends of my fingers/dovetails extend beyond the pins and sometimes the edges of the board do not meet properly.

I understand that this is all practice and am not discouraged by this, but I was just wondering how to go about "tidying up" joints when they look like this. There are many instructional videos that I have watched on how to cut the dovetails, but all the ones I have seen end at tapping the joint home and it looking fantastic. None go into the process of planing the joint down or paring out the sockets to make sure the dovetail sits flush to the socket base, or any of the other techniques for ensuring that the joint is perfect. I was wondering if anyone could explain this process to me as my joints aren't perfect straight from the cut and I don't know what to do to make them fit properly.

Thanks,
Sam.
 
I recommend you get hold of the relevant DVD's from David Charlesworth. His chisel technique and skill are first class. He has basically developed strategies that if followed carefully mean you cant go wrong almost. Very clever use of marking with a knife....which in turn creates an accurate starting point for the chisel etc. Well worth a look if you want to learn how to use a chisel properly.
 
Thank a lot, Bob. I'll look into those! I'll have to see how cheaply I can source them as it appears I have quite a bit to purchase and very little to purchase it all with at the moment! Ha!
 
The short answer is that you tidy up your joints after glueing, by planing. Some people prefer to make the sticking out bits of the joint deliberately a bit long, so they can just plane a little bit of end grain, not a whole surface of eg a drawer side. That's better than leaving the pins too short!

It's another reason why you need a plane. Without one, you could pare with a very sharp chisel or spend ages sanding.


One more tip for your practice joints - you are most likely using softwood (pine) which can actually be quite tricky as it has alternating layers of hard and soft wood. Try to get hold of some offcuts of hardwood and see the difference.
 
That's a good idea. I am using pine and have wondered how different it would be to be using hardwood so I might have to try that when I exhaust the pine I'm currently on.

I'm glad that is what most people do as it is what I have been doing - leaving the fingers long - so that I could plane them off (with my imaginary plane). The main issue I have is that the non-face side of my wood is not flush to the end grain of the sockets. What can I do to fix this?
 
Hi there

+ 1 for both David C's DVD's on chisel set up / dovetailing and using a hardwood. Give Pine a miss, it needs razor sharp chisels as it's so crumbly (esp the cheap stuff),
Try Meranti, most places carry that as their standard 'hardwood'

Cheers!
 
Cheers Steve. I have found that, whilst chiseling out my sockets, parts of the face edge have been crumbling off with the piece I'm removing. I'll take a look into where I can find some Meranti.
 
Have a look at Jeff Gorman's excellent site here

http://www.amgron.clara.net/

especially the section 'advice to choppers' in the dovetailing section. In fact, read the whole site - it's one of the best at mentioning and explaining significant details of hand methods.
 
Ah, Brilliant. Thank you all for the replies.

I just went out and spent a bit of time putting together what would be a draw I suppose although it is just cuts and joints for practice more than anything and the first couple are perfect! I couldn't be happier with them considering my previous attempts and lack of experience! Just one more set to cut and if it turns out well I might post a picture of my first workings for comment and methods of improvements!
 
AndyT":3mw1b7s4 said:
Have a look at Jeff Gorman's excellent site here

http://www.amgron.clara.net/

especially the section 'advice to choppers' in the dovetailing section. In fact, read the whole site - it's one of the best at mentioning and explaining significant details of hand methods.

Great link thanks Andy
 
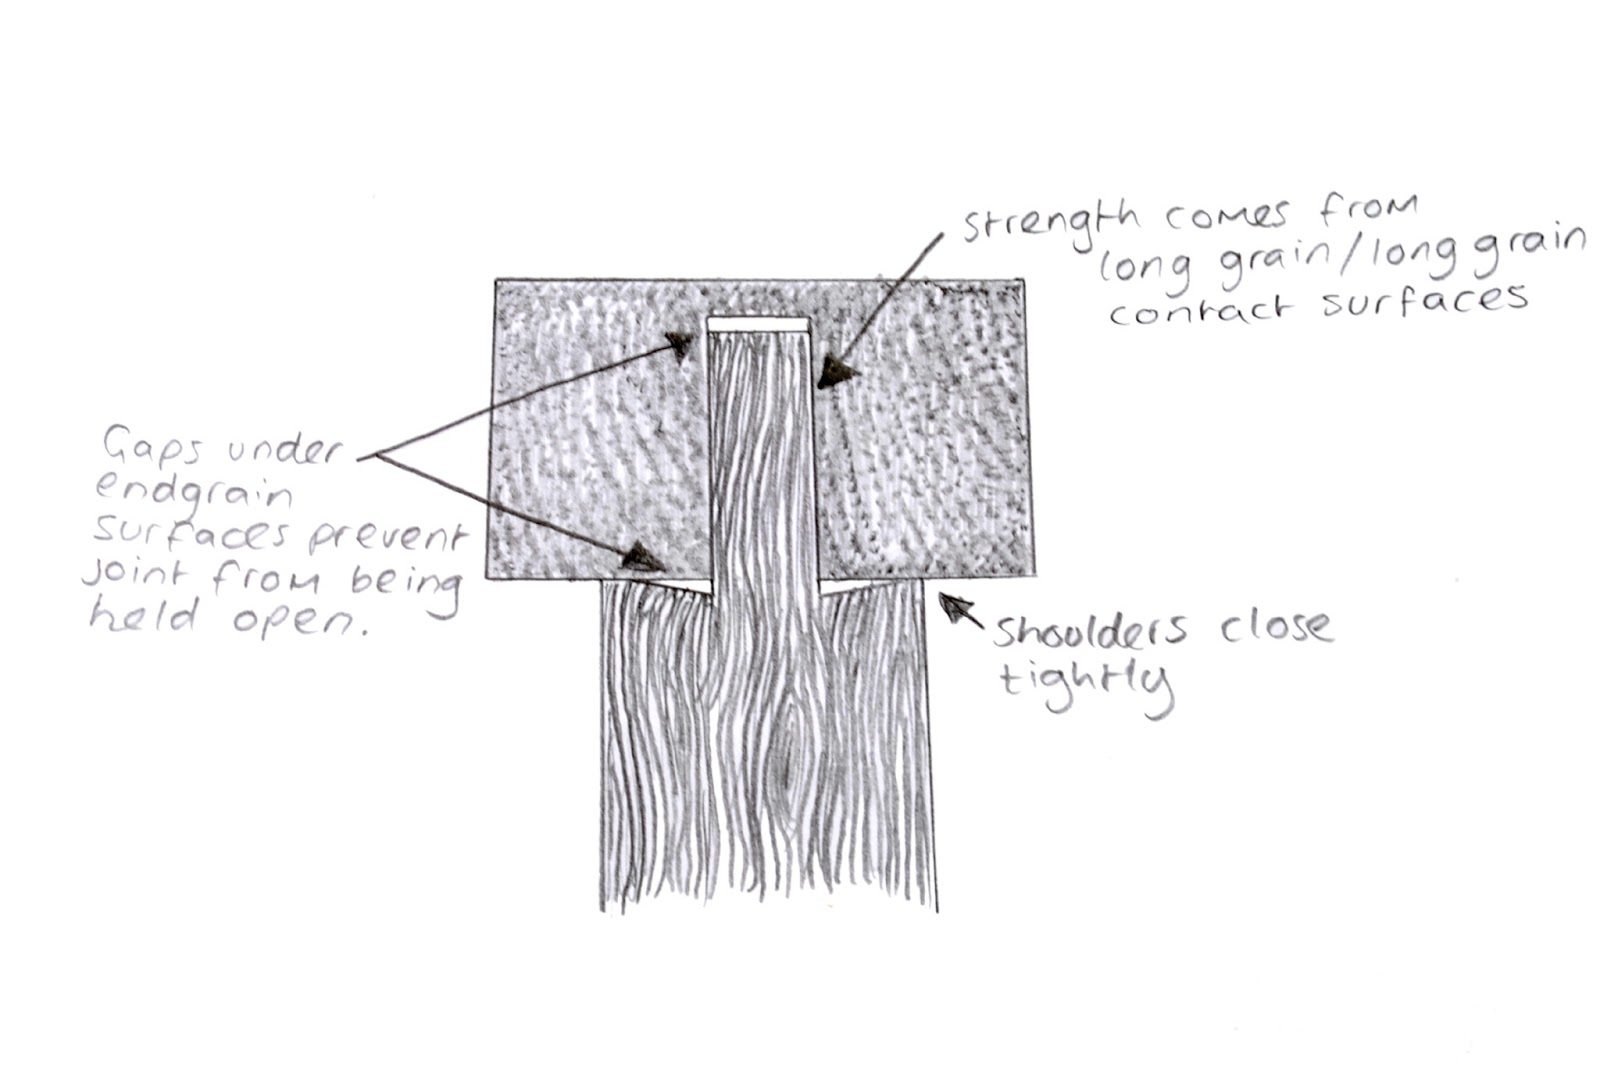
Undercutting your joints is a useful hand work technique that is often overlooked.

Paring_Chisel_Undercut_Joint.jpg


You can't glue end grain; it has no strength. However, even the slightest bump or piece of fluff can hold a joint open.

Although the outer faces do need to line up exactly, a slight excavation behind the line will help ensure that your dovetails and tenons go together nicely.
 
Back
Top