Axe cut wall plugs?

UKworkshop.co.uk

Help Support UKworkshop.co.uk:

This site may earn a commission from merchant affiliate links, including eBay, Amazon, and others.

bugbear

Established Member
Joined
16 Jul 2004
Messages
13,074
Reaction score
4
Location
North Suffolk
My guttering down pipe has come away from the wall, because
the old wall plugs have just dried out.

Does anyone have an old carpentry book giving instruction
in this old fashioned way of fixing "stuff" to walls?

I know you use an axe to shape a block with a twist, so that
as it is hammered into a rectangular hole, tension
is created.

But I would appreciate info on sizes, amount of twist,
chosen timber etc (and, of course, the "unknown unknowns"... )

BugBear
 
I'm old enough to remember using these and a plugging chisel but as phil.p says, there are much better modern alternatives, so why bother?
 
bugbear":asybxob7 said:
My guttering down pipe has come away from the wall, because
the old wall plugs have just dried out.

Does anyone have an old carpentry book giving instruction
in this old fashioned way of fixing "stuff" to walls?

I know you use an axe to shape a block with a twist, so that
as it is hammered into a rectangular hole, tension
is created.

But I would appreciate info on sizes, amount of twist,
chosen timber etc (and, of course, the "unknown unknowns"... )

BugBear
Very variable depending on the masonry/brickwork joints, or size of hole drilled, whether internal or ex.
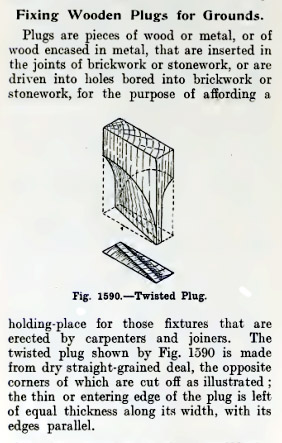
A simple plug for a door lining or skirting would be a length of say 3x1" with opposite corners axed off shallowly so the pointy end would be a diagonal across the section. You'd hammer this in to a gap chiselled out of the mortar (hitting the untrimmed other end) and then saw it off - perhaps to a plumb line, then proceed to the next one with the same piece of timber until used up.
 
Wooden plugs like this caused us annoying damp problems, I had to remove them all the repoint. Use a plastic plug, much better.
 
From "Cassell's Carpentry and Joinery" edited by Paul N. Hasluck, 1907.

BW0FUjg.jpg


Sorry about the resolution, this is as good as it gets.

Probably worth mentioning that other books from the same era (including one or two by Hasluck) imply that the twisted form is not the final word on wooden wall plugs.
 
MrTeroo":2m33drfh said:
That's it except you'd use a longer length (whatever happened to be available) and wouldn't axe both ends - you want to be able to hammer one end fairly firmly and only then saw it off..
NB the twist is a red herring - it just happens to be easier to axe trim a wedge that way, by taking off the corners.
 
Another Hasluck book records the use of lead bricks to receive heavy duty fixings. They wouldn't make the wall damp but I imagine they might introduce a few fresh problems.
 
AndyT":nu20qjtz said:
Another Hasluck book records the use of lead bricks to receive heavy duty fixings. They wouldn't make the wall damp but I imagine they might introduce a few fresh problems.
Like a visit from Elf & Safety? :mrgreen:

Wouldn't surprise me if within sight of lead flashing on the roof some jobsworthy would tell you "You can't have that."
 
Is this for a cob wall ?

Sent from my SM-G900F using Tapatalk
 
ColeyS1":25zi37fp said:
Is this for a cob wall ?
No. 1950 brick, already cut (obvs). Easiest repair is surely to replace the plugs? Modern fixing won't fit existing holes.

BugBear
 
bugbear":3hwdkck6 said:
ColeyS1":3hwdkck6 said:
Is this for a cob wall ?
No. 1950 brick, already cut (obvs). Easiest repair is surely to replace the plugs? Modern fixing won't fit existing holes.

BugBear
Just copy the old plugs - or trim your bits of oak with an axe and fit by trial and error. The main trick is to fix a longish piece and only cut it to length when it's in place.
 
Jacob":1l6vg2uq said:
bugbear":1l6vg2uq said:
ColeyS1":1l6vg2uq said:
Is this for a cob wall ?
No. 1950 brick, already cut (obvs). Easiest repair is surely to replace the plugs? Modern fixing won't fit existing holes.

BugBear
Just copy the old plugs.
Not practical - they're just bits and pieces of matchwood in the hole. That's why they need replacing.

- or trim your bits of oak with an axe and fit by trial and error. The main trick is to fix a longish piece and only cut it to length when it's in place.

Ah - is Oak best? Even when using ordinary steel screws?

But what about the magic twist that holds them in place? If they nicely fit the hole, they'll slide in like a tenon into a mortise, and slide out just as easily.

But thanks for your post.

BugBear
 
bugbear":18djyqym said:
.........

But what about the magic twist that holds them in place? If they nicely fit the hole, they'll slide in like a tenon into a mortise, and slide out just as easily.

..
You hammer them in tight. Then they tighten again when you knock in the nail or the ironmongery whatever it is.
If you are using screws probably much better to drill and plug the modern way.
I think the twist is of no significance. If you chop the edges as Sellers shows it's easier than doing them straight but they just look a bit twisted.
 
bugbear":3n7tcy0v said:
But what about the magic twist that holds them in place? If they nicely fit the hole, they'll slide in like a tenon into a mortise, and slide out just as easily.
They shouldn't slide in easy from all I've read. Regardless of form they should be a tight fit and in addition the wood should be very well dried so that they tighten further after placement.

To be assured the plugs are "bone dry" Hayward says to heat the wood for 10 minutes. He doesn't specify how so I presume by a fire or on a rad in his era, but we can use a microwave to achieve the same end (and probably with a better result, since it'll drive water out from the core not just dry out the surface). In case it needs to be said don't microwave for 10 minutes! Just some tens of seconds is probably sufficient depending on the number of plugs you do at one time.

I'd forgotten that I have my own copy of Hayward's handyman book and only thought to look at it at bedtime last night, in addition to the tip on having the wood good and dry – something left out in every other reference I can find – it has some other useful titbits, including using a cardboard mask to protect the saw when cutting flush after hammering home. But I don't see any reason the plugs have to be made overlong when you can just bash them home using an offcut of the same wood in the same way one uses a piece of t&g when flooring.
 
Phil, sort of nearly answering your question - in the context of fixing skirtings, I know it was ordinary practice to fit several plugs, then trim them to a common line, ready to nail skirting to. I've seen this described in old textbooks and observed it in my Victorian house.

And for many fittings, you'd probably do something similar - flush the plugs, nail a batten across them, then screw your shelf brackets or whatever to the batten.
 
Lordy, I thought dealing with old plaster walls was a hassle.

If this is on an outside wall, you mentioned gutter downspouts, why not put in one of the many masonry anchors made for this sort of thing?
 
Back
Top