


planetWayne
Established Member
Hi all,
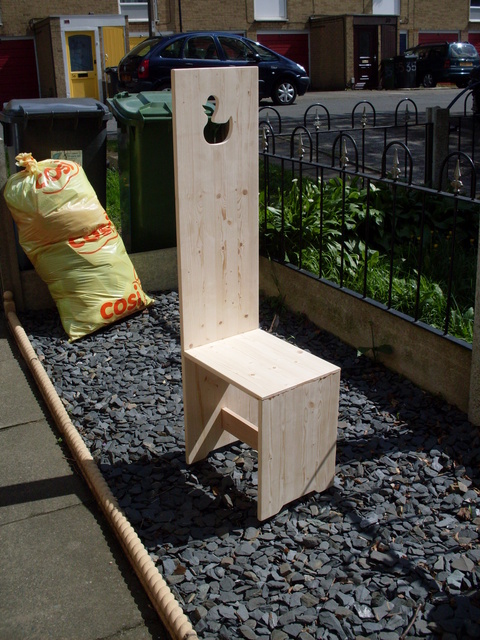
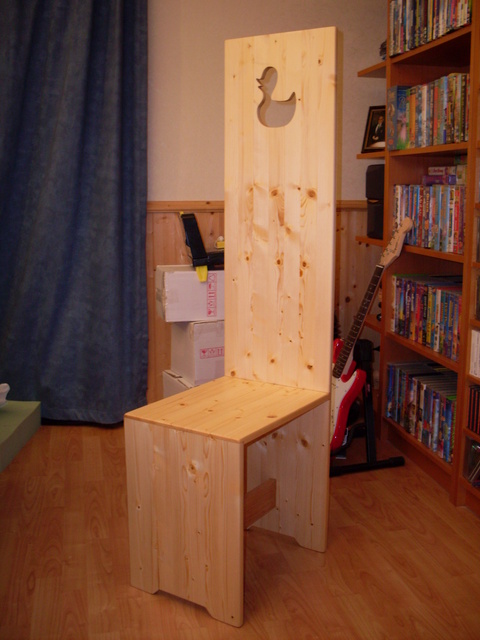
After all this watching - studying and asking, I thought I would post up a chair I was asked to create for my daughters 'fine art' collage project (I didn't understand the connection but who are we to argue with these people)
Humble beginnings compared to all of the other projects on here that's for sure! but I've also used this as a 'practice and learning' session and having a go with oil/wax finishing as well ( that's my excuse anyways") )
)
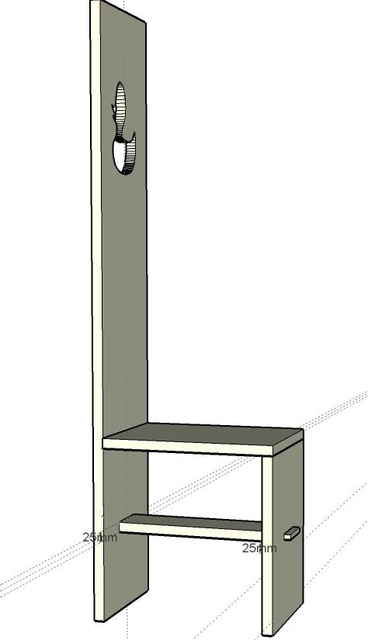
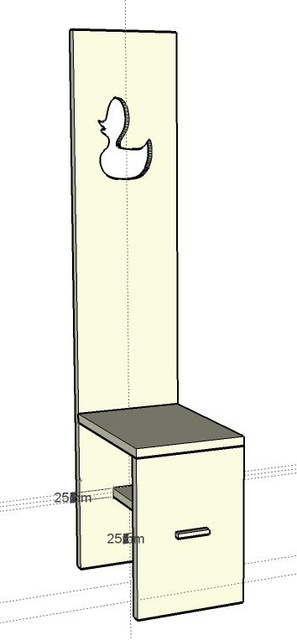
A couple of basic Sketch-ups so I had an idea what I was doing.
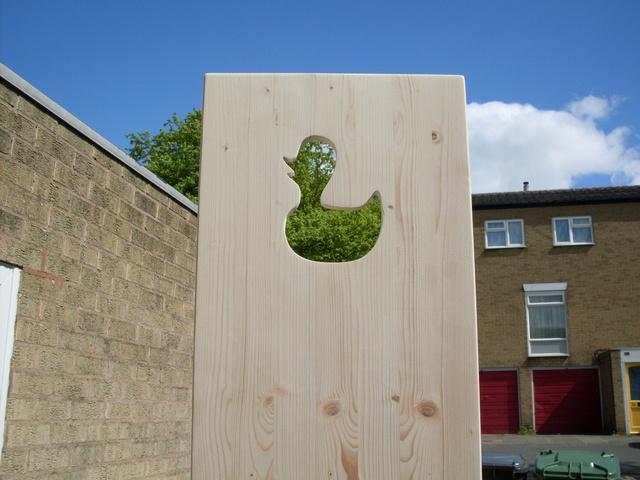
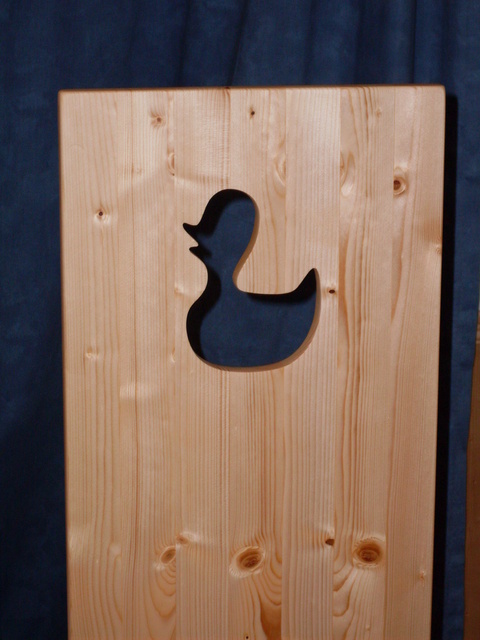
The final 'thing' that was to be included was a 'rubber ducky' theme.
Sorry for no WIP's but construction was as simple as it gets I think - even to the degree of sourcing the wood from our local Homebase.
The wood is sold as laminated strong boards for shelving / worktops. I bought one that was tall enough to cut the 3 sections from and wide enough that wouldn't need any more joining. Still ended up with about 2" left.
What they meant with lamination, in this instance, was glued up strips of 18mm x 40mm rather than, as I hoped it wasn't, faced chipboard - so bonus there. I even took the time to fill in the cracks etc. with coloured waxes - again to see how these things blend.
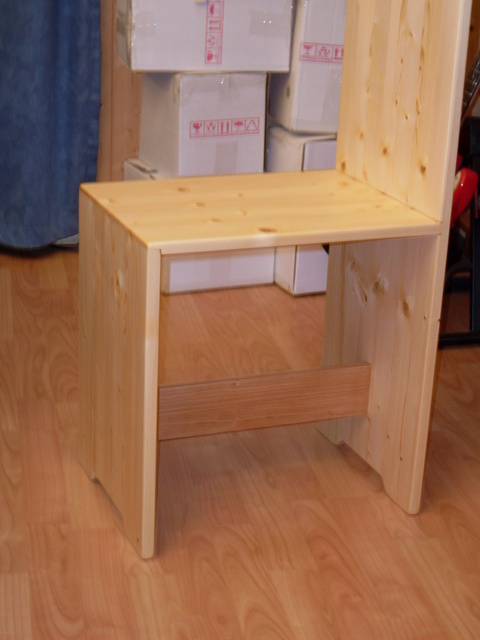
All glued up and in need of a sanding down. Must remember that squeeze out really needs mopping up before it dries as its damned hard afterwards! Most of it dripped inside - so no easy access.
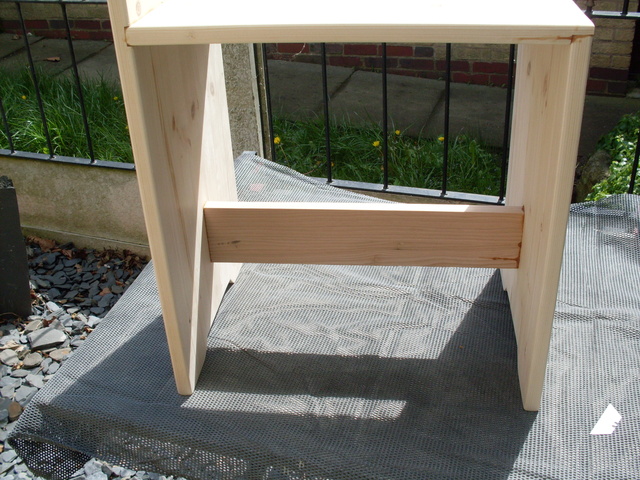
After a little advice in the design thread - it was decided to make the stretcher vertical rather than horizontal and to also shape the bottom a little rather than have flat ends to the boards. This was to add more strength and to make it easier to level to the floor - this worked really well (cheers again chaps!).
I couldn't use the off cut I had from the board as the grain was going the wrong way. Luckily I had a piece of hemlock when we had our banister fitted so out came the plane to joint the two pieces together to get the width needed. They were biscuited and glued. Takes a bit to find the join line too Also gives it little contrast against the pine. This was held in place by 5mm tenons on each side.
The 'duck' was a Sketch-up created duck with bezier curves - printed and stuck to the board with re mountable spray glue - spray to the paper - let it go tacky and stick it in position. That turned out to be fierce and needed a bit of sanding to remove the paper afterwards :roll:
One thing I did try was to take another sheet of a4 and stick it in the same way to the back of the wood. The idea being that sawing with the jigsaw wouldn't splinter as much. I used the finest blade I had and took things steady and was quite pleased not to have any splintering on the rear
Everything was then sanded down to through 120 to 180 grit with the B&D Mouse sander and a final rubbing down by hand with the grain.
After that - it was all finished with Tong oil - a couple of coats, 24 hours and a rub down between each. After that several good rubbings over with wax (now THAT is a good form of exercise!) to try and get a shine to it.
and the duck
Time beat me in the end I think with the waxing as I noticed that after a few days (and I guess a good time to dry) the shine would begin to fade - another buffing up with a loaded pad again would bring it back but I guess using a wax finish really takes a good few coats for it to stay.
Anyways - daughter was chuffed to bits with it - and collage thinks its brill (well that and the rest of the piece its with).
Thanks for reading
Wayne.
After all this watching - studying and asking, I thought I would post up a chair I was asked to create for my daughters 'fine art' collage project (I didn't understand the connection but who are we to argue with these people)
Humble beginnings compared to all of the other projects on here that's for sure! but I've also used this as a 'practice and learning' session and having a go with oil/wax finishing as well ( that's my excuse anyways
) A couple of basic Sketch-ups so I had an idea what I was doing.
The final 'thing' that was to be included was a 'rubber ducky' theme.
Sorry for no WIP's but construction was as simple as it gets I think - even to the degree of sourcing the wood from our local Homebase.
The wood is sold as laminated strong boards for shelving / worktops. I bought one that was tall enough to cut the 3 sections from and wide enough that wouldn't need any more joining. Still ended up with about 2" left.
What they meant with lamination, in this instance, was glued up strips of 18mm x 40mm rather than, as I hoped it wasn't, faced chipboard - so bonus there. I even took the time to fill in the cracks etc. with coloured waxes - again to see how these things blend.
All glued up and in need of a sanding down. Must remember that squeeze out really needs mopping up before it dries as its damned hard afterwards! Most of it dripped inside - so no easy access.
After a little advice in the design thread - it was decided to make the stretcher vertical rather than horizontal and to also shape the bottom a little rather than have flat ends to the boards. This was to add more strength and to make it easier to level to the floor - this worked really well (cheers again chaps!).
I couldn't use the off cut I had from the board as the grain was going the wrong way. Luckily I had a piece of hemlock when we had our banister fitted so out came the plane to joint the two pieces together to get the width needed. They were biscuited and glued. Takes a bit to find the join line too
Also gives it little contrast against the pine. This was held in place by 5mm tenons on each side.
The 'duck' was a Sketch-up created duck with bezier curves - printed and stuck to the board with re mountable spray glue - spray to the paper - let it go tacky and stick it in position. That turned out to be fierce and needed a bit of sanding to remove the paper afterwards :roll:
One thing I did try was to take another sheet of a4 and stick it in the same way to the back of the wood. The idea being that sawing with the jigsaw wouldn't splinter as much. I used the finest blade I had and took things steady and was quite pleased not to have any splintering on the rear
Everything was then sanded down to through 120 to 180 grit with the B&D Mouse sander and a final rubbing down by hand with the grain.
After that - it was all finished with Tong oil - a couple of coats, 24 hours and a rub down between each. After that several good rubbings over with wax (now THAT is a good form of exercise!) to try and get a shine to it.
and the duck
Time beat me in the end I think with the waxing as I noticed that after a few days (and I guess a good time to dry) the shine would begin to fade - another buffing up with a loaded pad again would bring it back but I guess using a wax finish really takes a good few coats for it to stay.
Anyways - daughter was chuffed to bits with it - and collage thinks its brill (well that and the rest of the piece its with).
Thanks for reading
Wayne.