A bodgers workbench

UKworkshop.co.uk

Help Support UKworkshop.co.uk:

This site may earn a commission from merchant affiliate links, including eBay, Amazon, and others.
I've inspected my plane this evening a No4 Stanley smoothing plane. It's all in good order except there's a very small nick in the middle of the blade which on a bit of scrap left a fine mark, pipper! I'll need to sort this out before I attempt to joint the timber with it. First time for everything i guess....(goes off to watch plane sharpening youtube videos...)
 
A number 4 is all you need. Get that sharp and well tuned, and it'll give you a lifetime of great planing. Just make sure it never gets another nick in the blade!! If it's a bad nick, you may need to grind it out on a wheel before starting the sharpening process.
 
Thanks. I have no means to do that unfortunately, ill try to photo it tomorrow, maybe someone can tell me if its recoverable without grinding.
 
ArtieFufkin":3hmob5xc said:
Thanks. I have no means to do that unfortunately, ill try to photo it tomorrow, maybe someone can tell me if its recoverable without grinding.
It depends on how deep it is.

If you are using paper abrasives on a glass/flat surface for sharpening, with a low grit and enough patience you should be able to work through it.


Sent from my Redmi Note 5 using Tapatalk
 
Bodgers":15qvtoao said:
.........If you are using paper abrasives on a glass/flat surface for sharpening, with a low grit and enough patience you should be able to work through it........

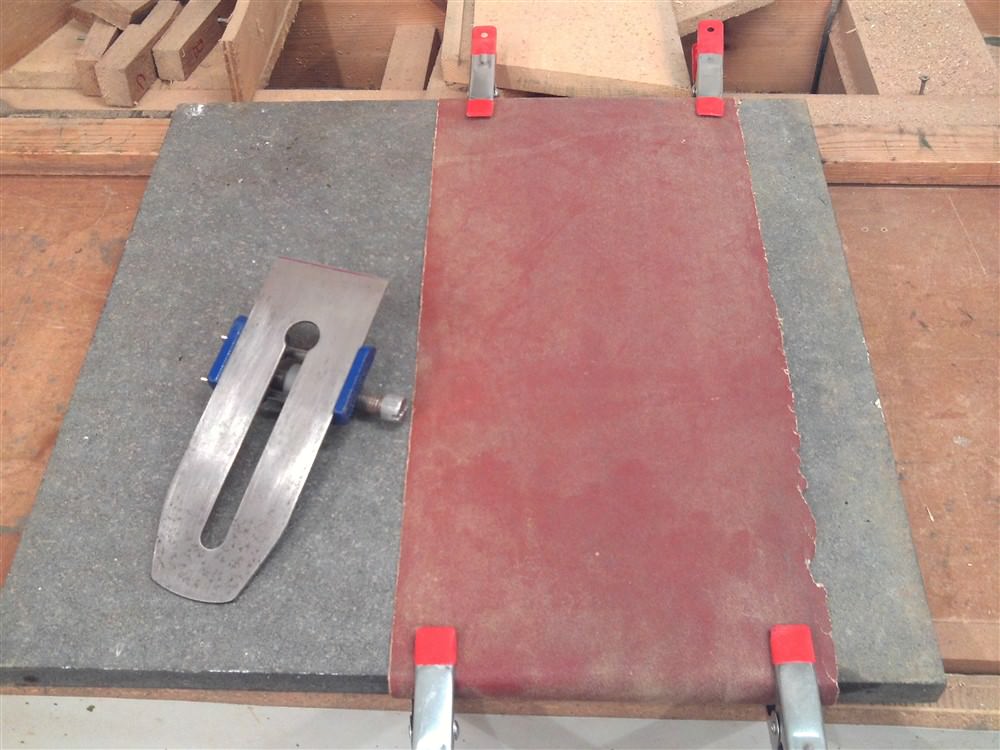
Like this, AF:

zaaaNDn.jpg


I ground a bit, but did most of the work on sandpaper on an offcut of granite worktop. I used 100 grit, then 120, and the cheap Chinese honing guide cost about a fiver on Ebay. Probably 10 minutes of work.
 
I'll be able to do this, first time for everything.

(Just to say I am fairly handy and have made things in the past, just not at this scale and never had the need to plane like this before)
 
Ive bought 4 metal sash clamps, only 1 was in stock, collect the remaining 3 early next week.
I had a quick go and bringing the timber together this afternoon, i already own 2 cheap but adequately long F clamps, which Id fogotten about. The 3 of them together with not much force closed the gaps quite easily.
With some planing (once its sharpened) and some boards top and bottom to keep them level I reckon the glue up will go ok if it do it in 2 or 3 stages.

Picture is 2.4m long. Will be cut down to approx 1.75m

20180915_133816-01.jpeg
 

Attachments

  • 20180915_133816-01.jpeg
    20180915_133816-01.jpeg
    2.4 MB · Views: 567
remember you can make cauls which distributes the pressure more evenly, it definitely works if you don't have enough clamps, I've found it's very effective, always have a hammer on hand to beat slipping wood back into place and keep it flat.
 
cauls, yes I'll be using them, thanks. (That's what i meant whe i said boards top and bottom, i just couldn't think of the correct name) I'll wrap them in brown tape to stop them sticking.
 
This afternoon I cut the top peices close to their final lenght (by hand) and set about planning with my freshly sharpened old No4 stanley (easy enough to sharpen).
I did the best I could, didn't need to remove that much. (The larger shavings you can see were from me practicing on some scrap).

I think with clamps and cauls it will come together ok, followed by some more planing and sanding.
This is with them just pushed up next to each other.

View attachment 20180916
 
A little tip I came across was to knock a couple of panel pins into the gluing face and then nip the heads off to leave about 5mm sticking out. Then when you tighten your boards together the nipped ends will stick into the adjoining board and preventing it slipping about.

You have got to get the boards lined up right first but you could always do this without glue first and then the nipped ends will drop into their little holes making glue up a lot less stressful.
 
No time recently but hoping to make progress this weekend.
During the week a cleaned up and painted Record vice turned up. Will be using big bolts from the top of the bench to secure it.

20180919_193028-01.jpeg


20180919_193045-01.jpeg
 

Attachments

  • 20180919_193028-01.jpeg
    20180919_193028-01.jpeg
    2.1 MB · Views: 640
  • 20180919_193045-01.jpeg
    20180919_193045-01.jpeg
    2.5 MB · Views: 640
record 52 1/2 the best woodworking vice in the world. nice one :)
 
I don’t know (and I don’t want to start an internet war or anything) but I think the record 53 might have something to say about that :)
 
Perhaps (I’ve been called worse things than a heretic :)) but I’d say that, for me at least, the 53 is better than the 52 1/2 for the same reason the 52 1/2 is better than the 52 in that you can still hold smaller stuff in a bigger vice but not bigger stuff in a smaller vice (I have all three btw and like them all).

What is really interesting about the vice pictured above is that it appears to be a fairly late model with a square boss, no RD number or webs at the back of the fixed jaw but unless my eyes are deceiving me, it appears to have a dust guard over the thread, which I thought only appeared on the earliest models. Could this be a Frankenvice of some sort?
 
so far as I know, the so called 'screw and nut cover' was standard issue on all the QR vices made after the range was relaunched in the 60s but only available as an option before then.
 
Sticking the first half together. I remebered to tape the underside of the cauls the second before i started pouring the glue. Phew!

Other half is out so working in the kitchen :D

hhhh.jpg
 

Attachments

  • hhhh.jpg
    hhhh.jpg
    35.9 KB · Views: 526
nabs":1mscqnkz said:
so far as I know, the so called 'screw and nut cover' was standard issue on all the QR vices made after the range was relaunched in the 60s but only available as an option before then.

That's my understanding, I have seen screw covers on other QR 52.5 E vices. Seems like a very sensible addition to me which is why I went for it. I paid £65 for the vice inc delivery. Considering it's in good condition I don't feel hard done by. Looking forward to getting it installed, will be a good while before that happens though. I have noticed a bolt is missing on the based of QR mechanism, will have to find a suitable replacement.
 
nabs":2a18gq4e said:
so far as I know, the so called 'screw and nut cover' was standard issue on all the QR vices made after the range was relaunched in the 60s but only available as an option before then.
That’s interesting. I have 4 Record QR vices in front of me. 2 definitely in the post 60’s era, the other 2 60’s or earlier. None of them have the cover. I always thought the cover was mainly available in the earliest variants but I could be wrong. There was a thread on record vices in the hand tools section but it was all a bit bewildering to be honest!
 
Back
Top