1st pewter casting

UKworkshop.co.uk

Help Support UKworkshop.co.uk:

This site may earn a commission from merchant affiliate links, including eBay, Amazon, and others.

Neil Dyball

Established Member
Joined
21 Jul 2008
Messages
204
Reaction score
0
Location
Framlingham, Suffolk
Hi,

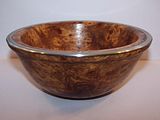
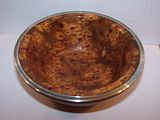
Saw a Simon hope demo a while back and was inspired to have a crack at casting pewter. I really liked the contrast between the dark natural wood (African Blackwood in his demo) and the 'silvery' polished pewter.

Finally got "a round tuit" this weekend, had a nice piece of elm burr that I'd been saving and SWMBO asked for a "simple bowl", so that's what I made.

The pewter casting actually took two goes, fortunately it's easy to melt down and re-try! I'm fairly happy with it although I did uncover a couple of small 'voids' in the casting when I turned it down to the final size. Lots of lessons learned for next time though!


All (constructive) criticism appreciated 8-[


Cheers,

Neil.
 
Hi Pete,

The bowl size/basic shape was really determined by the burr, didn't try to do anything out of the ordinary as the pewter was the driving force.

Once I'd turned the bowl I measured the min/max diameters of the rim and took the middle value. (The rim was deliberately left a bit 'thick' to allow for removal of material later which would be replaced by the pewter, otherwise it would probably have been a bit too fragile). Mounted a suitably sized piece of scrap wood (which MUST be bone dry to prevent 'spitting' when the pewter is cast) in another chuck and turned a groove about 5mm deep, with a minimum diameter slightly smaller than the previous measurement and max diameter slightly larger than the rim max.

Removed the chuck/scrapwood mould from the lathe. Melted some pewter in an old saucepan on a small portable gas stove, (OUTSIDE, to avoid any potential combustion of sawdust etc.) and once molten poured it into the 'turned' mould. Left for about 20 minutes to solidify and then added a couple of drops of thin superglue to keep it in place.

Remounted the chuck and turned it down to a smooth 'top' surface (this will actually be the bottom once on the bowl) and then carefully turned the mould away to release the pewter ring. Did this at a fairly low speed as the pewter is very soft and didn't want to damage it as it released.

Remounted the chuck/bowl and turned the outer edge of the rim away down to about 4mm depth. This removed the wood that would be replaced by the pewter. Some fine adjustments until the ring just fitted over the remaining inner 'half' of the rim and then the pewter was superglued on to the bowl (off the lathe, i.e. horizontal!).

Once the CA was cured, back to the lathe and turned away the excess pewter to match the height/diameter to the bowl's rim. Sanded upto 400 grit, which left some 'swirls' in the pewter ring, and the 0000 wire wool which polished them out. Finished with a coat of lemonoil to 'pop' the grain and some friction polish, "jobs a good 'un".

Reading that back it sounds far more complicated than it actually was!

Cheers,

Neil.
 
i think this is stunning, love the contrast between the two materials and hope you will do more.
Is it only possible to put the pewter on the rim, or can it be incorporated into the body itself somehow.
 
Hi Steve,

Thanks :oops:

I guess you could do anything with the pewter that you could make a mould for, or indeed cast directly into the piece, if that happened to be possible. From memory Simon actually made a 'neck' which he inserted into the opening of a hollow from, although I have feeling he might have also done something with a thread as well, memory not what it used to be, nor indeed is my memory :?

I just chose to make the outer part of the rim as an experiment!

Cheers,

Neil.
 
Very nice,and pleasantly different :D
The elm burr is quite stunning in its own right,but the pewter just adds to it nicely.

Andrew
 
Hi Neil,
What a nice finish to a superb piece of timber and thank you for the description of the process involved which as you comment sounds far more complicated than it really is but I remember how daunting my first steps into pen making were!!
If Pete hadn't asked I certainly would have asked for the blow by blow account.
Well done,
Regards,
Ian
 
Hi Ian,

Thanks!

No problem about the method description. Short version reads;

Turn bowl.
Make mould.
Cast pewter.
'Size' pewter to bowl.
Glue & finish.

:lol: :lol: :lol:


Sounds easier now!

Cheers,

Neil.
 
Neil,

Is it possible to just pour the perwter into a turned recess in the rim , rather than having to cast into a mould first ?


Loz
 
Hi Loz,

Yes, absolutely.

I wanted to experiment with moulds rather than pour directly into the bowl's rim, so decided to make only the outer half of the rim which obviously couldn't be done directly as there would be no 'outside edge' to pour into.

There's also the issue of 'singeing' of the wood by the molten metal to consider, plus having 'over-pour' to remove from the piece - doesn't matter with a scrap mould!

Cheers,

Neil.
 
Hi Vulthoom (must Google that!),

Just used my normal gouges etc. Pewter is largely tin (sorry if you already know that!) and therefore fairly soft. The only thing to watch was the transition between wood & metal when turning as there is a hardness difference. Having said that, in this case the burr was harder/softer in places so it was all interesting!

Have a go, you can always re-melt it like I had to.

Cheers,

Neil.
 
Neil, thats absolutely brilliant ! ... I love what you've done with that... its great !..
The finished bowl really 'works' with the contrast between the burr and the pewter..

Absolutely brilliant work... I love it.
Great job ! 8) 8) 8) 8) :lol: :lol: :lol:
 
Yes ! Its great ! ... one of those things that if you 'heard' it described.. you may perhaps say "....o-k-a-y .... " in that 'I remain to be convinced' way ! :lol: :lol: ... but when you SEE the end result... then everything falls into place and you 'understand and appreciate' completely !

Really like it.. :lol: :lol: 8) 8) 8)
 
Back
Top