Hi,
About 15 years ago a guy at work asked if I would make him a pine farmhouse table. I agreed and the design and size was agreed upon with a handshake as was the price. I had catalogues so the price was half that shown for a similar table. It was almost Christmas so during the Christmas holiday I set to and spent three freezing days in the garage making the table. Back at work in the New Year I informed the guy his table was ready; he replied he had seen one in a shop in Huddersfield for £10 less.
I've used the table for my computer since then and have only just got around to replacing it. What prompted me was that my wife Bronwyn and I visit Boundary Mills Retail Outlet in Colne and whilst there I've always been most impressed by the finish on the toilet doors and walls. (Yes I'm sad). I knew the material wasn't genuine wood burr because burr just doesn't come in such large sizes so I thought it must be laminate and perhaps Formica.
I surfed the web for hours trying to find a match but without success; not being one to give up easily I emailed Boundary Mills asking if they could please let me know what the material was? I received a lovely reply from a lady called Joanne; Joanne had contacted the installers and confirmed the material was in fact Formica laminate it being Mahogany Burl but the bad news was that it was no longer supplied.
Encouraged by this I did a lot more web surfing and eventually found a company in Morley near Leeds who are Formica stockists; a number of emails followed and I was kindly sent two free samples to inspect these being Formica Amberwood Burl; this was stunning in appearance but would I need oxygen when I requested the price? The two samples looked identical to me but the price of one was almost double the price of the other; the samples were Formica F1118 GLS and Formica 0352 GLS the GLS standing for “Gloss”. I sent another email to enquire if the prices quoted were actually correct or if perhaps a mistake had been made; no the prices were correct it was just that they came from different batches. Bron had seen the samples and asked if I would replace the kitchen work surfaces using this material so I ordered two sheets of the cheaper 0352. The sheets are huge at 3050mm x 1300mm so I asked for the delivery charge to be quoted around £44. Morley is quite local to us and the sheets were in stock so an hour later I was standing in reception paying the bill of £73.68 inclusive which I thought to be a real bargain. We own a little Toyota Aygo and I was worried if these two sheets would fit inside; I drove round to the warehouse and the two guys let me watch as they rolled the two sheets into a large roll securing them to prevent them unwrapping. I was most impressed by the way they rolled the sheets; both sheets were placed on a large table this table having an opening down the centre to allow a person to walk forward into the table; at the far end of this table was a large drum; one of the guys simply grasped the end of both sheets aligning them with the drum and simply walked forward pushing the sheets as he did so and the drum automatically rolled them; the sheet ends were secured then the roll was removed from the drum this only taking a couple of minutes and the roll was carried out to the car where is just fitted allowing the hatch to close.

I had only a rough idea in my head as to what I wanted my new computer desk to look like but I wanted this Formica to use as I would with wood veneer for the desk panels. The framework was to be solid oak throughout. The farmhouse table was rather too big so using it as a rough guide I juggled around taking measurements and settled on the finished size making a note of these. I didn't make a proper dimensioned drawing but with a number of sketches I could work out a cutting list then went and ordered the materials from our local timber yards. The oak is American White; the panels were to be Moisture Resistant 18mm MDF so I ordered a full sheet and I already had the Formica. At the first timber yard I handed over a cutting list asking how much the oak would cost to cover these sizes; I was happy to hand over £96 and delivery would be in a few days. Upon leaving I remarked that I was in for some serious machining of the oak once it arrived to be informed “why; the price includes machining to your cutting list”. I was amazed by this as I’ve always bought hardwood previously as sawn board. This yard also supplied the MR MDF included in the price but they could not supply the 1.5” thick oak for the desk top frame. I visited a second timber-yard and was again happily surprised to buy 1.5” thick oak 6” x 96” off the shelf for a total of £22; This was cross-cut to allow it to fit into the Aygo. So far it was looking good and I had been pleasantly surprised by the costs incurred to date.
I have a Startrite combination woodworker so machining wasn't a problem; this Startrite is 3 phase but I wired all the motors in “Delta” adding a start and run capacitor. As usual I was working in a cold black hole with the garage doors closed and apart from the four day summer which came and went it poured with rain most of the time.
First job was to cut the top MDF panel by laying the full sheet onto wooden bearers on the garage floor and using the Skilsaw.

I knew the Formica sheets were big but seeing them laid out on the garage floor was an eye opener. How the heck could I cut these without causing damage? I have a big industrial Startrite Volant 24” band-saw but I couldn't put a sheet through working on my own neither could I put a sheet through the Startrite saw-bench. The Skilsaw would be too fierce so in the end I settled on the cheap B&D router fitting a 1/8” tipped cutter; cutting both the MDF and Formica on the garage floor is a job I don't wish to do often but with patience and extreme care I cut the Formica lengthwise then cut an oversize section to fit the top MDF panel.

A visit to Screwfix provided the Evostik Impact Adhesive and I also bought a pack of cheap 4” foam rollers to apply the adhesive with; I had seen videos on “You tube” showing laminate adhesive being spread with ease by roller so hoped to do the same. Strips of 6mm thick MDF was cut and these were dusted off as they would separate the Formica and MDF allowing positioning before securing the Formica in place; once the glued Formica and MDF made contact there would be no plan B.
It's over 30 years ago since I used plastic laminate but what a downright pain this Evostik proved to be. I flipped the Formica face down and poured on some adhesive and set to with the roller; two strokes of the roller and I thought great; I've cracked it and this is easy? A few seconds later the Evostik starting turning stringy and refused to spread with the roller; in panic I grabbed the plastic serrated spreader supplied with the adhesive but now it was panic time and again the adhesive refused to spread so I threw the spreader away and grabbed a new paintbrush; this too was a pain but eventually I had applied a coat of adhesive onto the Formica and still using the brush applied a coat onto the dusted MDF. I needed calming down after this so had a pot of tea whilst the adhesive dried as recommended. The MDF strips were placed and the Formica laid on top of these; not wanting to make a mistake I spent a while checking and double checking then checking again that the Formica was correctly positioned then pulled out a couple of the middle strips and gently pressed the Formica into contact with the MDF panel; a rubber roller was used to ensure the Formica went down without air pockets as the remainder of the strips were removed. What a relief it was to see the Formica in place and as this was the largest panel I knew I could do the others easier. It was most important at this point to trim the Formica edges flush with the MDF otherwise they were sure to get damaged so the router was run around a couple of times fitted with a bearing guided flush cutting cutter. The bearing kept becoming fouled with adhesive but I suppose this will be down to practice on my part.

Not wishing to repeat the panic with the other panels I sent an email enquiry to Evostik explaining the problems I had encountered asking for their advice; I'm still awaiting their reply.
I could now relax a bit and concentrate on making the oak frame. The corners were to be mitred and normally I would do this on the big industrial Wadkin chop saw but to make space in the garage I had sold the saw. However I had bought a shiny new Evolution Rage3 compound mitre saw to replace the Wadkin with so set this up on the bench. This saw also cuts steel and I had been using it to cut steel box section so the first mitre cut was terrible. A trip to Screwfix provided three Titan blades at a much reduced clearance price these being rip blades. With a new blade installed there was a lot of improvement but the saw just wasn't accurate enough using the indent. Quite a while was spent aligning the blade and fence against a set square. I hate compromise but the garage was still very dark and gloomy even with both strip lights switched on; wherever I was working there were shadows and the shadows were so bad that if I put the square to the wrong side of a mark I couldn't even see the mark. There is little difference in Yorkshire between winter and summer.
All joints were to be biscuits to speed up the work using a Freud biscuit joiner I've owned for over 20 years. All the biscuit slots were cut including one in each mitre then after dusting off the oak frame was glued into place using water proof woodworking adhesive.
Once the glue had dried then the lower oak frame was added together with the MDF drawer dividers and two end panels. The dividers were lipped with 3” wide oak as were the end panels but the end panels were firstly laminated with Formica. It was a right struggle aligning everything and I even managed to cut three biscuit joints in the wrong place but fortunately out of sight. Everything was then glued up.

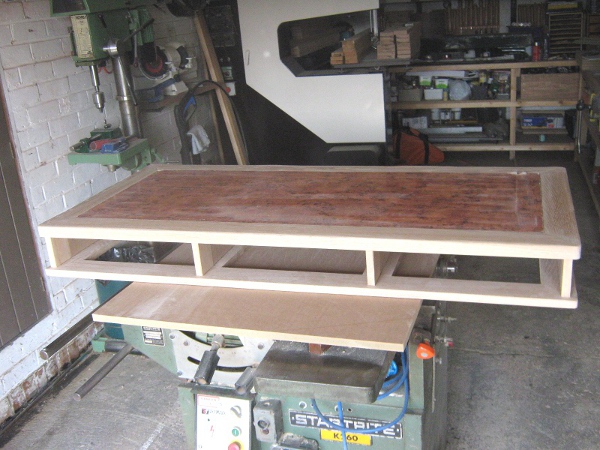
I had already bought 7 single 13A sockets and plastic boxes from Screwfix so wired these in series and screwed them in place along the back edge of the desk as I had designed a recess to accept these. I had become fed up of all the loose cables so decided from the start to tidy them up. A single twin and earth lead supplied the 7 sockets from a plug fused at 13A. Plugging in a drill and switching on confirmed power was on and all was well.
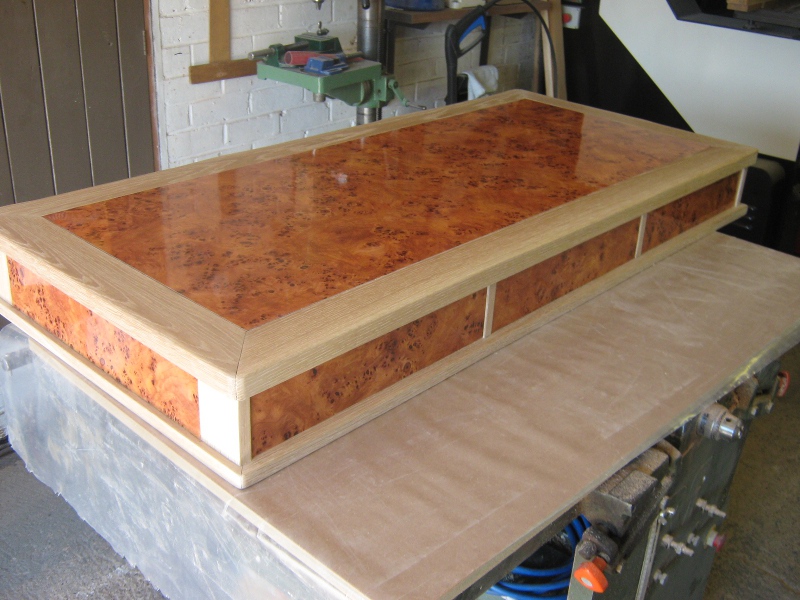

This cheered me considerably because now the hardest part had been completed successfully and it was looking very good. The top section was then brought up into the bungalow to make working space in the garage and to prevent it becoming damaged.
The two base units were made and assembled in similar manner. The computer section would be open front and back for ventilation but the other base would be fitted with shelf and a door to the front leaving the back open. MDF panels were cut as required and laminated with Formica before the oak frames were added. Much time and a lot of care went into getting everything to fit and align correctly.
The three drawers are constructed from 18mm MDF Formica laminated fronts to full width and depth; softwood sides and backs and the bottoms are WBP 6mm plywood glued and pinned; the front bottoms being rebated on the inside to receive the ply and to allow gluing and pinning.
This desk is heavy and once the three sections had been positioned in the hall the two bases were secured to the top section using four round head screws each.
As work progressed I finished each section using nothing more than Ronseal satin polyurethane varnish as I wanted a tough finish which would withstand a lot of use especially in front of the keyboard. The panels were carefully masked and the varnish applied with a top quality (Purdy) paint brush.
The final job was to play around on the Record DML24 wood-turning lathe and make the 7 knobs. Offcuts of oak and Formica discs ensured the knobs matched the desk and a finishing touch was to add the burnt ring decoration to each knob using a “hot wire”then the knobs were given a coat of cellulose sanding sealer with the lathe in motion followed by a coat of Black Bison clear wax. Whilst burning the rings the garage smelled wonderful.
The total cost for materials was just over £250 but the joy I derived from making the desk was priceless. The picture of the finished desk shows it with the door slightly ajar; I hadn't noticed this whilst taking the picture. Having made the desk I didn't want to sit the old 17” Compaq CRT monitor on it so I bought a new 23” LG Flatron IPS235 monitor costing £136 and worth every penny.

The old farmhouse table was then broken up and disposed of; it had served me well but not with good memories although it taught me a valuable lesson not to be so gullible in future.
I'm now seated at the desk and it gives me immense pleasure just to look at it and to think “Did I make that?”.
Kind regards, Col.
About 15 years ago a guy at work asked if I would make him a pine farmhouse table. I agreed and the design and size was agreed upon with a handshake as was the price. I had catalogues so the price was half that shown for a similar table. It was almost Christmas so during the Christmas holiday I set to and spent three freezing days in the garage making the table. Back at work in the New Year I informed the guy his table was ready; he replied he had seen one in a shop in Huddersfield for £10 less.
I've used the table for my computer since then and have only just got around to replacing it. What prompted me was that my wife Bronwyn and I visit Boundary Mills Retail Outlet in Colne and whilst there I've always been most impressed by the finish on the toilet doors and walls. (Yes I'm sad). I knew the material wasn't genuine wood burr because burr just doesn't come in such large sizes so I thought it must be laminate and perhaps Formica.
I surfed the web for hours trying to find a match but without success; not being one to give up easily I emailed Boundary Mills asking if they could please let me know what the material was? I received a lovely reply from a lady called Joanne; Joanne had contacted the installers and confirmed the material was in fact Formica laminate it being Mahogany Burl but the bad news was that it was no longer supplied.
Encouraged by this I did a lot more web surfing and eventually found a company in Morley near Leeds who are Formica stockists; a number of emails followed and I was kindly sent two free samples to inspect these being Formica Amberwood Burl; this was stunning in appearance but would I need oxygen when I requested the price? The two samples looked identical to me but the price of one was almost double the price of the other; the samples were Formica F1118 GLS and Formica 0352 GLS the GLS standing for “Gloss”. I sent another email to enquire if the prices quoted were actually correct or if perhaps a mistake had been made; no the prices were correct it was just that they came from different batches. Bron had seen the samples and asked if I would replace the kitchen work surfaces using this material so I ordered two sheets of the cheaper 0352. The sheets are huge at 3050mm x 1300mm so I asked for the delivery charge to be quoted around £44. Morley is quite local to us and the sheets were in stock so an hour later I was standing in reception paying the bill of £73.68 inclusive which I thought to be a real bargain. We own a little Toyota Aygo and I was worried if these two sheets would fit inside; I drove round to the warehouse and the two guys let me watch as they rolled the two sheets into a large roll securing them to prevent them unwrapping. I was most impressed by the way they rolled the sheets; both sheets were placed on a large table this table having an opening down the centre to allow a person to walk forward into the table; at the far end of this table was a large drum; one of the guys simply grasped the end of both sheets aligning them with the drum and simply walked forward pushing the sheets as he did so and the drum automatically rolled them; the sheet ends were secured then the roll was removed from the drum this only taking a couple of minutes and the roll was carried out to the car where is just fitted allowing the hatch to close.

I had only a rough idea in my head as to what I wanted my new computer desk to look like but I wanted this Formica to use as I would with wood veneer for the desk panels. The framework was to be solid oak throughout. The farmhouse table was rather too big so using it as a rough guide I juggled around taking measurements and settled on the finished size making a note of these. I didn't make a proper dimensioned drawing but with a number of sketches I could work out a cutting list then went and ordered the materials from our local timber yards. The oak is American White; the panels were to be Moisture Resistant 18mm MDF so I ordered a full sheet and I already had the Formica. At the first timber yard I handed over a cutting list asking how much the oak would cost to cover these sizes; I was happy to hand over £96 and delivery would be in a few days. Upon leaving I remarked that I was in for some serious machining of the oak once it arrived to be informed “why; the price includes machining to your cutting list”. I was amazed by this as I’ve always bought hardwood previously as sawn board. This yard also supplied the MR MDF included in the price but they could not supply the 1.5” thick oak for the desk top frame. I visited a second timber-yard and was again happily surprised to buy 1.5” thick oak 6” x 96” off the shelf for a total of £22; This was cross-cut to allow it to fit into the Aygo. So far it was looking good and I had been pleasantly surprised by the costs incurred to date.
I have a Startrite combination woodworker so machining wasn't a problem; this Startrite is 3 phase but I wired all the motors in “Delta” adding a start and run capacitor. As usual I was working in a cold black hole with the garage doors closed and apart from the four day summer which came and went it poured with rain most of the time.
First job was to cut the top MDF panel by laying the full sheet onto wooden bearers on the garage floor and using the Skilsaw.

I knew the Formica sheets were big but seeing them laid out on the garage floor was an eye opener. How the heck could I cut these without causing damage? I have a big industrial Startrite Volant 24” band-saw but I couldn't put a sheet through working on my own neither could I put a sheet through the Startrite saw-bench. The Skilsaw would be too fierce so in the end I settled on the cheap B&D router fitting a 1/8” tipped cutter; cutting both the MDF and Formica on the garage floor is a job I don't wish to do often but with patience and extreme care I cut the Formica lengthwise then cut an oversize section to fit the top MDF panel.

A visit to Screwfix provided the Evostik Impact Adhesive and I also bought a pack of cheap 4” foam rollers to apply the adhesive with; I had seen videos on “You tube” showing laminate adhesive being spread with ease by roller so hoped to do the same. Strips of 6mm thick MDF was cut and these were dusted off as they would separate the Formica and MDF allowing positioning before securing the Formica in place; once the glued Formica and MDF made contact there would be no plan B.
It's over 30 years ago since I used plastic laminate but what a downright pain this Evostik proved to be. I flipped the Formica face down and poured on some adhesive and set to with the roller; two strokes of the roller and I thought great; I've cracked it and this is easy? A few seconds later the Evostik starting turning stringy and refused to spread with the roller; in panic I grabbed the plastic serrated spreader supplied with the adhesive but now it was panic time and again the adhesive refused to spread so I threw the spreader away and grabbed a new paintbrush; this too was a pain but eventually I had applied a coat of adhesive onto the Formica and still using the brush applied a coat onto the dusted MDF. I needed calming down after this so had a pot of tea whilst the adhesive dried as recommended. The MDF strips were placed and the Formica laid on top of these; not wanting to make a mistake I spent a while checking and double checking then checking again that the Formica was correctly positioned then pulled out a couple of the middle strips and gently pressed the Formica into contact with the MDF panel; a rubber roller was used to ensure the Formica went down without air pockets as the remainder of the strips were removed. What a relief it was to see the Formica in place and as this was the largest panel I knew I could do the others easier. It was most important at this point to trim the Formica edges flush with the MDF otherwise they were sure to get damaged so the router was run around a couple of times fitted with a bearing guided flush cutting cutter. The bearing kept becoming fouled with adhesive but I suppose this will be down to practice on my part.

Not wishing to repeat the panic with the other panels I sent an email enquiry to Evostik explaining the problems I had encountered asking for their advice; I'm still awaiting their reply.
I could now relax a bit and concentrate on making the oak frame. The corners were to be mitred and normally I would do this on the big industrial Wadkin chop saw but to make space in the garage I had sold the saw. However I had bought a shiny new Evolution Rage3 compound mitre saw to replace the Wadkin with so set this up on the bench. This saw also cuts steel and I had been using it to cut steel box section so the first mitre cut was terrible. A trip to Screwfix provided three Titan blades at a much reduced clearance price these being rip blades. With a new blade installed there was a lot of improvement but the saw just wasn't accurate enough using the indent. Quite a while was spent aligning the blade and fence against a set square. I hate compromise but the garage was still very dark and gloomy even with both strip lights switched on; wherever I was working there were shadows and the shadows were so bad that if I put the square to the wrong side of a mark I couldn't even see the mark. There is little difference in Yorkshire between winter and summer.
All joints were to be biscuits to speed up the work using a Freud biscuit joiner I've owned for over 20 years. All the biscuit slots were cut including one in each mitre then after dusting off the oak frame was glued into place using water proof woodworking adhesive.
Once the glue had dried then the lower oak frame was added together with the MDF drawer dividers and two end panels. The dividers were lipped with 3” wide oak as were the end panels but the end panels were firstly laminated with Formica. It was a right struggle aligning everything and I even managed to cut three biscuit joints in the wrong place but fortunately out of sight. Everything was then glued up.


I had already bought 7 single 13A sockets and plastic boxes from Screwfix so wired these in series and screwed them in place along the back edge of the desk as I had designed a recess to accept these. I had become fed up of all the loose cables so decided from the start to tidy them up. A single twin and earth lead supplied the 7 sockets from a plug fused at 13A. Plugging in a drill and switching on confirmed power was on and all was well.


This cheered me considerably because now the hardest part had been completed successfully and it was looking very good. The top section was then brought up into the bungalow to make working space in the garage and to prevent it becoming damaged.
The two base units were made and assembled in similar manner. The computer section would be open front and back for ventilation but the other base would be fitted with shelf and a door to the front leaving the back open. MDF panels were cut as required and laminated with Formica before the oak frames were added. Much time and a lot of care went into getting everything to fit and align correctly.
The three drawers are constructed from 18mm MDF Formica laminated fronts to full width and depth; softwood sides and backs and the bottoms are WBP 6mm plywood glued and pinned; the front bottoms being rebated on the inside to receive the ply and to allow gluing and pinning.
This desk is heavy and once the three sections had been positioned in the hall the two bases were secured to the top section using four round head screws each.
As work progressed I finished each section using nothing more than Ronseal satin polyurethane varnish as I wanted a tough finish which would withstand a lot of use especially in front of the keyboard. The panels were carefully masked and the varnish applied with a top quality (Purdy) paint brush.
The final job was to play around on the Record DML24 wood-turning lathe and make the 7 knobs. Offcuts of oak and Formica discs ensured the knobs matched the desk and a finishing touch was to add the burnt ring decoration to each knob using a “hot wire”then the knobs were given a coat of cellulose sanding sealer with the lathe in motion followed by a coat of Black Bison clear wax. Whilst burning the rings the garage smelled wonderful.
The total cost for materials was just over £250 but the joy I derived from making the desk was priceless. The picture of the finished desk shows it with the door slightly ajar; I hadn't noticed this whilst taking the picture. Having made the desk I didn't want to sit the old 17” Compaq CRT monitor on it so I bought a new 23” LG Flatron IPS235 monitor costing £136 and worth every penny.

The old farmhouse table was then broken up and disposed of; it had served me well but not with good memories although it taught me a valuable lesson not to be so gullible in future.
I'm now seated at the desk and it gives me immense pleasure just to look at it and to think “Did I make that?”.
Kind regards, Col.
Attachments
-
 Amberwood Burl Formica..jpg159.4 KB
 -
 Cutting 18mm MDF..jpg214.3 KB
 -
 Cutting Formica..jpg243.2 KB
 -
 Desk top ready for Formica..jpg159.2 KB
 -
 Biscuits added dry for test fit..jpg238.2 KB
 -
 Drawer openings..jpg161.3 KB
 -
 Drawers with Formica added..jpg233.4 KB
 -
 Power laid on..jpg230.6 KB
 -
 Finished desk..jpg238.1 KB


